background image

Page 5

SKU 92509

       For technical questions, please call 1-800-444-3353

SPECIFIC SAFETY RULES FOR THE ROUTER

 WARNING! This Router has sharp, fast-moving parts. Misuse can cause severe in-

jury. Always follow the safety instructions below.

1.

Hold tool by the insulated gripping handles when performing an operation
where the cutting tool may contact hidden wiring or its own cord. 
Contact with
“live” wire will make exposed metal parts of the tool “live” and shock the operator.

2.

Under no circumstance is the Router base ever to be removed from the Router
in order to use bits that are too large to use with the base assembly attached.
Removal of the Router base, and using the Router “free hand” can lead to serious
bodily injury.

3.

Never touch the bit, collet, or any other moving parts while the Router is in
operation.

4.

Never lay the Router down until it has stopped rotating completely.

5.

Hold the Router firmly when starting, as startup rotation creates significant
torque.

6.

Never hold workpiece by hand. Secure the workpiece by clamping, or with other
holding devices.

7.

Make sure the workpiece is free of nails and other obstacles. These can interfere
with the cutting process, and possibly cause damage and injury.

8.

Hold the tool firmly while cutting. The action of the bit against the workpiece can
cause it to “kick out,” jumping rapidly away from the workpiece. This can be caused by
an improper type, or dull bit being used.

9.

Do not handle the Router bit immediately after cutting. It may be very hot,
potentially causing burns or injury.

10.

Avoid overloading the tool. If the speed drops abnormally, decrease the pressure on
the bit immediately. Do not apply excessive pressure to the router while cutting.

11.

Always use sharpened bits. If the bit stops abruptly, or the bit becomes blocked,
remove the Router from the workpiece and shut it off.

12.

Never start the Router while the bit is in contact with workpiece. Allow the tool to
reach its normal operating speed before applying the bit to the workpiece.

13.

Maintain labels and nameplates on the Router. These carry important information.
If unreadable or missing, contact Harbor Freight Tools for a replacement.

14.

Always wear ANSI approved safety impact eye goggles and heavy work gloves
when using the Router. 
Using personal safety devices reduce the risk for injury.
Safety impact eye goggles and heavy work gloves are available from Harbor Freight
Tools.

(1)

Summary of Contents for Chicago Electric 92509

Page 1: ...ONS 3491 MISSION OAKS BLVD CAMARILLO CA 93011 VISIT OUR WEB SITE AT HTTP WWW HARBORFREIGHT COM Copyright 2004 by Harbor Freight Tools All rights reserved No portion of this manual or any artwork contained herein may be reproduced in any shape or form without the express written consent of Harbor Freight Tools For technical questions and replacement parts please call 1 800 444 3353 92509 ...

Page 2: ...h this manual Write the invoice number on the inside of the front cover Keep the manual and invoice in a safe and dry place for future reference GENERAL SAFETY RULES WARNING READ AND UNDERSTAND ALL INSTRUCTIONS Failure to follow all instructions listed below may result in electric shock fire and or serious injury SAVETHESE INSTRUCTION Work Area 1 Keep your work area clean and well lit Cluttered be...

Page 3: ...s the need for the three wire grounded power cord and grounded power supply system 9 Do not abuse the Power Cord Never use the Power Cord to carry the tools or pull the Plug from an outlet Keep the Power Cord away from heat oil sharp edges or moving parts Replace damaged Power Cords immediately Damaged Power Cords increase the risk of electric shock 10 When operating a power tool outside use an ou...

Page 4: ...afety measures reduce the risk of starting the tool accidentally 21 Store idle tools out of reach of children and other untrained persons Tools are dangerous in the hands of untrained users 22 Maintain tools with care Keep cutting tools sharp and clean Properly maintained tools with a sharp cutting edge are less likely to bind and are easier to control Do not use a damaged tool Tag damaged tools D...

Page 5: ...ails and other obstacles These can interfere with the cutting process and possibly cause damage and injury 8 Hold the tool firmly while cutting The action of the bit against the workpiece can cause it to kick out jumping rapidly away from the workpiece This can be caused by an improper type or dull bit being used 9 Do not handle the Router bit immediately after cutting It may be very hot potential...

Page 6: ...fore us ing this product Electromagnetic fields in close proximity to a heart pacemaker could cause interference or failure of the pacemaker WARNING Some dust created by power sanding sawing grinding drilling and other construction activities contain chemicals known to the State of California to cause cancer birth defects or other reproductive harm Some examples of these chemi cals are lead from l...

Page 7: ... grounded in accordance with all codes and ordinances The plug and outlet should look like those in the following illustration See Figure A Double Insulated Tools with Two Prong Plugs 4 This product has a polarized plug one blade is wider than the other as a feature to reduce the risk of electric shock This plug will fit in a polarized outlet only one way If the plug does not fit fully in the outl...

Page 8: ... A 5 If you are using one extension cord for more than one tool add the nameplate amperes and use the sum to determine the required minimum cord size See Table A 6 If you are using an extension cord outdoors make sure it is marked with the suffix W A W in Canada to indicate it is acceptable for outdoor use 7 Make sure your extension cord is properly wired and in good electrical condition Always re...

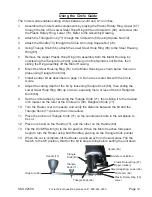
Page 9: ...s possible OPERATING INSTRUCTIONS Caution Before cutting or trimming run the tool for about 10 seconds to ensure that all moving parts are running smoothly and there are no loose parts rattles or sparking that would indicate damage Be sure the bit is firmly and properly installed before use Improperly installed bits may eject suddenly at high speed from the Router Controls and Indicators On Off Sw...

Page 10: ...justing Cutting Depth You can set the depth of cut using the Ruler 44 scale on the side of the Router 1 Install the router bit as previously described 2 Loosen counterclockwise both Handles 37 securing the Ring 38 to the Guide Poles 41 Slide the Ring 38 upward so the router bit is retracted within the Base 3 Place the Base 54 on a flat surface and slide the Ring 38 down until the tip of the bit co...

Page 11: ...ing a measuring tape Readjust the Guide Plate Bracket 59 if necessary 5 Adjust the cutting depth as previously described on page 10 6 Secure the workpiece to the work bench so that the clamps do not interfere with the horizontal movement of the Router Never hold the workpiece by hand 7 Align the Guide Plate Bracket 59 to the edge of a test scrap workpiece then lift the Router slightly so that the ...

Page 12: ...e router bits with the Circle Guide 8 Adjust the cutting depth of the bit by loosening Triangle Knob 66 then sliding the Lower Steel Hoop Ring 68 up or down exposing more or less of the bit Retighten Knob 66 9 Set the circle radius by loosening the Triangle Knob 71 then sliding it to the desired inch marker on the ruler of the Circle Arm 69 Retighten Knob 71 10 Turn the Router over to measure and ...

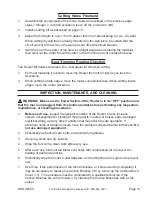
Page 13: ...ND CLEANING WARNING Make sure the Power Switch of the Router is in its OFF position and that the tool is unplugged from its electrical outlet before performing any inspection maintenance or cleaning procedures 1 Before each use inspect the general condition of the Router Check for loose screws misalignment or binding of moving parts cracked or broken parts damaged electrical wiring and any other c...

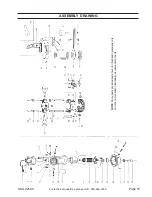
Page 14: ...uide Pole 4 Nut 42 Nut 5 Cable Sleeve 43 Ring Plastic Hoop Lower 6 Switch 44 Ruler Steel 7 Inductor 45 Washer Plain 8 Capacitor 46 Washer Spring 9 Carbon Brush Holder 47 Screw 10 Carbon Brush 48 Washer Plain 11 Cover Carbon Brush 49 Washer Spring 12 Cable Pressboard 50 Screw 13 Screw Self tapping 51 Nut 14 Housing 52 Angle Stop 15 Label 53 Knob Triangle 16 Stator 54 Base 17 Screw Self tapping 55 K...

Page 15: ... 15 SKU 92509 For technical questions please call 1 800 444 3353 NOTE Some parts are listed and shown for illustration purposes only and are not available individually as replacement parts ASSEMBLY DRAWING ...

Reviews: