Page 3
For technical questions, please call 1-888-866-5797.
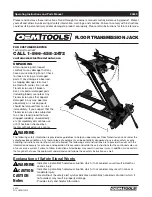
Item 58395
Specifications
Minimum Lift Height
4-1/2
″
Maximum Lift Height
41
″
Rated Load
5,000 Lb.
Operating Instructions
Park vehicle on a flat, level, solid, surface safely away from oncoming traffic. Turn off the vehicle’s
engine. Place the vehicle’s transmission in “PARK” (if automatic) or in its lowest gear (if manual).
Set the vehicle’s emergency brake. Then, chock the wheels that are not being lifted.
Lifting Load
WARNING! TO PREVENT SERIOUS INJURY:
Place Trail Jack on a flat, level surface. Only
use this Trail Jack on a hard, stable, clean, dry
surface that is capable of sustaining the weight
of the Trail Jack and the load it is stabilizing.
WARNING!
TO PREVENT SERIOUS INJURY:
Ensure Trail Jack remains at a 90° angle during use.
1. Remove any obstacle that will prevent lifting.
2. Set Reversing Latch (16) to UP position.
Reversing
Latch
Reversing
Switch
3. Ensure Reversing Latch is locked in
place with indentation firmly engaged in
notch on the Reversing Switch (13).
4. Place Base of Trail Jack beneath load.
5. Jack up nose of Large Runner (15) until it
contacts appropriate vehicle lifting point.
Note:
Do not use extension on Handle (27).
WARNING!
TO PREVENT SERIOUS INJURY:
Ensure Trail Jack will not slip after load is applied.
WARNING!
TO PREVENT SERIOUS
INJURY:
Keep head, hands and body clear
of Handle and Rail (3) gap during use
Keep Clear
6. Raise vehicle.
a. Pull Handle down to the bottom of its stroke.
b. Raise Handle up to the top of its stroke.
c. Repeat steps a. and b. until
desired height is reached.
7. Once vehicle is raised, slide a jack stand of
appropriate capacity (not included) under a
proper lifting point referred to in vehicle owner’s
manual. Always use two jack stands. Position
them at the same point on each side of vehicle.
CAUTION!
Refer to jack stand manual for
operating instructions and safety warnings.
8. Center vehicle’s lifting points on the saddle of
jack stands. Set jack stands to same height
according to manufacturer’s instructions, making
sure that they lock securely into position.
9. Ensure Handle is in full upright position.
10. Set Reversing Latch to DOWN position.
Reversing
Latch
Reversing
Switch
11. Lower vehicle.
a. Pull Handle down to the bottom of its stroke.
b. Raise Handle up to the top of its stroke.
c. Repeat steps a. and b. to lower vehicle
onto saddles of jack stands.
12. Ensure Handle is in full upright position.
13. Remove Trail Jack.