14
FINAL INSTALLATION
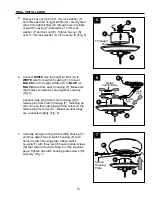
Locate motor screws (J) and lock washers (K) that
were removed in Step 5 on page 7.
Insert two motor screws (J), along with lock washers
(K), through one blade arm (H) to attach blade arm
(H) to motor. Tighten motor screws (J) securely.
(Fig. 3) Repeat with remaining blade arms (J),
making sure to completely secure each blade arm
(J) before proceeding with the next.
3.
3
2.
2
AA
Blade Screw x15
Blade Washer x15
BB
Hardware Used
G
H
BB
AA
V
Align posts in blade plate (V) with holes on one
side of blade (G). Align holes in blade arm (H) with
holes on opposite side of blade (G) and then push
up on blade plate (V) until posts go through holes
in blade arm (H). Use three blade screws (AA) and
three blade washers (BB) to secure blade plate (V)
and blade arm (H) to blade (G). Do not tighten
blade screws (AA) until each blade screw (AA) has
been started, and then tighten each blade screw
(AA), starting with the one in the middle. (Fig. 2)
Repeat with remaining blades (G).
K
J
H
4.
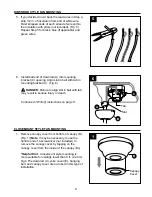
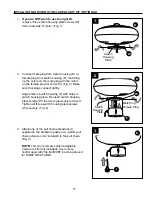
If you wish to USE the light kit
, remove three
switch housing plate screws (W) from underside of
motor. (Fig. 4)
Punch center cap out of switch housing (F) with a
screwdriver. Locate
BLUE
(or
BLACK
) and
WHITE
wires in switch housing (F) labeled FOR
LIGHT and remove and discard plastic that holds
these two wires together. (Fig. 4)
If you do NOT wish to use the light kit,
please
go to section titled “Installing Fan Without Included
Light Kit (Optional)” on page 17.
4
F
Center Cap
Switch
Housing Plate
D
W


