background image

2

TABLE OF CONTENTS

Package Contents  . . . . . . . . . . . . . . . . . . . . . . . . . . . . . . . . . . . . . . . . . . . . . . . . . . . . . . . . . . . . . . . . . 3

Hardware Contents  . . . . . . . . . . . . . . . . . . . . . . . . . . . . . . . . . . . . . . . . . . . . . . . . . . . . . . . . . . . . . . . . 4

Safety Information  . . . . . . . . . . . . . . . . . . . . . . . . . . . . . . . . . . . . . . . . . . . . . . . . . . . . . . . . . . . . . . . . . 5

Preparation  . . . . . . . . . . . . . . . . . . . . . . . . . . . . . . . . . . . . . . . . . . . . . . . . . . . . . . . . . . . . . . . . . . . . . . 6

Initial Installation  . . . . . . . . . . . . . . . . . . . . . . . . . . . . . . . . . . . . . . . . . . . . . . . . . . . . . . . . . . . . . . . . . . 7

Wiring   . . . . . . . . . . . . . . . . . . . . . . . . . . . . . . . . . . . . . . . . . . . . . . . . . . . . . . . . . . . . . . . . . . . . . . . . . . 9

Final Installation. . . . . . . . . . . . . . . . . . . . . . . . . . . . . . . . . . . . . . . . . . . . . . . . . . . . . . . . . . . . . . . . . . 10

Operating Instructions  . . . . . . . . . . . . . . . . . . . . . . . . . . . . . . . . . . . . . . . . . . . . . . . . . . . . . . . . . . . . . 13

Care and Maintenance   . . . . . . . . . . . . . . . . . . . . . . . . . . . . . . . . . . . . . . . . . . . . . . . . . . . . . . . . . . . . 14

Troubleshooting . . . . . . . . . . . . . . . . . . . . . . . . . . . . . . . . . . . . . . . . . . . . . . . . . . . . . . . . . . . . . . . . . . 14

Limited Lifetime Warranty  . . . . . . . . . . . . . . . . . . . . . . . . . . . . . . . . . . . . . . . . . . . . . . . . . . . . . . . . . . 16

Replacement Parts List  . . . . . . . . . . . . . . . . . . . . . . . . . . . . . . . . . . . . . . . . . . . . . . . . . . . . . . . . . . . . 17

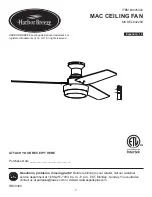
Summary of Contents for 3025022

Page 1: ...estions problems missing parts Before returning to your retailer call our customer service department at 1 888 251 1003 8 a m 8 p m EST Monday Sunday You could also contact us at partsplus lowes com o...

Page 2: ...3 Hardware Contents 4 Safety Information 5 Preparation 6 Initial Installation 7 Wiring 9 Final Installation 10 Operating Instructions 13 Care and Maintenance 14 Troubleshooting 14 Limited Lifetime Wa...

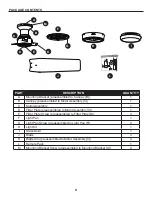
Page 3: ...D Fitter Plate preassembled to Motor Assembly C 1 E Fitter Plate Screw preassembled to Fitter Plate D 3 F Light Pan 1 G Light Pan Screw preassembled to Light Pan F 3 H Light Kit 1 I Glass Bowl 1 J Bl...

Page 4: ...4 HARDWARE CONTENTS shown actual size Wire Connector Qty 1 1 extra Blade Screw Qty 9 1 extra Blade Washer Qty 9 1 extra Screw Cap Qty 9 1 extra AA BB CC LL...

Page 5: ...e a loud humming noise from the fan To reduce the risk of fire or electric shock do NOT use a full range dimmer switch to control the fan speed WARNING To reduce the risk of fire electric shock or per...

Page 6: ...s equipment does cause harmful interference to radio or television reception which can be determined by turning the equipment off and on the user is encouraged to try to correct the interference by on...

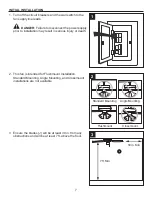
Page 7: ...ation may result in serious injury or death 2 This fan is intended for Flushmount Installation Standard Mounting Angle Mounting and Closemount installations are not available 3 Ensure the blades J wil...

Page 8: ...ng bracket A from canopy B 5 Feed the supply wires from the outlet box through the center hole in the mounting bracket A Then secure the mounting bracket A to the outlet box not included using screws...

Page 9: ...d to the Black wire from the receiver of remote pack L Note The Black wire is hot power for the fan The White wire is neutral for the fan and light kit The Green wire is the ground wire If supply wire...

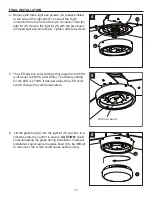
Page 10: ...blade washers CC and screw caps LL Hardware Used BB Blade Screw x 9 CC Blade Washer x 9 Screw Cap x 9 3 Remove one and loosen the other two fitter plate screws E but do not remove from fitter plate D...

Page 11: ...has five color settings that range from 2700K soft white to 6500K cool white The factory setting for the LED is 2700K If desired adjust the LED color switch change the color temperature 6 Lift the gla...

Page 12: ...the battery cover and press the high fan speed button on the remote to ensure the remote turns on the fan Note If remote does not turn on fan see TROUBLESHOOTING page 15 8 If desired the wall bracket...

Page 13: ...sition 2 Using a ceiling fan will allow you to raise your thermostat setting in summer and lower your thermostat setting in winter without feeling a difference in your comfort In warmer weather push t...

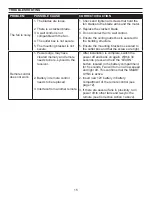
Page 14: ...e power on or check the fuse 2 Turn the power off Loosen the canopy and check all connections 3 Check that the connectors from the light kit and fan are connected properly 4 Push the reverse switch co...

Page 15: ...o the outlet box and that the screws are tight Remote control does not work 1 Power surge may have cleared memory and remote needs to be re synced to the receiver 2 Battery in remote control needs to...

Page 16: ...arying climate conditions this warranty does not cover any changes in brass finish including rusting pitting corroding tarnishing or peeling Brass finishes of this type give their longest useful life...

Page 17: ...03 8 a m 8 p m EST Monday Sunday You could also contact us at partsplus lowes com or visit www lowespartsplus com PART DESCRIPTION PART A Mounting Bracket 4L000014460 H Light Kit 4L000014470 I Glass B...

Reviews: