background image

Cooling

Page GB-11

 WARNING

Danger of explosion!
Improper handling of the appliance 
can lead to explosions.


Do not store explosive substances or 
spray cans with flammable propel-
lants inside the appliance, as they 
may cause ignitable gas-air mixtures 
to explode.


Alcohol should only be stored upright 
and tightly sealed.

 CAUTION

Health hazard!
Contaminated foods can cause health 
problems.


Opening the door for long periods can 
cause a significant increase of the  
temperature in the compartments of 
the appliance.


Clean regularly surfaces that can 
come in contact with food and acces-
sible drainage systems.


Store raw meat and fish in suitable 
containers in the refrigerator, so that 
it is not in contact with or drip onto 
other food.


If the refrigerating appliance is left 
empty for long periods, switch off,  
defrost, clean, dry, and leave the door 
open to prevent mould developing 


within the appliance.

Store food correctly

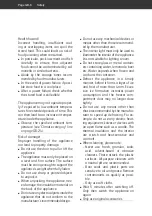
(14)

(1)

(2)

(4)

(5)

•  Fill the fridge compartment in such a way 

that the temperature conditions inside are 
used to their full potential:


– Place  spreadable  butter  and  cheese 

high on the top shelves (14) or the small 
door shelf (1). It is warmest here.


– Position bottles and drinks cartons in the 

bottle compartment in the door shelf (2). 
Position  full  containers  closer  to  the 
hinge in order to reduce the strain on 
the door.


– Place  cooked  or  baked  goods,  fresh 

meat,  game,  poultry,  bacon,  sausage 
and raw fish at the bottom of the refrig-
erator (4). This is where the temperature 
is lowest.

Maintaining quality

•  To maintain the flavour and freshness of 

food in the fridge compartment, only place 
packaged food in the fridge compartment. 
Use special plastic food containers or 
standard food wrap.

•  Place food in a way that allows air to 

circulate freely in the refrigerator. Do not 
cover the wire rack (5) with paper or any-
thing similar.

•  Do not place food directly against the 

back wall. Otherwise it may freeze to the 
back wall.

  Cooling

Summary of Contents for HMKS 5144 A1

Page 1: ...ühlschrank Gebrauchsanleitung HMKS 5144 A1 HMKS 5144 A1S HMKS 5144 A2 HMKS 5144 A2S Anleitung Version 93523 DE 20190529 Bestell Nr 734 697 503 870 653 600 690 013 Nachdruck auch auszugs weise nicht gestattet ...

Page 2: ...E 17 Tauwasserschale einsetzen DE 19 Grundreinigung DE 20 Gerät anschließen DE 20 Fehlersuchtabelle DE 21 Service DE 23 Beratung Bestellung und Reklamation DE 23 Reparaturen und Ersatzteile DE 23 Umweltschutz DE 24 Elektro Altgeräte umweltgerecht entsorgen DE 24 Unser Beitrag zum Schutz der Ozonschicht DE 24 Produktdatenblatt nach VO EU Nr 1060 2010 DE 25 Technische Daten DE 27 Informationen zur I...

Page 3: ...ollständig sein oder das Gerät einen Transportschaden aufweisen nehmen Sie bitte Kontakt mit unserem Service auf siehe Service auf Seite DE 23 WARNUNG Gerät nicht in Betrieb nehmen wenn es einen sichtbaren Schaden aufweist Verpackungstipps Sollten es Ihre räumlichen Verhältnis se zulassen empfehlen wir Ihnen die Verpackung zumindest während der Garantiezeit aufzubewahren Sollte das Gerät zur Repar...

Page 4: ...r 6 Tauwasserabfluss 7 Reinigungsstäbchen 8 Tauwasserschale bitte unbedingt vor Inbetriebname einsetzen siehe Tauwasserschale einsetzen auf Seite DE 19 09 Styroporblock bitteunbedingtvorIn betriebname entfernen und Tau wasserschale einsetzen siehe Tau wasserschale einsetzen auf Seite DE 19 10 Isolierung 11 Netzkabel mit Netzstecker 12 Temperaturregler 13 Kühlschrank Rückseite 1 0 5 4 3 2 09 ...

Page 5: ...nalbegriff warnt vor mög lichen Sachschäden Dieses Symbol verweist auf nützliche Zusatzinformationen Symbolerklärung Warnung Brandgefahr Entzündliche Materialien Sicherheitshinweise In diesem Kapitel finden Sie allgemei ne Sicherheitshinweise die Sie zu Ihrem eigenen Schutz und zum Schutz Dritter stets beachten müssen Beachten Sie zusätzlich die Warnhinweise in den ein zelnen Kapiteln zu Bedienung...

Page 6: ... andere Flüssigkeiten tauchen Im Fehlerfall sowie vor Reinigung und Wartung den Netzstecker aus der Steckdose ziehen Eingriffe und Reparaturen am Ge rät dürfen ausschließlich autorisierte Fachkräfte vornehmen sowie unser Service siehe Seite DE 23 Eigenständige Reparaturen an dem Gerät können Sach und Personenschäden verursachen und dieHaftungs undGarantieansprüche verfallen Niemals versuchen das d...

Page 7: ...e könnten daran er sticken Risiken im Umgang mit Kühl und Gefriergeräten Gefahren durch Kältemittel Im Kältemittel Kreislauf Ihres Geräts befindetsichdasumweltfreundliche aber brennbare Kältemittel R600a Isobutan Mechanische Eingriffe in das Kälte system sind nur autorisierten Fach kräften erlaubt Den Kältekreislauf nicht beschädigen z B durch Aufstechen der Kältemittelkanäle des Verdampfers mit s...

Page 8: ...a nebenliegende Lebensmittel nicht durch Salmonellen o Ä kontaminiert werden Die von den Lebensmittelherstellern empfohlenen Lagerzeiten einhalten Lebensmittel falls möglich auch wäh rend eines eventuellen Stromausfalls kühl lagern Nach einem Stromausfall überprü fen ob die eingelagerten Lebensmittel noch genießbar sind Das Gerät arbeitet eventuell nicht ein wandfrei wenn es über längere Zeit zu g...

Page 9: ...ersteller empfohlenen Z B keine elektrischen Heizgeräte Messer oder Geräte mit offener Flamme wie z B Kerzen verwenden Die Wärmedämmung und der Innenbehälter sind kratz und hitzeempfindlich oder können schmelzen Beim Reinigen beachten Auf keinen Fall aggressive kör nige soda säure lösemittelhal tige oder schmirgelnde Reinigungs mittel verwenden Diese greifen die Kunststoffflächen an Empfeh lenswer...

Page 10: ...tes Rauschen 2 Macht das Gerät störende Geräusche überprüfen Sie den festen Stand und ent fernen Sie Gegenstände auf dem Gerät Ausschalten 1 Stellen Sie den Temperaturregler auf 0 2 Räumen Sie das Gerät aus 3 Reinigen Sie es siehe Kapitel Pflege und Wartung auf Seite DE 14 4 Lassen Sie die Tür leicht geöffnet damit sich kein Schimmel bildet 5 Wenn Sie das Gerät für längere Zeit außer Betrieb nehme...

Page 11: ...drehen Sie den Temperaturregler Rich tung 0 Um die Temperatur niedriger einzustellen drehen Sie den Temperaturregler Rich tung 5 Passen Sie die Temperatur im Kühlschrank bei ansteigender Umgebungstemperatur an z B im Sommer Richtung 5 Um die Kühlleistung kontrollieren zu können benötigen Sie idealerweise ein Kühl Gefrierthermometer Platzieren Sie es auf dem Ablagegitter 5 Die richtige Temperatur b...

Page 12: ... geeigneten Behältern im Kühlschrank so aufbewahren dass es andere Lebensmittel nicht berührt oder auf diese tropft Wenn das Kühl Gefriergerät längere Zeit leer steht das Gerät ausschalten abtauen reinigen und die Tür offen lassen um Schimmelbildung zu vermeiden Lebensmittel richtig lagern 14 1 2 4 5 Bestücken Sie den Kühlbereich so dass er die Temperaturverhältnisse im Inneren optimal ausnutzt Le...

Page 13: ... frei zirkulieren kann Decken Sie das Ablagegitter 5 nicht mit Papier o Ä ab Legen Sie die Lebensmittel nicht direkt an die Rückwand Sie können sonst an der Rückwand festfrieren Energie sparen Lassen Sie warme Lebensmittel abkühlen bevor Sie sie in den Kühlbereich stellen Die Temperaturen im Gerät und damit der Energieverbrauch können ansteigen wenn die Türen häufig oder lange geöff net werden wen...

Page 14: ...eiche Tücher verwenden Türdichtungen kontrollieren und reinigen Die Türdichtungen müssen regelmäßig kon trolliert werden damit keine warme Luft in das Gerät eindringt 1 Klemmen Sie zur Prüfung ein dünnes Stück Papier an verschiedenen Stellen ein Das Papier muss sich an allen Stellen gleich schwer durchziehen lassen 2 Falls die Dichtung nicht überall gleichmä ßig anliegt Erwärmen Sie die Dichtung a...

Page 15: ... Wasser und Spülmittel aus Geben Sie beim Nachwischen einige Tropfen Essig ins Wasser um Schimmel bildung vorzubeugen Wischen Sie den Innenraum trocken und lassen Sie die Tür zum Lüften noch einige Zeit offen 6 Säubern Sie die Öffnung des Tauwasserab flusses 6 mit dem Reinigungsstäbchen 7 7 Reinigen Sie die Türdichtung nur mit kla rem Wasser Sie ist empfindlich gegen Öl und Fett 8 Setzen Sie Ablag...

Page 16: ... nicht ein wandfrei wenn es über längere Zeit zu geringer Umgebungstemperatur aus gesetzt wird Es kann dann zu einem Temperauranstieg im Inneren kommen Halten Sie die vorgesehene Umgebungstemperatur ein siehe Klimaklasse ab Seite DE 25 Unsachgemäßer Umgang mit dem Ge rät beim Transport beim Auspacken und bei der Inbetriebnahme kann das Gerät beschädigen Keine spitzen Gegenstände beim Ent fernen de...

Page 17: ... Sie mindestens 3 cm Abstand 2 Überprüfen Sie den Stand mit einer Was serwaage 3 Wenn das Gerät nicht sicher steht 3 Schließen Sie die Türen 4 Kippen Sie das Gerät leicht nach hinten 5 Drehen Sie die Schraubfüße 3 hinein bzw heraus bis das Gerät senkrecht aus gerichtet ist 6 Stellen Sie das Gerät wieder gerade hin 7 Prüfen Sie die Ausrichtung mit einer Was serwaage Beim Öffnen der Türen darf sich ...

Page 18: ...harniers 21 und nehmen Sie dieses ab 23 22 24 9 Lösen Sie mit dem Schraubenschlüssel die Mutter 23 und nehmen Sie die Stift schraube 22 ab Achten Sie dabei dar auf den Sprengring 24 nicht zu verlieren 25 10 Schrauben Sie die Blechschraube 25 ab und schrauben Sie sie auf der gegen überliegenden Seite wieder an 23 22 24 11 Drehen Sie das Scharnier um setzen Sie die Stiftschraube 22 sowie den Sprengr...

Page 19: ...rei Schrauben 16 wieder an der Oberseite des Geräts 15 18 17 16 Befestigen Sie die Blindplatten 15 und 18 sowie den Blindstopfen 17 auf der Türoberseite 17 Kontrollieren Sie ob die Türdichtung gut anliegt siehe Türdichtungen kontrollie ren und reinigen auf Seite DE 14 Tauwasserschale einsetzen Bevor Sie das Gerät benutzen ist es erfor derlich zunächst die Tauwasserschale einzu setzen 1 0 5 4 3 2 0...

Page 20: ...dreinigung Um den Geruch zu entfernen der allen neu en Geräten anhaftet reinigen Sie das Gerät bevor Sie es benutzen siehe den Abschnitt Kühlbereich reinigen auf Seite DE 15 Gerät anschließen HINWEIS Beschädigungsgefahr Vor dem Anschließen muss die Kühlflüs sigkeit zur Ruhe kommen Gerät nach dem Transport 2 Stunden ruhig stehen lassen Stecken Sie den Netzstecker in eine vorschriftsmäßig installier...

Page 21: ... Wenn die Innentemperatur steigt schaltet sich der Kompressor selbsttätig ein Gerät kühlt zu stark Temperaturregler steht auf einer zu hohen Kühlstufe Temperaturregler herunterdrehen siehe Bedienung auf Seite DE 10 Gerät kühlt nicht ausreichend Falsche Temperatur ge wählt Temperaturregler auf höhere Position dre hen siehe Bedienung auf Seite DE 10 Tür nicht fest verschlossen oder Türdichtung liegt...

Page 22: ...e Betriebsgeräusche Diese zeigen keine Störung an Rauschen Kälteaggregat läuft Fließgeräusche Kältemittel fließt durch die Rohre Klicken Motor schaltet sich ein oder aus Störende Geräusche die Sie beseitigen können Festen Stand prüfen Gegenstände vom Gerät entfernen Fremdkörper von der Geräterückseite entfernen ...

Page 23: ...er suchtabelle beheben lässt Sie weiteres Zubehör bestellen möchten Reparaturen und Ersatzteile Kunden in Deutschland Wenden Sie sich bitte an unseren Technik Service Telefon 0 18 06 18 05 00 Festnetz 20 Cent Anruf Mobilfunk max 60 Cent Anruf Kunden in Österreich Wenden Sie sich bitte an das Kundencen ter oder die Produktberatung Ihres Ver sandhauses Bitte beachten Sie Sie sind für den einwandfrei...

Page 24: ...ei Austritt von Kältemittel besteht Brandgefahr Achten Sie darauf dass an einem Kühlgerät bis zur fachgerechten Ent sorgung keine Kühlrippen oder Rohre beschädigt werden Unser Beitrag zum Schutz der Ozonschicht In diesem Gerät wurden 100 FCKW und FKW freie Kälte und Aufschäummittel verwendet Da durch wird die Ozonschicht geschützt und der Treibhauseffekt reduziert Unsere Verpackungen werden aus um...

Page 25: ...Effizienz A Energieverbrauch 84 kWh Jahr auf der Grundlage von Ergebnissen der Normprüfung über 24 Stunden Der tatsächliche Verbrauch hängt von der Nutzung und vom Standort des Geräts ab Nutzinhalt Kühlbereich Gefrierbereich Sterne Einstufung 44 L L Sterne Lagerzeit bei Störung h Gefriervermögen kg 24 h Klimaklasse N ST Dieses Gerät ist für den Betrieb bei einer Umgebungstemperatur zwischen 16 C u...

Page 26: ...rbrauch 106 kWh Jahr auf der Grundlage von Ergebnissen der Normprüfung über 24 Stunden Der tatsächliche Verbrauch hängt von der Nutzung und vom Standort des Geräts ab Nutzinhalt Kühlbereich Gefrierbereich Sterne Einstufung 44 L L Sterne Lagerzeit bei Störung h Gefriervermögen kg 24 h Klimaklasse N ST Dieses Gerät ist für den Betrieb bei einer Umgebungstemperatur zwischen 16 C und 38 C bestimmt Luf...

Page 27: ...Schaummittel Zyklopentan Leistungsaufnahme 55 W Versorgungsspannung Frequenz Nennstrom 220 240 V 50 Hz 0 4 A Schutzklasse I Bestellnummer 734697 503870 Gerätebezeichnung Kühlschrank Modell HMKS5144A1 HMKS5144A1S Gerätemaße Höhe Breite Tiefe mit Anschlüssen 51 0 cm 43 5 cm 49 0 cm Leergewicht 15 kg Kältemittel R600a Kältemittel Füllmenge 15 g Schaummittel Zyklopentan Leistungsaufnahme 60 W Versorgu...

Page 28: ......

Page 29: ...ni Refrigerator User manual HMKS 5144 A1 HMKS 5144 A1S HMKS 5144 A2 HMKS 5144 A2S Manual version 93523 GB 20190529 Article no 734 697 503 870 653 600 690 013 Reproduction even of excerpts is not permitted ...

Page 30: ...ols GB 5 Safety notices GB 5 Operation GB 9 Before getting started GB 9 Switching on and off GB 9 Thermostat control GB 9 Cooling GB 11 Store food correctly GB 11 Maintaining quality GB 11 Saving energy GB 12 Care and maintenance GB 13 Checking and cleaning door seals GB 13 Clean exterior GB 13 Defrosting the fridge compartment GB 13 Cleaning the fridge compartment GB 14 Start up GB 15 Moving and ...

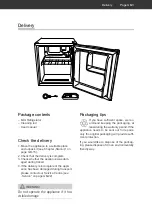
Page 31: ...ncomplete or the appli ance has been damaged during transport please contact our Service Centre see Service on page GB 22 WARNING Do not operate the appliance if it has visible damage Packaging tips If you have sufficient space we rec ommend keeping the packaging at least during the warranty period If the appliance needs to be sent out for repairs only the original packaging will provide suffi cie...

Page 32: ...re rack 6 Defrost water drain 7 Cleaning rod 8 Defrost water container please insert before start up see Inserting the de frost water container on page GB 18 09 Polystyrene block please remove be fore start up and insert defrost water container see Inserting the defrost water container on page GB 18 10 Insulation 11 Mains cord with mains plug 12 Temperature controller 13 Rear of refrigerator 1 0 5...

Page 33: ...chapter you will find general safety notices which you must always observe for your own protection and that of third parties Please also ob serve the warning notices in the indi vidual chapters on operation care and maintenance etc Risks in handling household electrical appliances Risk of electric shock The appliance works with 220 240V 50Hz mains voltage Touching live parts may result in severe i...

Page 34: ... property damage and person al injury and invalidate liability and warranty claims Never attempt to re pair the faulty or supposedly faulty appliance yourself Only parts corresponding to the orig inal appliance specifications may be used for repairs This appliance con tains electrical and mechanical parts which are essential for protection against potential sources of danger Fire hazard Improper h...

Page 35: ... of a flam mable gas air mixture in the event of a leakage in the refrigeration cir cuit the installation space must have a minimum size of 1 m per 8 g of refrigerant in compliance with the EN 378 standard The amount of re frigerant contained in your appliance can be found on the data sheet see data sheet starting on page GB 24 Danger of explosion Improper handling of the appliance can lead to exp...

Page 36: ...the appliance Donotuseanyelectricalpartsinsidethe appliance that do not conform to the manufacturer s recommended design Do not use any mechanical devices or means other than those recommend ed by the manufacturer The interior light must only be used to illuminate the interior of the appliance It is not suitable for lighting a room Do not store glass or metal contain ers containing water lemonade ...

Page 37: ...n be heard 3 If the appliance makes worrying noises check its stability and remove any objects on top of the appliance Switching off 1 Set the temperature controller to 0 2 Empty the appliance 3 Clean it see Chapter Care and mainte nance on page GB 13 4 Leave the door open slightly to avoid mould formation 5 Pull the mains plug out of the socket if you are not using the appliance for a pro longed ...

Page 38: ...r a prolonged period To set a higher temperature turn the ther mostat towards 0 To set a lower temperature turn the ther mostat towards 5 Should the ambient temperature change ad just the temperature in the refrigerator e g in summer towards 5 You ideally need a freezer thermome ter to be able to control the cooling ef ficiency Position it on the wire rack 5 The correct temperature here is 6 C ...

Page 39: ...mould developing within the appliance Store food correctly 14 1 2 4 5 Fill the fridge compartment in such a way that the temperature conditions inside are used to their full potential Place spreadable butter and cheese high on the top shelves 14 or the small door shelf 1 It is warmest here Position bottles and drinks cartons in the bottle compartment in the door shelf 2 Position full containers cl...

Page 40: ...atures in the appliance and thus the energy consumption can in crease if the doors are opened frequently or for a prolonged period if the ambient temperature fluctuates above or below the prescribed level Energy consumption is also dependent on the selected location for more detailed information see page GB 15 ...

Page 41: ...Only use soft cloths Checking and cleaning door seals The door seals must be checked regularly so that no air can enter the appliance 1 To test them clamp a thin piece of paper in various places The paper should be difficult to pull through at all points 2 If the seal is not uniform everywhere Carefully warm the seal in the affected places with a hair dryer and pull it out slightly with your finge...

Page 42: ...e inside with warm water and washing up liquid Add a few drops of vinegar to the water when wiping for a second time to prevent the formation of mould Wipe the interior dry and leave the door open a while to air 6 Clean the opening of the defrost water drain 6 using the cleaning rod 7 7 Clean the door seal with clean water only It is sensitive to oil and grease 8 Replace the shelves and drawers an...

Page 43: ... appliance may not operate proper ly if exposed to low ambient tempera tures for extended periods of time This can then lead to an increase in temper ature inside the appliance Observe the specified ambient tem perature see Climate category from page GB 24 Improper handling of the appliance during transport unpacking and start up can damage the appliance Do not use any pointed objects while removi...

Page 44: ...t there is adequate wall clearance Leave space of at least 3 cm 2 Check the position with a spirit level 3 If the appliance is not positioned securely 3 Close the doors 4 Tilt the appliance backwards slightly 5 Screw unscrew the screw feet 3 until the appliance is level 6 Reposition the appliance upright 7 Check the alignment with a spirit level The appliance should not move when opening the doors...

Page 45: ...With the wrench loosen the nuts 23 and remove the pin screw 22 In do ing so ensure you do not lose the snap ring 24 25 10 Remove the tapping screw 25 and screw it back in on the opposite side 23 22 24 11 Reverse the hinge insert the pin screw 22 and the snap ring 24 from the other side and re tighten the nuts 23 12 Tip To tighten the nuts hold these with the wrench while tightening the pin screw f...

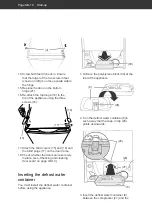
Page 46: ...d the blind plugs 17 on the door frame 18 Check whether the door seal is securely in place see Checking and cleaning door seals on page GB 13 Inserting the defrost water container You must install the defrost water container before using the appliance 1 0 5 4 3 2 09 1 Remove the polystyrene block 09 at the rear of the appliance 8 26 2 Turn the defrost water container 8 in such a way that the snap ...

Page 47: ... use To remove the odour that comes with all new appliances clean the appliance before using it see Section Cleaning the fridge compart ment on page GB 14 Connecting the appliance NOTICE Risk of damage The coolant must be allowed to settle before connecting After transport leave the appliance to stand for 2 hours Insert the mains plug into a properly in stalled socket 220 240 V 50 Hz 10 A ...

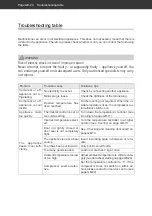
Page 48: ...r cooling not required When the in side temperature rises the compressor au tomatically switches on Appliance cools too quickly Thermostat control is set at too cold a setting Turn down the temperature controller see Cooling on page GB 11 The appliance doesn t cool suffi ciently Incorrect temperature select ed Turn the temperature controller to a higher position see Cooling on page GB 11 Door not ...

Page 49: ... noise These are not malfunctions Humming Refrigeration unit is running Flowing noise Refrigerant is flowing through the pipes Clicking Motor switching on or off Distracting noises that you can disregard Check that it is stable Remove any objects from the appliance Remove any foreign matter from the back of the appliance ...

Page 50: ...unction cannot be rectified using the troubleshooting table you would like to order further accessories Repairs and spare parts Customers in Germany Please contact our technical service Telephone 0 18 06 18 05 00 landline 20 cents call mobile max 60 cents call Customers in Austria Please contact your mail order company s customer service centre or product advice centre Please note You are responsi...

Page 51: ...sulation have to be proper ly disposed of Refrigerant leakage may cause a fire hazard Until the point of proper disposal ensure that none of the cooling fins or tubes on a cooling appliance are damaged Our contribution to the protection of the ozone layer 100 CFC and HFC free refriger ants and foaming agents were used in this appliance This protects the ozone layer and reduces the greenhouse ef fe...

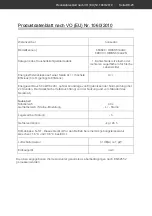
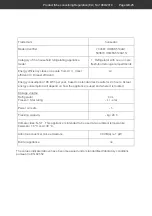
Page 52: ...ast efficient A Energy consumption 84 kWh per year based on standard test results for 24 hours Actual energy consumption will depend on how the appliance is used and where it is located Storage volume Refrigerator Freezer Star rating 44 L L star Power cut safe h Freezing capacity kg 24 h Climate class N ST This appliance is intended to be used at an ambient temperature between 16 C and 38 C Airbor...
Page 53: ...sumption 106 kWh per year based on standard test results for 24 hours Actual energy consumption will depend on how the appliance is used and where it is located Storage volume Refrigerator Freezer Star rating 44 L L star Power cut safe h Freezing capacity kg 24 h Climate class N ST This appliance is intended to be used at an ambient temperature between 16 C and 38 C Airborne acoustical noise emiss...

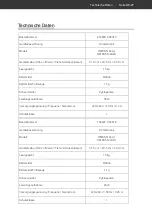
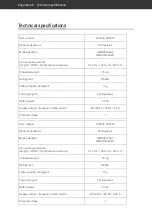
Page 54: ...t 15 g Foaming agent Cyclopentane Rated power 55 W Supply voltage frequency rated current 220 240 V 50 Hz 0 4 A Protection class I Item number 734697 503870 Name of appliance Refrigerator Model identifier HMKS5144A1 HMKS5144A1S Device measurements Height Width Depth with connections 51 0 cm 43 5 cm 49 0 cm Unloaded weight 15 kg Refrigerant R600a Filling capacity refrigerant 15 g Foaming agent Cycl...

Page 55: ......

Page 56: ......

Reviews: