background image

Start-up

Page EN-15

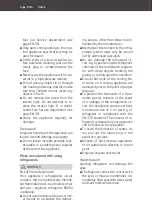
(20)

(4)

(21)

2.  Tip the appliance back as far as possible 

(45° max.) in such a way that the larger 

screw feet (4) and the lower hinge (20) 

are easy to reach.

3.  Rotate the larger screw feet (4) anti-

clockwise to remove them.

4.  Unscrew the screws (21) and remove 

the lower hinge (20).

(22)

5.  Remove the decorative cap (22), and 

place it back on the opposite side.

(20)

(4)

(21)

6.  Tighten the lower hinge (20) with the 

screws (21) and the larger screw feet (4) 

back on the opposite side.

7.  Reposition the appliance upright.

Preparing the doors

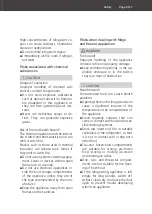
(23)

(24)

1.  Remove the 3 blind plugs (23) and the 

decorative cap (24) on the left side in the 

area of the middle hinge (15) and affix 

them in the corresponding positions on 

the opposite side.

(25)

2.  Unscrew the door stopper (25) on the 

bottom side of the fridge door and the 

freezer door.

(25)

3.  Screw the door stopper (25) back on 

tightly at the corresponding positions on 

the opposite side.

4.  Place the freezer door on the hinge bolt 

of the lower hinge (20) and close the 

freezer door.

Summary of Contents for HKGK16155C

Page 1: ...hl Gefrier Kombination Gebrauchsanleitung Anleitung Version 2301 00665_DE_20230925 Bestell Nr 99055130 28972007 32605202 Nachdruck auch auszugs weise nicht gestattet HKGK16155CI HKGK16155CW HKGK16155C...

Page 2: ...ung DE 25 T rdichtungen kontrollieren und reinigen DE 25 Au enw nde reinigen DE 25 R ckseite reinigen DE 25 Abtauen und Innenbereich reinigen DE 25 Innenraumbeleuchtung DE 27 Fehlersuchtabelle DE 28 S...

Page 3: ...warnt vor m glichen Sachsch den Symbolerkl rung Folgende Symbole finden Sie in dieser Ge brauchsanleitung bzw auf dem Ger t Dieses Symbol verweist auf n tzliche Zusatzinformationen Vorsicht Brandgefah...

Page 4: ...Sie das Ger t ausschlie lich wie in dieser Gebrauchsanleitung beschrieben Jede andere Verwendung gilt als nicht be stimmungsgem und kann zu Sachsch den oder sogar zu Personensch den f hren Der Herstel...

Page 5: ...hild Die vollst ndige Trennung vom Stromnetz erfolgt bei diesem Ger t nur durch Ziehen des Netzsteckers aus der Steckdose Ger t daher nur an eine gut zug ngliche Steckdo se anschlie en damit es im St...

Page 6: ...ren Service siehe Seite DE 30 Ger t regelm ig auf Sch den pr fen Brandgefahr Unsachgem er Umgang mit dem Ge r t kann zu einem Brand zu Verletzun gen und zu Sachsch den f hren Ortsver nderliche Mehrfac...

Page 7: ...ge Gas Luft Gemische bilden k nnen Zum Abtauen auf keinen Fall Abtau sprays verwenden Sie k nnen explo sive Gase bilden Brand und Gesundheitsgefahr Die W rmed mmung und der Innenbe h lter sind kratz u...

Page 8: ...nsmittelvergiftung Stern Einstufungen und im Gefrierbereich sowie die da raus resultierenden Lagerzeiten f r Tiefk hlprodukte beachten Beachten dass sich die Lagerzeit des Gefrierguts aufgrund eines T...

Page 9: ...des gef llten Ger tes tragen kann Beim Auspacken keine scharfen oder spitzen Gegenst nde verwenden Beim Auspacken auf keinen Fall das Isoliermaterial an der Ger ter cksei te besch digen Zum Beschleun...

Page 10: ...igneten Standort und packen Sie es aus siehe Inbetriebnahme auf Seite DE 11 2 Entfernen Sie alle Verpackungsteile Kunststoffprofile Klebestreifen und Schaumpolster 3 Pr fen Sie ob die Lieferung vollst...

Page 11: ...gstemperaturen von 10 C bis 32 C bestimmt gem igte Zone N Dieses K hlger t ist f r die Verwendung bei Umge bungstemperaturen von 16 C bis 32 C bestimmt subtropische Zone ST Dieses K hlger t ist f r di...

Page 12: ...te mittelkreislaufs kein z ndf higes Gas Luft Gemisch entstehen kann muss der Aufstellraum laut Norm EN378 eine Mindestgr e von 1 m3 je 8 g K ltemittel haben Die Menge des K ltemittels in Ih rem Ger t...

Page 13: ...Geruch zu entfernen der allen neuen Ger ten anhaftet wischen Sie den K hl und Gefrierraum vor dem ersten Gebrauch mit einer L sung aus 100 ml Essig und 200 ml Wasser aus Wischen Sie anschlie end mit k...

Page 14: ...sen Sie die Schrauben 13 mit dem Kreuzschlitz Schraubendreher oder dem 8er Schraubenschl ssel und entfernen Sie das obere Scharnier 14 15 16 17 5 ffnen Sie die K hlbereichst r und heben Sie sie senkr...

Page 15: ...er tefu 4 auf der gegen berlie genden Seite wieder an 7 Stellen Sie das Ger t wieder aufrecht hin T ren vorbereiten 23 24 1 Entfernen Sie die 3 Blindstopfen 23 sowie die Zierkappe 24 auf der linken Se...

Page 16: ...rs 15 und schlie en Sie die K hlbereichst r 13 14 7 Stecken Sie das obere Scharnier 14 auf die K hlbereichst r und schrauben Sie sie anschlie end mit den drei Schrau ben 13 fest 8 Pr fen Sie ob die K...

Page 17: ...17 Ger teteile 1 3 8 7 6 5 4 1 2 1 Temperaturregler 2 Innenraumbeleuchtung 3 T rablagen 4 Ger tef e im Bild nicht sichtbar 5 Gefrierschubladen 6 Obst Gem seschublade 7 Glasabdeckung der Obst Gem sesch...

Page 18: ...Sie den Temperaturregler 1 in Richtung 1 Bevor Sie beginnen Lesen Sie das Kapitel Sicherheit ab Sei te DE 4 und alle Sicherheitshinweise Stellen Sie das Ger t auf und schlie en Sie es an wie im Kapite...

Page 19: ...thermometer um die tats chliche Temperatur zu ermitteln Glas und T rablagen Die Glasabdeckung 7 der Obst Gem se schublade 6 die Glasablagen 8 und die T rablagen 3 lassen sich herausnehmen Die Glasabla...

Page 20: ...mbinieren Sie die Schubladen Glas und T rablagen wie in der Abbildung oben gezeigt um die effizienteste Energienut zung f r Ihr Ger t zu erzielen Eine zu hohe oder zu niedrige Tempera tureinstellung k...

Page 21: ...infrieren und aufbewahren m chten plat zieren Sie rohes Fleisch gefrorene Spei sen Eiscreme Pizza Trockenfr chte etc in den Gefrierschubladen 5 Die Temperaturen im Ger t und damit der Energieverbrauch...

Page 22: ...r t nehmen und in einem ausreichend k hlen Raum oder einem anderen K hlger t einlagern Nach einer St rung berpr fen ob die eingelagerten Lebensmittel noch genie bar sind Auf oder angetaute Lebensmitte...

Page 23: ...ion vor dem Eindringen von Mikroben vor der bertragung von Geruchs und Geschmacksstoffen und vor dem Aus trocknen Gefrierbrand sch tzen Verwenden Sie nur Verpackungsmaterial das widerstandsf hig luft...

Page 24: ...n Um Lebensmittel aufzutauen nehmen Sie sie aus dem Gefrierraum und lassen Sie sie am besten bei Raumtemperatur oder im K hlschrank auftauen Tauen Sie Fleisch Gefl gel und Fisch immer im K hlschrank a...

Page 25: ...n an Empfehlenswert sind Allzweckreiniger mit einem neutralen pH Wert T rdichtungen und Ger teteile aus Kunststoff sind empfindlich gegen l und Fett Verunreinigungen m g lichst schnell entfernen Nur w...

Page 26: ...ab Den K ltemittelkreislauf nicht be sch digen z B durch Aufstechen der K ltemittelkan le des Verdamp fers mit scharfen Gegenst nden Ab knicken von Rohrleitungen oder Auf schneiden der Isolierung Taue...

Page 27: ...sser um Schimmelbildung vorzubeugen 14 Wischen Sie die Innenr ume trocken und lassen Sie die Ger tet ren zum L f ten noch einige Zeit offen 10 9 15 An der R ckwand des K hlbereichs oberhalb der Obst G...

Page 28: ...aus f hren Problem M gliche Ursache L sungen Tipps Erkl rungen Kompressor aus Innenraum beleuchtung aus Steckdose ohne Strom Steckdose mit einem anderen Ger t berpr fen Sicherung pr fen Netzstecker s...

Page 29: ...n und Innenbereich reinigen auf Seite DE 26 Umgebungstemperatur zu niedrig oder zu hoch Umgebungstemperatur anpassen siehe Bestimmungsgem er Gebrauch auf Seite DE 4 Kompressor scheint defekt Temperatu...

Page 30: ...Ihrem Ger t haben sich eine St rung nicht mithilfe der Fehlersuchtabelle beheben l sst Sie weiteres Zubeh r bestellen m chten Die Kontaktdaten Ihrer Produktberatung findenSieonlineaufdenServiceseiten...

Page 31: ...Verbraucher bis zu drei Altger te einer Ger teart bei einer Sam melstelle eines Vertreibers unentgeltlich ab geben ohne dass dies an den Erwerb eines Neuger ts gekn pft ist Allerdings darf keine der u...

Page 32: ...nd Um welt haben Kleben Sie daher bei lithiumhalti gen Batterien und Akkus vor der Entsorgung die Pole ab um einen u eren Kurzschluss zu vermeiden Batterien und Akkus die nicht fest im Ger t verbaut s...

Page 33: ...elle der Energieeffizienzklasse G Produktdatenblatt nach VO EU Nr 2019 2016 Bestellnummer 28972007 99055130 32605202 Ger tebezeichnung K hl Gefrier Kombination Modellkennung HKGK16155CW HKGK16155CI HK...

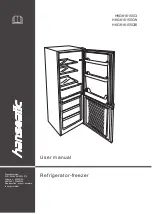
Page 34: ...Refrigerator freezer User manual Manual version 2301 00665 EN 20231113 Order no 99055130 28972007 32605202 Reproduction even of excerpts is not permitted HKGK16155CI HKGK16155CW HKGK16155CBI...

Page 35: ...and cleaning the door seals EN 25 Cleaning the exterior EN 25 Cleaning the reverse side EN 25 Defrosting and cleaning the inner compartment EN 26 Interior light EN 27 Troubleshooting table EN 28 Servi...

Page 36: ...nst possible dam age to property Explanation of symbols The following symbols can be found in this user manual and or on the appliance This symbol refers to useful additional information Caution Fire...

Page 37: ...ribed in this user manual Any other use is deemed improper and may result in damage to prop erty or even personal injury The manufactur er accepts no liability for damage caused by improper use Safety...

Page 38: ...ly accessible socket so that it can be quickly disconnected from the power supply in the event of breakdown Since all poles of the appliance can not be disconnected from the mains via an accessible di...

Page 39: ...R600a isobutane Do not use mechanical devices or oth er means to accelerate the defrost ing process other than those recom mended by the manufacturer Mechanical intervention in the refrig eration sys...

Page 40: ...liance unless they are of the type recommended by the man ufacturer Keep the appliance away from open flames and hot surfaces Risks when dealing with fridge and freezer appliances WARNING Fire hazard...

Page 41: ...er the stored food is still edible Con sume thawed and defrosted foods immediately do not refreeze Use only potable water to make ice cubes Risk of injury from frozen goods Improper handling of the ap...

Page 42: ...the appli ance It is not suitable for lighting a room When cleaning please note Never use harsh granular soda acid solvent based or abrasive cleaners These attack the plastic surfaces All purpose cle...

Page 43: ...Move the appliance to a suitable place and unpack it see Start up on page EN 11 2 Remove all parts of the packaging plastic profiles tape and foam padding 3 Check that the delivery is complete 4 Check...

Page 44: ...t temperatures of 10 C to 32 C temperate zone N This cooling appliance is designed for use at ambient temperatures of 16 C to 32 C subtropical zone ST This cooling appliance is designed for use at amb...

Page 45: ...in the refrigeration circuit the installation space must have a minimum size of 1 m3 per 8 g of refrigerant in compliance with the EN 378 standard The amount of refrigerant contained in your appliance...

Page 46: ...l new appliances wipe the fridge and freezer out prior to first use with a solution made from 100 ml vinegar and 200 ml water Then wipe it out with clean water and dry all of the parts off afterwards...

Page 47: ...screwdriv er 12 3 Also remove the covering plate 12 on the opposite side 13 14 4 Loosen the screws 13 with the star headed screwdriver or the size 8 spanner and remove the upper hinge 14 15 16 17 5 O...

Page 48: ...ith the screws 21 and the larger screw feet 4 back on the opposite side 7 Reposition the appliance upright Preparing the doors 23 24 1 Remove the 3 blind plugs 23 and the decorative cap 24 on the left...

Page 49: ...inge 15 and close the fridge door 13 14 7 Place the upper hinge 14 on the fridge door and then screw it tight using the three screws 13 8 Check whether the fridge door is posi tioned accurately Adjust...

Page 50: ...Appliance parts 1 3 8 7 6 5 4 1 2 1 Temperature controller 2 Interior light 3 Door shelves 4 Screw feet not visible in picture 5 Freezer drawers 6 Fruit vegetable drawer 7 Glass cover for fruit vegeta...

Page 51: ...rrect temperature in the fridge is 6 C The ideal storage temperature in the freezer is 18 C This can be achieved by setting the temperature controller 1 to 4 In any case use the refrigerator freezer t...

Page 52: ...ently if re quired Simply pull out the glass shelves 8 and push them back into the holders in the de sired position Push the door shelves 3 together slight ly sideways and simultaneously pull them upw...

Page 53: ...ves and door shelves as shown in the diagram above to achieve the most efficient use of energy for your appliance A temperature setting that is too high or too low can reduce the shelf life of your fo...

Page 54: ...ried fruit etc in the freezer drawers 5 The temperatures in the appliance and thus the energy consumption can increase if the doors are opened frequently or for a prolonged period if the temperature f...

Page 55: ...ppliance After a malfunction check whether the stored food is still edible Consume thawed and defrosted foods immedi ately do not refreeze Two star frozen food compartments are suitable for storing pr...

Page 56: ...as this causes the contents to dry out and takes up space Fill liquid containers no more than full because liquids expand when frozen Do not store glass or metal containers containing liquids such as...

Page 57: ...ickly use the defrost function on your microwave for example Observe the manufacturer s instructions and note that bacteria and germs can form in this way If you only want to defrost part of a pack re...

Page 58: ...e plastic surfaces All purpose cleaners with a neutral pH are recommended Door seals and plastic parts are sen sitive to oil and grease Remove con taminants as quickly as possible Only use soft cloths...

Page 59: ...ding the piping or cutting open the insulation If possible defrost the freezer in winter when the outside temperature is low You can then store the food on the balcony or similar while defrosting Alte...

Page 60: ...o air 10 9 15 The defrost drain 9 can be found on the reverse side of the cooling area above the fruit vegetable drawer 6 Use the cleaning tool 10 to clean the defrost drain 9 16 Only clean the door s...

Page 61: ...his re pair work Problem Possible cause Solutions tips explanations Compressor off interior light off No electricity to socket Check the socket with another appliance Check the fuse Mains plug is loos...

Page 62: ...artment on page EN 26 Ambient temperature too low or too high Adjust ambient temperature see Intended use on page EN 4 Compressor seems defective Set the temperature controller to 7 If the compressor...

Page 63: ...on cannot be rectified using the troubleshooting table you would like to order further accessories You can find the contact details of your product advisor online on the service pages of your mail ord...

Page 64: ...turn up to three old electrical appliances of the same type to a distributor s collection point for free with out having to purchase a new electrical ap pliance In this case however the old appli ance...

Page 65: ...therefore important to tape off the poles of lithium batteries and rechargeable batteries before disposing of them to prevent an exter nal short circuit Before disposing of the appliance batteries an...

Page 66: ...class G Product fiche concerning regulation EU no 2019 2016 Item number 28972007 99055130 32605202 Name of appliance Refrigerator freezer Model identifier HKGK16155CW HKGK16155CI HKGK16155CBI Device m...

Reviews: