background image

Operation

Page EN-14

Door alarm

The energy consumption and the tempera-
ture inside the appliance can increase if the 
appliance door (1) is opened often or for long 
periods of time.

A beep will sound if the appliance door (1) is 
left open for longer than 2 minutes.

•  Close the appliance door (1).
•  Briefly press the (14) button to turn off the 

beep.

The glass shelves

The top glass shelves (3) can be removed 
and rearranged if necessary.
You will achieve the most efficient use of en-
ergy for your appliance if you combine the 
drawers, glass shelves and door shelves, as 
shown in the figure on page EN-10.

1. To remove the top glass shelves (3), lift 

them slightly at the front and then pull them 
out of the guide rail.

2. Place the top glass shelves (3) back into 

the desired positions.

The freezer drawers

If there is not enough space in the small 
freezer drawers (5) or in the large freezer 
drawer (6), you can remove the small freezer 
drawers (5).

Summary of Contents for HGS18560ENFDBI

Page 1: ...itung Anleitung Version 2101 01159 DE 20220113 Artikel Nr 29471502 Nachdruck auch auszugs weise nicht gestattet HGS18560ENFDBI Beinhaltet die Montageanleitung für die optionale Erweiterung zur Side by Side Kühl Gefrier Kombination ...

Page 2: ...t in Betrieb nehmen DE 22 Auspacken und Aufstellen DE 22 Grundreinigung DE 25 Türgriff montieren DE 25 Elektrischer Anschluss DE 26 Geräte im Tandem aufstellen DE 27 Fehlersuchtabelle DE 30 Service DE 31 Beratung Reklamation und Bestellung DE 31 Reparaturen und Ersatzteile DE 31 Entsorgung und Abfallvermeidung DE 32 Unser Beitrag zum Schutz der Ozonschicht DE 32 Abfallvermeidung DE 32 Elektro Altg...

Page 3: ...WEIS Dieser Signalbegriff warnt vor möglichen Sachschäden Symbolerklärung Dieses Symbol verweist auf nützli che Zusatzinformationen Vorsicht Brandgefahr entflammbare Materialien 4 Sterne Symbol Gefrierbereich mit 18 C oder kälter Definitionen Lebensmittel bezeichnet Nahrungsmittel Zutaten und Getränke einschließlich Wein sowie andere hauptsächlich für den Verzehr bestimmte Dinge die einer Kühlung ...

Page 4: ...rwenden Sie das Gerät ausschließlich wie in dieser Gebrauchsanleitung beschrieben Jede andere Verwendung gilt als nicht be stimmungsgemäß und kann zu Sachschäden oder sogar zu Personenschäden führen Der Hersteller übernimmt keine Haftung für Schä den die durch nicht bestimmungsgemäßen Gebrauch entstanden sind Sicherheitshinweise In diesem Kapitel finden Sie allgemeine Si cherheitshinweise die Sie ...

Page 5: ... Spannung anliegt Nähere Informationen hierzu finden Sie auf dem Typschild Die vollständige Trennung vom Stromnetz erfolgt bei diesem Gerät nur durch Ziehen des Netzsteckers aus der Steckdose Gerät daher nur an eine gut zugängliche Steckdo se anschließen damit es im Störfall schnell vom Stromnetz getrennt wer den kann Falls der Netzstecker nach dem An schluss nicht mehr zugänglich ist muss eine all...

Page 6: ... Ge rät kann zu einem Brand zu Verletzun gen und zu Sachschäden führen Der Anschluss an eine Zeitschaltuhr oder ein separates Fernwirksystem zur Fernüberwachung und steuerung ist unzulässig Ortsveränderliche Mehrfachsteckdo sen oder Netzteile nicht an der Rück seite des Geräts platzieren Risiken im Umgang mit Kältemitteln WARNUNG Brand und Explosionsgefahr Im Kältemittelkreislauf Ihres Gerätes befi...

Page 7: ...sive Gase bilden Brand und Gesundheitsgefahr Die Wärmedämmung und der Innenbe hälter sind kratz und hitzeempfindlich oder können schmelzen oder in Brand geraten Kunststoffe wie sie in der Wärmedäm mung verbaut sind können wenn sie schmelzen oder in Brand geraten gifti ge Dämpfe freisetzen Keine elektrischen Heizgeräte Messer oder Geräte mit offener Flamme z B Kerzen verwenden Keine elektrischen Ger...

Page 8: ...l auf dem Typschild des Geräts Bei längerem Stromausfall oder einer Störung am Gerät das eingelagerte Gefriergut aus dem Gerät nehmen und in einem ausreichend kühlen Raum oder einem anderen Kühlgerät einlagern Nach einer Störung überprüfen ob die eingelagerten Lebensmittel noch genießbar sind Auf oder angetaute Lebensmittel nicht wieder einfrieren sondern sofort verbrauchen Zur Bereitung von Eiswü...

Page 9: ...e scharfen oder spitzen Gegenstände verwenden Beim Reinigen beachten Auf keinen Fall aggressive körni ge soda säure lösemittelhaltige oder schmirgelnde Reinigungsmit tel verwenden Diese greifen die Kunststoffflächen an Empfehlens wert sind Allzweckreiniger mit ei nem neutralen pH Wert Türdichtungen und Geräteteile aus Kunststoff sind empfindlich ge gen Öl und Fett Verunreinigungen möglichst schnel...

Page 10: ...acken Sie es aus siehe Erstinbetriebnahme auf Sei te DE 22 2 Entfernen Sie alle Verpackungsteile Kunst stoffprofile Klebestreifen und Schaumpols ter 3 Prüfen Sie ob die Lieferung vollständig ist 4 Kontrollieren Sie ob das Gerät Transport schäden aufweist 5 Sollte die Lieferung unvollständig sein oder das Gerät einen Transportschaden aufwei sen nehmen Sie bitte Kontakt mit unserem Service auf siehe...

Page 11: ...teteile und Bedienelemente 1 Gerätetür 2 Innenbeleuchtung 3 obere Glasablagen 4 Glasablage als Abdeckung für die obere Gefrierschublade 5 kleine Gefrierschubladen 6 große Gefrierschublade 7 Schraubfüße 8 Türgriff 9 Türablagen 2 9 1 7 4 5 6 3 Gerät 8 ...

Page 12: ...e aktiv 12 Taster zur Einstellung der Temperatur 13 Taster zur Aktivierung Deaktivierung des Schnellen Einfrierens 14 Taster zum Abschalten des Tonsignals bei geöffneter Gerätetür sowie zum Aktivieren Deaktivieren des ECO Modus 15 Taster zur Aktivierung Deaktivierung der Tastensperre 16 Anzeige Schnelles Einfrieren aktiv 17 Anzeige ECO Modus aktiv Bedienfeld ...

Page 13: ... ist las sen Sie die Gerätetür 1 leicht geöffnet damit sich kein Schimmel bildet Temperatur einstellen VORSICHT Gesundheitsgefahr Das Gerät arbeitet eventuell nicht ein wandfrei wenn es über längere Zeit zu geringer Umgebungstemperatur aus gesetzt wird Es kann dann zu einem Temperaturanstieg im Kühlbereich kommen sodass die eingelagerten Le bensmittel schneller verderben Immer die vorgeschriebene ...

Page 14: ...s Einfrieren aktiv 16 Die Tem peraturanzeige wechselt auf 25 C Nach ca 5 Sekunden blinkt die Anzeige Schnelles Einfrieren aktiv 16 nicht mehr Das bedeutet dass die Betriebsart Schnelles Einfrieren nun aktiviert ist Schnelles Einfrieren deaktivieren Das Schnelle Einfrieren wird nach 50 Stunden automatisch deaktiviert Um das Schnelle Einfrieren manuell zu deaktivieren berühren Sie den Taster 13 3 Se...

Page 15: ...lton Schließen Sie die Gerätetür 1 Um den Signalton abzuschalten berühren Sie kurz den Taster 14 Die Glasablagen Die oberen Glasablagen 3 lassen sich her ausnehmen und bei Bedarf anders anordnen Die effizienteste Energienutzung für Ihr Gerät erzielen Sie wenn Sie die Schubladen Glas und Türablagen wie in der Abbildung auf Sei te DE 11 gezeigt kombinieren 1 Um die oberen Glasablagen 3 heraus zunehm...

Page 16: ...Abtauen Reinigen oder Stromausfall Bei einem Stromausfall bleibt das Ge friergut noch einige Zeit ausreichend gekühlt Bei längerem Stromausfall oder einer Störung am Gerät das ein gelagerte Gefriergut aus dem Gerät nehmen und in einem ausreichend kühlen Raum oder einem anderen Kühlgerät einlagern Die maximale Lagerzeit bei einer Störung entneh men Sie dem Typschild des Geräts Nach einer Störung üb...

Page 17: ...ränke eignen sich nicht zum Einfrieren da die Kohlensäure beim Einfrieren entweicht Die geeignete Verpackung Wichtig beim Tiefgefrieren ist die Verpackung Sie soll vor Oxidation vor dem Eindringen von Mikroben vor der Übertragung von Geruchs und Geschmacksstoffen und Austrocknen Gefrierbrand schützen Verwenden Sie nur Verpackungsmateri al das widerstandsfähig luft und flüssig keitsundurchlässig ni...

Page 18: ...ens 18 C betragen Kaufen Sie deshalb keine Ware die in bereiften stark vereisten Truhen liegt oberhalb der vorgeschriebenen Markie rungsmarke gestapelt ist teilweise verklumpt ist vor allem bei Bee ren und Gemüse leicht festzustellen Schnee und Saftspuren aufweist Transportieren Sie Tiefkühlkost in Spezial boxen aus Styropor oder in Isoliertaschen Beachten Sie die Lagerbedingungen und zeiten auf d...

Page 19: ...he Handhabung besteht die Gefahr einer Lebensmittelvergiftung Zur Bereitung von Eiswürfeln nur fri sches Trinkwasser verwenden Füllen Sie den mitgelieferten Eiswürfelbe hälter zu mit frischem Trinkwasser und stellen Sie ihn waagerecht auf eine der Glasablagen 3 oder 4 oder in eine der Gefrierschubladen 5 oder 6 Die Eiswürfel lösen sich am besten wenn Sie den Eiswürfelbehälter leicht biegen oder ku...

Page 20: ...pH Wert Türdichtungen und Geräteteile aus Kunststoff sind empfindlich gegen Öl und Fett Verunreinigungen mög lichst schnell entfernen Nur weiche Tücher verwenden Türdichtungen kontrollieren und reinigen Die Türdichtungen müssen regelmäßig kont rolliert werden damit keine warme Luft in das Gerät eindringt 1 Klemmen Sie zur Prüfung ein dünnes Stück Papier an verschiedenen Stellen zwischen Türdichtung...

Page 21: ... der Halterung he raus 8 Reinigen Sie alle Teile in lauwarmem Spülwasser Trocknen Sie danach alles gründlich ab 9 Wischen Sie den Innenraum mit warmem Wasser und Spülmittel aus 10 Geben Sie beim Nachwischen etwas Es sig ins Wasser um Schimmelbildung vor zubeugen 11 Wischen Sie den Innenraum trocken 12 Reinigen Sie die Türdichtungen nur mit klarem Wasser sie sind empfindlich ge gen Öl und Fett 13 S...

Page 22: ...es Verdampfers mit scharfen Gegenständen Abknicken von Rohrleitungen usw Herausspritzendes Kältemittel ist brennbar und kann zu Augenschäden führen Spülen Sie in diesem Fall die Augen unter klarem Wasser und rufen Sie sofort einen Arzt HINWEIS Beschädigungsgefahr Unsachgemäßer Umgang mit dem Ge rät kann zu Beschädigungen führen Das Kühlgerät möglichst nicht in die Horizontale kippen Zum Auspacken ...

Page 23: ... Ungünstig sind Standorte mit direkter Sonneneinstrahlung oder unmittelbar ne ben einem Ofen Herd oder Heizkörper 3 Wenn am Aufstellungsort eine Fußbo denheizung installiert ist stellen Sie das Kühlgerät auf eine Isolierplatte aus festem Material Sorgen Sie dafür dass die Um gebungstemperaturen der Klimaklasse des Geräts entsprechen siehe Bestimmungs gemäßer Gebrauch auf Seite DE 4 4 Überprüfen Si...

Page 24: ...igte Zone N Dieses Kühlgerät ist für die Verwendung bei Umge bungstemperaturen von 16 C bis 32 C bestimmt subtropische Zone ST Dieses Kühlgerät ist für die Verwendung bei Umge bungstemperaturen von 16 C bis 38 C bestimmt tropische Zone T Dieses Kühlgerät ist für die Verwendung bei Umge bungstemperaturen von 16 C bis 43 C bestimmt Sinkt die Raumtemperatur wesentlich darunter schaltet sich das Gerät...

Page 25: ...n Sie anschließend mit klarem Wasser nach und trocknen Sie alle Teile danach ab Türgriff montieren Bevor Sie das Gerät in Betrieb nehmen soll ten Sie den Türgriff 8 montieren 18 1 1 Hebeln Sie die beiden Blindstopfen 18 aus der Seite der Gerätetür 1 19 8 1 2 Schrauben Sie den Türgriff 8 mit den beiliegenden Schrauben 19 an die Gerä tetür 1 20 21 3 Schieben Sie die beiliegenden Zierblen den 20 über...

Page 26: ...vor geschaltet sein ziehen Sie gegebe nenfalls eine Fachkraft zurate siehe Service auf Seite DE 31 Netzanschlussleitung nicht knicken oder klemmen und nicht über scharfe Kanten legen Die Folge kann ein Ka belbruch sein VORSICHT Brandgefahr Unsachgemäßer Umgang mit dem Ge rät kann zu einem Brand und zu Sach schäden führen Gerät nur an eine ordnungsgemäß installierte Schutzkontakt Steckdose anschlie...

Page 27: ... Verbindungsstück Gerätevorderseite 24 26 8 Schraube zur Befestigung des Verbindungsstücks auf der Gerätevor derseite 24 2 des Verbindungsstücks auf dem Dach 23 2 und der oberen Abdeckung 22 4 27 4 Schrauben zur Befestigung der Verbindungsstücke an der Geräte rückseite 23 28 1 Dichtungsprofil 1 Stellen Sie die beiden Geräte nebeneinan der auf und richten Sie sie mithilfe der je weiligen Schraubfüß...

Page 28: ...ngsstücks 23 sowie 2 der Schrauben 26 31 5 Hebeln Sie mithilfe eines Bindfadens oder eines kleinen Schraubendrehers die Blindstopfen 31 an den Vorderseiten der Geräte heraus 26 24 6 Verbinden Sie die Geräte an der Vorder seite mit dem Verbindungsstück Geräte vorderseite 24 und 2 der Schrauben 26 28 7 Bringen Sie nun das Dichtungsprofil 28 an 22 26 8 Schrauben Sie die obere Abdeckung 22 mit den 4 ü...

Page 29: ...Geräte im Tandem aufstellen Seite DE 29 25 24 9 Bringen Sie die Abdeckblende 25 für das Verbindungsstück Gerätevorderseite 24 an ...

Page 30: ...niedrig eingestellt Höhere Einstellung wählen siehe Temperatur einstellen auf Seite DE 13 Gerät kühlt nicht ausreichend Temperatur zu hoch eingestellt Niedrigere Einstellung wählen siehe Temperatur einstellen auf Seite DE 13 Tür nicht fest verschlossen oder Türdichtung liegt nicht voll auf Siehe Türdichtungen kontrollieren und reinigen auf Seite DE 20 Gerät steht in der Nähe einer Wärmequelle Isol...

Page 31: ...Wenden Sie sich an un seren Service Ersatzteile stehen für eine Mindestdauer von sieben Jahren nach dem Inverkehrbringen des letzten Exemplars des Modells zur Ver fügung Türdichtungen stehen für einen Zeit raum von zehn Jahren zur Verfügung Kunden in Deutschland Wenden Sie sich an unseren Technik Service Telefon 040 36 03 31 50 Kunden in Österreich Wenden Sie sich bitte an das Kundencenter oder di...

Page 32: ...h den Vorschriften der Richtlinie 2008 98 EG grundsätzlich Vorrang vor Maßnahmen der Abfallbewirtschaftung Als Maßnahmen der Abfallvermeidung kom men bei Elektro und Elektronikgeräten insbe sondere die Verlängerung ihrer Lebensdauer durch Reparatur defekter Geräte und die Ver äußerung funktionstüchtiger gebrauchter Ge räte anstelle ihrer Zuführung zur Entsorgung in Betracht Helfen Sie uns Abfall z...

Page 33: ...r Technische Daten Technische Daten Bestellnummer 29471502 Gerätebezeichnung Gefrierschrank Modellkennung HGS18560ENFDBI Gerätemaße Höhe Breite Tiefe 1850 mm 600 mm 700 mm Leergewicht 66 kg Kältemittel R600a Kältemittel Füllmenge 74 g Schaummittel Zyklopentan Leistungsaufnahme 140 W Versorgungsspannung Frequenz Nennstrom 220 240 V 50 Hz 1 3 A Schutzklasse I Klimaklasse SN N ST T Dieses Gerät ist f...

Page 34: ......

Page 35: ...l Manual version 2101 01159 EN 20220113 Item no 29471502 Reproduction even of ex cerpts is not permitted HGS18560ENFDBI Contains the assembly instructions for the optional extension of the side by side fridge freezer combination ...

Page 36: ...packing and setup EN 20 Cleaning before use EN 23 Attaching the door handle EN 23 Electrical connections EN 24 Setting up appliances in tandem EN 25 Troubleshooting table EN 28 Service EN 29 Advice complaints and orders EN 29 Repairs and spare parts EN 29 Disposal and waste prevention EN 30 Our contribution to protecting the ozone layer EN 30 Waste prevention EN 30 Disposing of old electrical devi...

Page 37: ...erm warns against possible damage to property Explanation of symbols This symbol refers to useful addi tional information Caution Fire hazard flammable ma terials 4 star symbol Freezer at 18 C or colder Definitions Food refers to foods ingredients and drinks including wine and other things mainly intend ed for consumption which require refrigera tion at certain temperatures Food to be frozen means...

Page 38: ...l Any other use is deemed improper and may result in damage to prop erty or even personal injury The manufactur er accepts no liability for damage caused by improper use Safety notices In this chapter you will find general safety notices which you must always observe for your own protection and that of third parties Please also observe the warning notices in the individual chapters Risks to childr...

Page 39: ...n easi ly accessible socket so that it can be quickly disconnected from the power supply in the event of malfunction Since all poles of the appliance can not be disconnected from the mains via an accessible disconnecting de vice an all pole disconnecting device in accordance with overvoltage cate gory III must be connected within the house installation with at least 3 mm contact clearance consult ...

Page 40: ...frigeration circuit contains the environmentally friendly but flammable and as a mixture of air and gas explosive refrigerant R600a isobutane Do not use mechanical devices or oth er means to accelerate the defrost ing process other than those recom mended by the manufacturer Mechanical intervention in the refrig eration system must only be carried out by authorised specialists Do not damage the ref...

Page 41: ...tric heating equip ment knives or devices with an open flame such as candles Do not use electrical appliances in side the food storage compartments of the appliance unless they are of the type recommended by the man ufacturer Keep the appliance away from open flames and hot surfaces Risks in handling freezers CAUTION Health hazard Contaminated food can cause health problems Opening the door for long...

Page 42: ...ance may result in injury There is a risk of burns caused by low temperatures The food and the inside walls of the freezer have a very low temperature Never touch them with wet hands This can cause injury to the skin Skin damage can occur even with dry skin Let ice cubes or ice lollies thaw a lit tle before eating do not put into your mouth straight from the freezer NOTICE Risk of damage to proper...

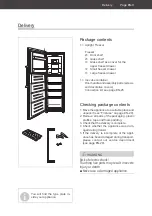
Page 43: ...ppliance to a suitable place and unpack it see First use on page EN 20 2 Remove all parts of the packaging plastic profiles tape and foam padding 3 Check that the delivery is complete 4 Check whether the appliance was dam aged during transit 5 If the delivery is incomplete or the appli ance has been damaged during transport please contact our service department see page EN 29 WARNING Risk of elect...

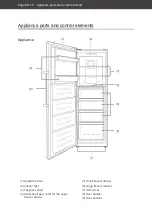
Page 44: ...iance parts and control elements 1 Appliance door 2 Interior light 3 Top glass shelf 4 Glass shelf as a cover for the upper freezer drawer 5 Small freezer drawer 6 Large freezer drawer 7 Screw feet 8 Door handle 9 Door shelves 2 9 1 7 4 5 6 3 Appliance 8 ...

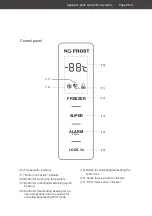
Page 45: ... lock active indicator 12 Button for setting the temperature 13 Button for activating deactivating quick freezing 14 Button for deactivating beeping for an opened appliance door as well as for activating deactivating ECO mode 15 Button for activating deactivating the button lock 16 Quick freezing active indicator 17 ECO mode active indicator Control panel ...

Page 46: ...ce door 1 open slightly to avoid mould formation Setting the temperature CAUTION Health hazard The appliance may not operate proper ly if exposed to low ambient tempera tures for extended periods of time The temperature may increase in the fridge which may cause the foods stored with in to spoil more quickly Always ensure the prescribed ambi ent temperature is maintained see Intended use on page E...

Page 47: ...ated Deactivating quick freezing Quick freezing is automatically deactivated after 50 hours Press the button 13 for 3 seconds to manually deactivate quick freezing The Quick freezing active indicator 16 goes out The respective temperature indi cator will return to the original setting Activating ECO mode In the ECO operating mode the temperature in the freezer is automatically set according to the...

Page 48: ... top glass shelves 3 can be removed and rearranged if necessary You will achieve the most efficient use of en ergy for your appliance if you combine the drawers glass shelves and door shelves as shown in the figure on page EN 10 1 To remove the top glass shelves 3 lift them slightly at the front and then pull them out of the guide rail 2 Place the top glass shelves 3 back into the desired position...

Page 49: ...the stored frozen food from the appliance and store it in a sufficiently cool place or in anoth er cooling appliance The maximum storage time in the event of a fault is shown on the appliance s type plate After a malfunction check wheth er the stored food is still edible Con sume thawed and defrosted foods immediately do not refreeze If the refrigerating appliance is left empty for long periods swi...

Page 50: ... the contents to dry out and takes up space Fill liquid containers no more full be cause liquids expand when frozen Do not store glass or metal containers con taining liquids such as water lemonade beer etc Water expands when frozen and may burst the container Freeze only high percentage alcohol from 40 by volume make sure that it is tightly closed Label the frozen food by type quantity amount and...

Page 51: ...immersed in its own thawing liquid To defrost food quickly use the defrost function on your microwave for exam ple Observe the manufacturer s instruc tions and note that bacteria and germs can form in this way If you only want to defrost part of a pack remove the portion you need and imme diately close the rest of the pack In this way you will avoid freezer burn and will reduce ice formation on th...

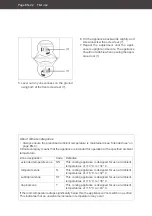
Page 52: ...ded Door seals and plastic parts are sen sitive to oil and grease Remove con taminants as quickly as possible Only use soft cloths Checking and cleaning door seals The door seals must be checked regularly so that no air can enter the appliance 1 To test them clamp a thin piece of paper in various places between the door seal and frame of the appliance The paper should be difficult to pull through ...

Page 53: ...he large freezer drawer 6 as far out of the holder as possible 8 Clean all of the parts in lukewarm soapy water Then dry everything thoroughly 9 Wipe down the inside with warm water and washing up liquid 10 When wiping clean add a few drops of vinegar to the water to prevent mould from forming 11 Wipe the interior dry 12 Clean the door seals with clean water only they are sensitive to oil and fat ...

Page 54: ...s flammable when spurt ing out and can damage the eyes In this case rinse your eyes in clean wa ter and seek medical assistance im mediately NOTICE Risk of damage Improper handling of the appliance may result in damage If possible do not tilt the cooling ap pliance horizontally Do not use sharp or pointed objects to unpack it When unpacking the appliance nev er damage the insulation material on the...

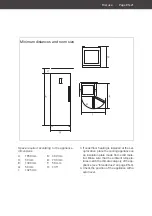
Page 55: ...25 mm Minimum distances and room size 3 If underfloor heating is installed at the set up location place the cooling appliance on an insulation plate made from solid mate rial Make sure that the ambient tempera tures match the climate category of the ap pliance see Intended use on page EN 4 4 Check the position of the appliance with a spirit level ...

Page 56: ...mperate zone N This cooling appliance is designed for use at ambient temperatures of 16 C to 32 C subtropical zone ST This cooling appliance is designed for use at ambient temperatures of 16 C to 38 C tropical zone T This cooling appliance is designed for use at ambient temperatures of 16 C to 43 C If the room temperature drops significantly below this the appliance will not switch on as often Thi...

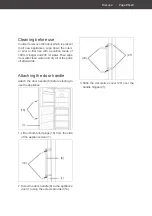
Page 57: ...00 ml water Then wipe it out with clean water and dry all of the parts off afterwards Attaching the door handle Attach the door handle 8 before starting to use the appliance 18 1 1 Lift out both blind plugs 18 from the side of the appliance door 1 19 8 1 2 Screw the door handle 8 to the appliance door 1 using the screws provided 19 20 21 3 Slide the decorative cover 20 over the handle hinges 21 ...

Page 58: ...h at least 3 mm contact clearance consult a qualified professional if necessary see Ser vice on page EN 29 Do not kink or pinch the supply cord or lay it over sharp edges This can re sult in a break in the cable CAUTION Fire hazard Improper handling of the appliance can lead to fire and damage to property Connect the appliance only to a prop erlyinstalledandearthedelectricsock et Do not connect to a...

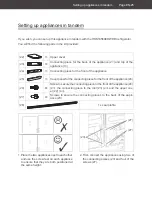
Page 59: ...nce 25 1 Cover panel for the connecting piece for the front of the appliance 24 26 8 Screw to secure the connecting piece to the front of the appliance 24 2 the connecting piece to the roof 23 2 and the upper cov er 22 4 27 4 Screws to secure the connecting pieces to the back of the appli ance 23 28 1 x seal profile 1 Place the two appliances next to each other and use the screw feet on each appli...

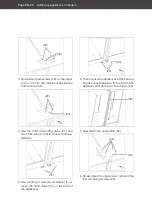
Page 60: ...two of the screws 26 to connect both ap pliances 31 5 Use a string or a small screwdriver to re move the blind plugs 31 on the front of the appliances 26 24 6 Then connect the appliances at the front us ing the connecting piece for the front of the appliance 24 and two of the screws 26 28 7 Now attach the seal profile 28 22 26 8 Screw down the upper cover 22 with the four remaining screws 26 ...

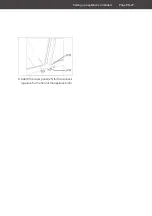
Page 61: ...Setting up appliances in tandem Page EN 27 25 24 9 Attach the cover panel 25 for the connect ing piece for the front of the appliance 24 ...

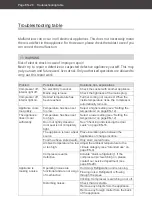
Page 62: ...has been set too low Select a higher setting see Setting the temperature on page EN 12 The appliance doesn t cool sufficiently Temperature has been set too high Select a lower setting see Setting the temperature on page EN 12 Door not tightly closed or door seal is not completely tight See Checking and cleaning the door seals on page EN 18 The appliance is near a heat source Place insulation plate...

Page 63: ...c tive appliances repaired Please contact our service department regarding this Spare parts are available for a minimum peri od of seven years after the final version of the model has been placed on the market Door seals are available for a period of ten years Customers in Germany Please contact our Technical Service Phone 49 0 40 36 03 31 50 Customers in Austria Please contact your mail order com...

Page 64: ...8 EC waste prevention measures al ways take priority over waste management For electrical and electronic devices waste prevention measures include extending the lifespan of defective devices through repair and reselling used working appliances in stead of disposing of them Please help us reduce waste and contact our service department if your product is faulty More information can be found in the ...

Page 65: ...ons Technical specifications Item number 29471502 Name of appliance Upright Freezer Model identifier HGS18560ENFDBI Device measurements Height Width Depth 1850 mm 600 mm 700 mm Unloaded weight 66 kg Refrigerant R600a Filling capacity refrigerant 74 g Foaming agent cyclopentane Rated power 140 W Supply voltage frequency rated current 220 240 V 50 Hz 1 3 A Protection class I Climate class SN N ST T ...

Page 66: ......

Page 67: ......

Page 68: ......

Reviews: