Hansa C4 O&M Manual - OM-005 Revision F 20/06/2019
© Hansa Chippers 2019
16
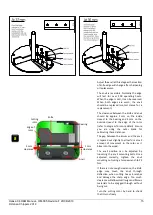
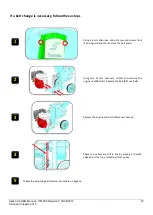
Reassemble the housing and inlet chute by
repeating steps 1-3 in reverse.
Note
: When reassembling the housing, first
align the hooks on the curved wall with the
tabs near the outlet on the housing front.
Once these are aligned use a nylon
hammer (or other suitable alternative) to
hammer the back of the housing to locate
the remaining four tabs. Do not attempt to
do up the housing bolts until these tabs
have been aligned.
Engine servicing
For servicing of the engine, please refer to the Honda engine manual.
Engine oil
It is recommended you check the oil level every time you use your chipper. To check the oil level,
unscrew the oil filler cap/dipstick, clean the dipstick, then insert the dipstick without screwing it
into the thread. Fill as necessary, using the diagram as a reference. For optimal performance of
your chipper, the engine oil should be completely changed every 100 operating hours, or roughly
once every 12 months on average.
If the engine oil needs to be changed, follow these steps:
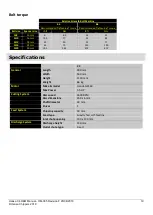
Run the engine for 1-2 minutes in order to warm up the
oil. Switch the engine off after the oil is warm. Place a
container to the side of the engine. Remove the oil filler
cap/dipstick and oil drain plug (using a 10 mm spanner)
then let the oil drain into the container. Ensure the
machine does not lean more than 30 degrees from
vertical while doing so.
Screw the oil outlet drain plug back in and fill the engine with 0.45 Litres of SAE 10W30 or SAE 10W40 through
the oil filler cap/dipstick hole (the oil should reach the thread near the hole opening).
Using the dipstick, check the oil to make sure it is at the right level (close to the upper limit, but not over). Screw
the oil filler cap/dipstick back into the hole. Dispose of the used engine oil in an environmentally sensitive way.
Belt Tension
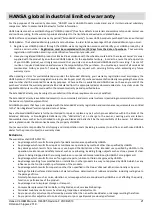
Correct belt tension is crucial for minimising belt wear and
maximising machine efficiency. To check the belt tension, the belt
guard must first be removed (see
step 1 of ‘belt replacement’ on
page 17). After the belt guard is removed, fully engage the belt.
There should be approximately 5 mm deflection in the belt when
pressing firmly on the belt. If required, adjust belt tension.
WARNING!
Every time the knife clamping bolts are torqued up to 22 Nm and loosened off again, the life of the bolts is
reduced. The knife clamping bolts must be replaced at most after every six sharpens. Contact Hansa for replacement
bolts (m8x25 countersunk bolts of grade 12.9 or higher). Use only genuine Hansa bolts.
9
Align the
‘hooks’ on
the housing
wall with the
tabs in the
housing back
Align the four
remaining
tabs
1
Oil filler
cap/dipstick
Oil drain plug
2
3
Check for
deflection
here


