


6
English
Français
Español
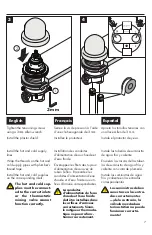
Install the lower mounting ring
and washer. Screw the lower
mounting ring to its lowest posi-
tion.
Insert the rough up through the
mounting surface.
Install the upper mounting ring.
Tighten it as far as it will go
without forcing it. It will stop at
the correct mounting height.
Installez l’anneau de montage
et la rondelle inférieurs. Vissez
l’anneau de montage inférieure
à sa position la plus basse.
Insérez la pièce intérieure dans
la surface de montage.
Installez l’anneau de montage
du haut. Serrez-le autant que
possible mais sans le forcer.
Il s’arrêtera juste à la bonne
hauteur pour le montage.
Instale el aro y la arandela de
montaje inferiores. Enrosque
el aro de montaje inferior a su
posición más baja.
Inserte la pieza exterior hacia
arriba a través de la superficie
de montaje.
Instale el aro de montaje superi-
or. Apriete hasta que haga tope
sin forzarlo. El aro hará tope a
la altura de montaje correcta.
Rest the rough on the mounting
surface.
Tighten the lower mounting ring.
Posez la pièce intérieure sur la
surface de montage.
Serrez l’anneau de montage
inférieur.
Apoye la pieza interior en la
superficie de montaje.
Apriete el aro de montaje
inferior.
2
1
2
1
3
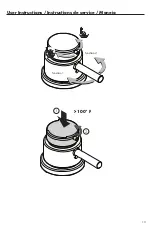
Installation / Installation / Instalación
Summary of Contents for Talis S 06453 0 Series
Page 5: ...5 max 1 G 3 2 1 NPT 06401xx0 06453xx0 06456xx0 04172xx0 04416xx0...
Page 11: ...11 100 1 0 0 Justify the handle R glez la poign e Ajuste la manija 1 2 3 4 3 mm 3 mm 1 2 1 2...
Page 13: ...13 User Instructions Instructions de service Manejo 100 F 1 2 function 1 function 2...
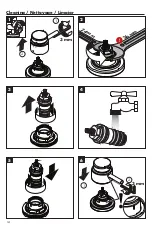
Page 14: ...14 Cleaning Nettoyage Limpiar 100 3 mm 3 mm 1 2 1 2 2 4 m m 3 6 m m 1 2 3 4 5 6...
Page 19: ...19...


