background image

26

Maintenance

• Should the volume of water decrease over time, 

inspect and clean the filters on the thermostatic 

cartridge.    After  reassembly,  set  the  high 

temperature limit stop and justify the handle.  

• To prolong the life of the themostatic cartridge, 

regularly  run  it  through  its  full  range  of 

temperatures.

Troubleshooting

Problem

Possible Cause

Solution

Insufficient water


– Supply pressure inadequate


– Check water pressure


– Cartridge filters dirty


– Clean the filters


– Showerhead or handshower 

filter dirty


– Clean the filter

Crossflow: hot water forced into 

cold water supply or vice versa 

when mixture is closed


– Check valves dirty or worn


– Clean check valves, replace if 

necessary

Output temperature does not cor-

respond with temperature marked 

on handle


– Handle not justified


– Justify the handle


– Water heater set too low


– Increase the hot water 

temperature

Temperature regulation not 

possible


– (new installation) Hot and cold 

supplies are reversed 


– Correct the plumbing


– Thermostatic cartridge dirty or 

worn


– Replace the thermostatic 

cartridge

Safety stop button not operating


– Button and/or spring are dirty 

or worn


– Clean spring and button, replace 

if necessary

Handle hard to turn


– Cartridge dirty or worn


– Replace cartridge

Shower or spout dripping


– Volume control cartridge dirty 

or worn


– Clean or replace volume control 

cartridge

Summary of Contents for Croma Showerpipe 27169 1 Series

Page 1: ...EN Installation User Instructions Warranty FR Instructions de montage Mode d emploi Garantie ES Instrucciones de montaje Manejo Garant a Croma Showerpipe 27169xx1...

Page 2: ...enough to support the showerpipe The enclosed screws and anchors are suitable for a solid surface wall If installing in a fiberglass or acrylic shower unit install header boards at the mounting points...

Page 3: ...toute son tendue aucun d passement de joint ni de carrelage que la construction de la paroi soit adapt e l installation du produit et surtout ne pr sente aucun point faible Les vis et les chevilles fo...

Page 4: ...e la fijaci n sea plana sin juntas que sobresalen ni azulejos desplazados que la estructura de la pared sea adecuada para un montaje del producto y que ante todo no presente puntos d biles Los tornill...

Page 5: ...5 36 14 43 6 2 2 11 5 1 2 3 G 14 11 5 26 26 3 4 3 Tools Required Outiles Utiles Herramientas tiles 17 mm 30 mm 6 mm...

Page 6: ...sont id ales pour une personne de 6 1800 mm de hauteur et doivent tre ajust es selon le besoin A ce sujet il faut tenir compte pour un changement de hauteur que la c te minimum donn e de 91 po 2330 mm...

Page 7: ...7 Using the Stops 4 mm open ouvert abierto closed ferm cerrado...

Page 8: ...roughly before installation of the showerpipe Rincez bien les con duites d alimentation en eau chaude et froide avant l installation de ce tuyau de douche Lave los suministros de agua caliente y fr a...

Page 9: ...mez l eau la valve principale El showerpipe debe ser insta lado con un juego de piezas interiores del tubo de ducha 16181181 no incluido Para que la v lvula mezcladora termost ti ca funcione correcta...

Page 10: ...ada Corte cuidadosamente el niple en este punto Seal the wall around the nipples with water proof sealant Install the escutcheon mounting plates Wrap the nipples with plumbers tape Scellez le mur auto...

Page 11: ...cutcheons Install the mixer Tighten the nuts Installez les boitiers de service Lubrifiez les joints toriques Installez les cussons Installez le m langeur thermostatique Serrez les crous Instale las v...

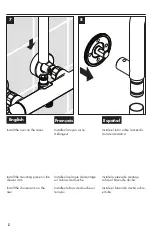
Page 12: ...all the shower arm on the riser Installez la tuyau sur le m langeur Installez la plaque de montage sur le bras de douche Installez le bras de douche sur le tuyau Instale el tubo sobre la mezcla dora t...

Page 13: ...k the positions of the screw holes Remove the riser Veillez ce que la tuyau soit au niveau Marquez les positions des trous de vissage Enlevez la tuyau Verifique que el tubo quede nivelada Marque las p...

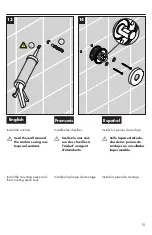
Page 14: ...14 English Fran ais Espa ol Remove the mounting piece Drill the screw holes Enlevez la plaque de montage Percez les trous Quite la pieza de montaje Perfore los orificios para tornillos 11 12...

Page 15: ...the mounting piece and the mounting piece seal Installez les chevilles Scellez le mur aut our des chevilles l aide d un agent d tanch it Installez la plaque de montage Instale los pernos de anclaje Se...

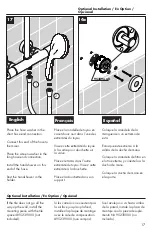
Page 16: ...e riser on the mixer Tighten the screw Install the showerhead Installez le tuyau Serrez le vis Installez le pomme de douche Instale el tubo Apriete el tornillo Instale la ducha cabezal 1 2 3 3 mm 4 4...

Page 17: ...n support Coloque la arandela de la manguera en un extremo de esta Enrosque este extremo a la salida de la ducha de mano Coloque la arandela de filtro en el otro extremo y con ctelo a la ducha de mano...

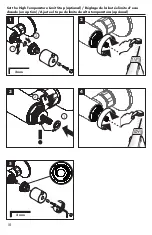
Page 18: ...18 Set the High Temperature Limit Stop optional R glage de la but e limite d eau chaude en option Ajuste el tope de l mite de alta temperatura opcional 1 2 1 2 3 mm 3 mm 1 2 3 4 5...

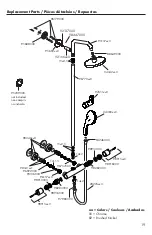
Page 19: ...98282000 97651xx0 95137xx0 96770xx0 28276xx3 96737000 98916000 96157xx0 12x2 15x2 5 14x2 17x1 5 04342xx0 98913000 96922000 98915xx0 98916000 98283000 15x2 5 98913000 94246000 04083xx0 95692xx0 956880...

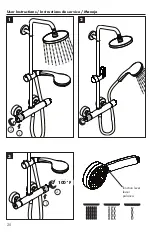
Page 20: ...20 User Instructions Instructions de service Manejo 100 F function lever levier palanca 1 2 3 1 2 1 2...

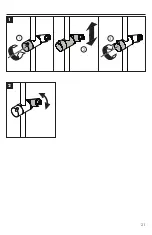
Page 21: ...21 1 2 3 1 2...

Page 22: ...22 Cleaning Nettoyage Limpieza scale remover d tartrant desincrustante 1 1 2 2 3...

Page 23: ...23 Cleaning Nettoyage Limpieza Scale Remover 1 min scale remover d tartrant desincrustante 1 1 2 2 3...

Page 24: ...ns une fois par ann e Remplacez les clapets de non retour lorsque n cessaire Inspeccione las v lvulas de retenci n al menos una vez por a o Reemplace las v lvulas de retenci n de ser necesario Check v...

Page 25: ...25 6 1 2 7 1 2 3 30 mm 12 5 ft lb 17 Nm 4 5 8 9 3 mm 4 4 ft lb 6 Nm 10 mm 14 7 ft lb 20 Nm red rouge rojo...

Page 26: ...er supply or vice versa when mixture is closed Check valves dirty or worn Clean check valves replace if necessary Output temperature does not cor respond with temperature marked on handle Handle not j...

Page 27: ...e est encrass ou entartr Nettoyez l l ment ther mostatique ou le changez ventuellement L alimentation en eau chaude et eau froide sont invers s Doit tre froid droite Corrigez la plomberie Bouton press...

Page 28: ...a cruzada agua cali ente entra en la tuber a del agua fr a o al rev s V lvula antirretorno sucia o pierde Limpiar cambiar v lvula Temperatura del agua no corre sponde a lo marcado Termostato no ha sid...

Page 29: ...from the Hansgrohe product Damage to the product caused by improper care or the use of improper cleaning agents is not covered by the warranty If a component of the product is damaged replace it as th...

Page 30: ...erfumes lociones de afeitado y esmalte de unas pueden danar tambien los materiales Enjuague el producto con agua limpia despu s de cada uso Los residuos de limpiadores para lavatorios ba eras o azulej...

Page 31: ...31...

Page 32: ...cts in material or workmanship B Conditions malfunctions or damage resulting from 1 normal wear and tear improper installation improper maintenance misuse abuse negligence accident or alteration 2 the...

Reviews: