HanRongDa HRD-787 Operational Manuallines Download Page 5


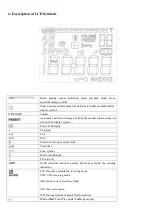
1: Power on/off the machine [Refer to 7.1.1 for details]. 

2: Set 90 minutes’ sleep mode [Refer to 7.1.2 for details] 

3: Working Mode: light press it to switch pause/play. 


1: Under clock display state: Set receiving frequency range [Refer to 7.4 for details]. 

2: Under starting-up status: Select working mode switch [Refer to 7.2 for details] 

3: Fully automatic station search and storage [Refer to 7.4.1.3 for details] 

            1: radio mode: light press it to enter fetch mode & long press it for 2 seconds to manually save stations.   

2: Music playback working mode: light press it to select EQ sound.   

3: Turn on and off VHF; switch NFM/WFM mode and select WFM [refer to 

7:6

 for details]   


1: power-on status: volume adj 

2: Clock status: long press it to enable runtime setting/12-hour system&24-hour system   


1: power-on status: volume adjustment- 

2: Clock status: long press it to set the timed alarm clock/timed startup & timed shutdown will be set after it 

is started.   

3:  Alarm  clock  state:  light  press  it  to  close  the  alarm  clock;  Clock  status:  light  press  it  to  cancel  the  alarm 

clock.   


1: Power-on/Power-off state: lock & Unlock 

2: Open or close “SOS” alarm functions [refer to 13.4/13.5 for details]   

3: Short wave working mode: Enable the fast meter wave to select stations.   

4: Select TF card play mode [refer to 9 points for details ] 


1: clock/alarm clock is set: adjust the time +; 

2: Radio mode: light press it to increase frequency; 

long press it for two seconds to automatically search for stations   

    enter the station fetch/storage mode: light press it to get the station fetch/storage address  

3: TF card playing mode: light press it to play the next song; long press it to play quickly; 

4:Bluetooth mode: light press it to go to the next song. 


1: Clock/ alarm clock setting: adjust the time -; 

2: Radio mode: light press it to decrease frequency; 

  long press it for two seconds to automatically search for stations   

  enter the station fetch/storage mode: light press it to get the station fetch/storage address number-.   

3: TF card playing mode: light press it to return to the previous song; long press it to rewind playback; 

4: Bluetooth mode: light press it to return to the previous song.   


1: Double click it (press it twice continuously) to start the flashlight; light press it to turn off the light. 

2: When the SOS alarm lock is on, long press it for two seconds to start "SOS" alarm + flashing light.   

Light press it to turn off the light and alarm. 


TF card jack socket 


3.5MM headphone audio output jack.   

TYPE-C 

USB jack 

1: Charging hole; 

2: Computer audio input jack. 
 

Summary of Contents for HRD-787

Page 1: ...erica national weather band multi band broadcast and can support Bluetooth TF card multimedia music playback with high fidelity sound quality It supports flashlight lighting and SOS alarm emergency fu...

Page 2: ...e 9KHZ Under music playing mode our product is equipped with the music spectrum which can bring you beautiful music melody Our product has both BASS low sound quality and headphones Therefore it can m...

Page 3: ...torage bag 1 Packing box 1 4 Schematic diagram for downloading mobile APP see APP installation instructions in the attachment Step 1 turn on the radio Step 2 Install the APP Step 3 successful installa...

Page 4: ...Left view Right view Top view 5 1 Functions of all buttons...

Page 5: ...details 3 Short wave working mode Enable the fast meter wave to select stations 4 Select TF card play mode refer to 9 points for details 1 clock alarm clock is set adjust the time 2 Radio mode light p...

Page 6: ...anual station storage station fetch display symbol Power Charging Charging Unit Unit Start auto start up alarm clock Sleep time Lock symbol Bluetooth playback TF card play North American national weat...

Page 7: ...g press for two seconds to set sleeping mode 90 80 70 60 50 40 30 20 10 minute When sleep time is displayed light press to choose automatic sleep shutdown minutes as 90 80 70 60 50 40 30 20 10 minutes...

Page 8: ...MHZ Minimum step value of AM medium wave 9KHZ 10KHZ Minimum step value of SW short wave 0 005MHZ 7 4 1 2 Semi automatic station search long press for 2 seconds and each band quickly searches radio by...

Page 9: ...ing to their needs The operations are shown as below 7 7 Manual station storage method In the radio receiving mode you can find target frequency points by the three methods mentioned above 7 4 1 Long...

Page 10: ...oth mode Bluetooth name of our product HRD 787 Under the startup working state light press BAND to switch to BT mode and Bluetooth will flash indicating that it is waiting to be connected to Bluetooth...

Page 11: ...g press VOL for 2 seconds and hour flashes light press or long press to adjust the current hour Light press VOL again and minute flashes light press or long press to adjust the current minute Light pr...

Page 12: ...he alarm clock makes dudu light press any other button to pause the alarm 11 2 Select automatic power on and then the automatic shutdown time the unit of the selected time is minutes Operations are sh...

Page 13: ...rmally 14 TYPE C USB Charging Computer AUX IN function 14 1 Charging It is recommended to use a charging device whose output voltage is DC5V 1A DC3A to charge the battery Otherwise lithium battery or...

Page 14: ...meters Minimum operating voltage 3 4V External input voltage DC 5v Lithium battery 3 7v 1000mAh TF card playback format Support MP3 WAV WMA formats Maximum capacity supported by TF card 256G Product s...

Page 15: ...is not used for a long time please make sure to charge it once a month Do not expose our product to rain damp or any liquid Do not make our product close to high temperature and heat source do not bar...

Page 16: ...nce by one or more of thefollowing measures Reorient or relocate the receiving antenna Increase the separation between the equipment and receiver Connect the equipment into an outlet on a circuit diff...

Reviews: