background image

ENGLISH

9

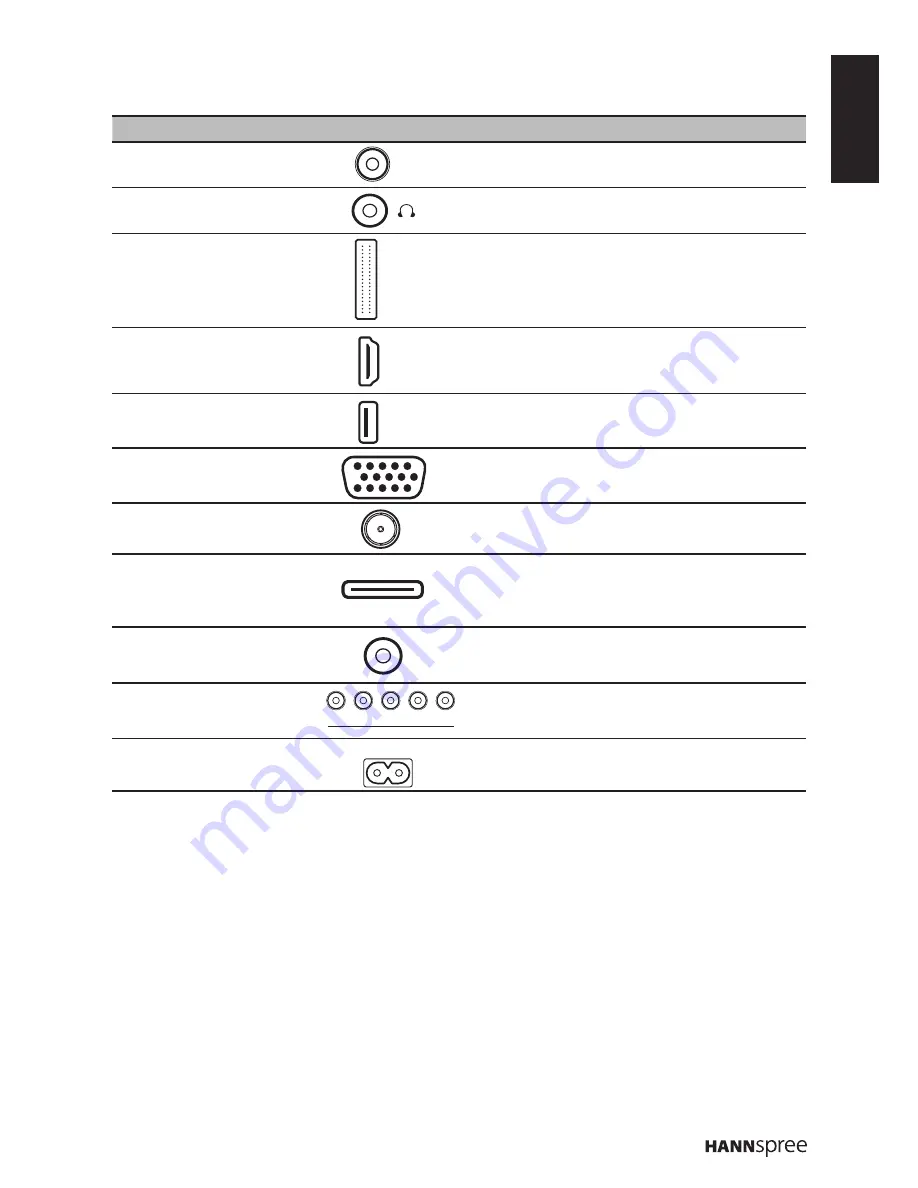
Input and Output Jacks

Please refer to the front cover illustration for the Input & Output location.

No. Description

Connector

Function

1

SPDIF

Connect to a digital audio output device 

such as a home theater.

2

Earphone Output

Connect to earphones or external speakers 

with built-in amplifier.

3

CI

Connect to a CI device.

4

HDMI 1/HDMI 2/

HDMI 3 Input

Connect a HDMI equipment or an HDMI-

DVI adapter cable to devices such as a 

DVD player or set-top box.

5

USB

Connect to a USB device such as a USB 

flash drive or USB hard disk drive.

6

VGA (PC) Input

Connect to a PC’s VGA port.

7

Cable/Antenna

Connect to an antenna or cable TV.

8

SCART Adapter

Connect to an external device, such as 

a VCR, STB, or a DVD player using the 

included SCART adapter cable.

9

VGA Audio Input

Connect to a PC’s line / audio port.

10 Component Inputs 

Connect to an external device, such as a 

VCR, STB, or a DVD player.

11 Power Connector

Connect to the included power cord.

SPDIF

CI SLOT

HDMI 

USB

VGA

DTV/TV

CABLE/ANTENNA

SCART

ADAPTER

VGA

AUDIO

COMPONENT

Y

Pb/Cb

Pr/Cr

R

L

AC IN

Summary of Contents for SL32UMNB

Page 1: ...English Deutsch Fran ais User s Manual LED TV SL Series...

Page 2: ...chasing this Hannspree product For more detailed information please refer to www hannspree com eu HANNspree produces various products If you are interested to know more about that kindly visit www eu...

Page 3: ...tion instructions please refer to the I O port descriptions and function table in the enclosed user s manual COMPONENT Y Pb Cb Pr Cr R L VGA AUDIO SCART ADAPTER DTV TV CABLE ANTENNA VGA SPDIF HDMI 1 H...

Page 4: ...the TV 12 Turning the TV On and Off 12 Running Setup Wizard 12 Selecting Your Content Source 13 Performing an Automatic Channel Search 13 Selecting Channels 13 Adjusting the Volume 13 Setting Up Your...

Page 5: ...contact an authorized service technician If any fluid is sprayed or dropped into the TV contact an authorized service technician The screen of the TV is made of glass Avoid hitting or scraping it If t...

Page 6: ...for identification purpose only and may be the trademarks or registered trademarks of their respective owners The purchase of the product described herein shall not be deemed to grant either directly...

Page 7: ...possibility of such damages in advance Warranty and Service Repair For complete warranty service information please refer to the Warranty Card enclosed with your TV Service and Repair Information for...

Page 8: ...reen display menu system The built in stereo speakers provide full rich sound and a convenient audio output port lets you connect to an external audio system or earphones Features TV Tuner Built in TV...

Page 9: ...asten with a cross screw driver Disconnecting the Stand 1 Carefully place the TV screen side down on a cushioned surface to protect the screen from damage 2 Remove the screws and detach the stand from...

Page 10: ...Metric 6 x 12 mm 200 kg 1 Purchase a VESA compatible wall bracket please refer to the table above 2 Locate your ideal TV position on the wall 3 Fix the wall bracket firmly on the wall 4 Secure the TV...

Page 11: ...e press to turn the TV on 2 Volume adjust Press to increase the volume or move to the right on the OSD menu Press to decrease the volume or move to the left on the OSD menu 3 Menu MENU Press to turn t...

Page 12: ...uch as a DVD player or set top box 5 USB Connect to a USB device such as a USB flash drive or USB hard disk drive 6 VGA PC Input Connect to a PC s VGA port 7 Cable Antenna Connect to an antenna or cab...

Page 13: ...elect a subtitle language available for selected digital TV program 12 Power Press to turn the TV on or off 13 Guide Press to display detailed programming information for channels only for DTV 14 Exit...

Page 14: ...Y Pb Cb Pr Cr L R Use HDMI to connect external devices when available If not available use Component COMPONENT Y Pb Cb Pr Cr R L VGA AUDIO SCART ADAPTER DTV TV CABLE ANTENNA VGA SPDIF HDMI 1 HDMI 2 HD...

Page 15: ...come to use the Wizard for Initial Setup Please press OK to start the wizard Initial Setup Country Please select your country Spain Finland France United Kingdom Italy Back Next Exit Exit Select Initi...

Page 16: ...e control to enter the TV menu 2 Select Tuner mode 3 Select Channel install Automatic search 4 Select Country and press OK 5 Select the signal type 6 Press OK u on the remote control to run the channe...

Page 17: ...r favorite channels 4 Press LIST Exit to exit Adjusting the ECO Dynamic Backlight 1 Press Menu on the remote control to display the main menu 2 Select Picture ECO Dynamic back light 3 Press t u to sel...

Page 18: ...e label will be displayed after the name selected in the source list Changing Your Location 1 Press Menu on the remote control to display the main menu 2 Select Setup Location 3 Press t u to select yo...

Page 19: ...Menu Up P Arrow p Down P Arrow q Select Increase VOL Arrow u Select Decrease VOL Arrow t Return MENU Menu 3 Adjusting On Screen Display OSD Settings Picture Picture Sound TV Setup Parental Picture pre...

Page 20: ...vid Studio Personal Movie Brightness Adjust the base level of the signal in the picture 0 100 Contrast Adjust the gradient of the video signal 0 100 Saturation Adjust the color intensity 0 100 Tint on...

Page 21: ...a preset audio option optimized for different sounding conditions Rock Pop Live Dance Techno Classic Soft Personal Off Balance Adjust the sound balance between the left and right speakers 50 50 Audio...

Page 22: ...search Scan the channel search automatically based on the selected tuner mode Automatic update Update the channel search automatically if you are receiving TV channels with an antenna only on Air mod...

Page 23: ...nding on the input signal source Setup Option Description PAP PAP Enable Disable the PAP feature On Off TV position only available when PAP is set to On Set the TV window position Left Right Subtitle...

Page 24: ...dule is correctly inserted and activated The on screen applications and content are provided by your digital TV service operator Location Set your current location Home Shop Software update Enable you...

Page 25: ...rd Set the new password Confirm password Enter the new password again to confirmation Clean all Reset all parental settings to the factory default settings OK Cancel Note The default password is 1234...

Page 26: ...de show settings 4 Press OK to pause the slide show n Press p q to view the previous or next photo Playback Music 1 Select Media Center Music then press OK to enter the main file content browser 2 In...

Page 27: ...n Use p q t u to adjust the recording duration n Press the green button to stop recording manually Otherwise the recording will stop automatically when the recording duration is complete n The record...

Page 28: ...ance in the Sound menu Cannot receive some TV channels using cable TV Try the Automatic search function in the TV menu Want to reset TV settings Use the Reset function in the TV menu Cannot operate me...

Page 29: ...V V 3 800 x 600 60Hz V V 4 800 x 600 75Hz V V 5 1024 x 768 60Hz V V 6 1024 x 768 75Hz V V 7 1360 x 768 60Hz V 8 1280 x 1024 60Hz V 9 1280 x 1024 75Hz V 10 1600 x 1200 60Hz V 11 1360 x 768 60Hz V 12 1...

Page 30: ...ce Techno Classic Soft Personal Off Picture Format Cinerama 14 9 Zoom 16 9 Zoom 16 9 Zoom up 16 9 format 4 3 format Wide Zoom Zoom 2 Picture Mode ECO Vivid Studio Personal Movie CONNECTION Rear Connec...

Reviews: