background image

User’s Manual 


INPUT as a PC option, and make sure PC audio 
output cable is connected to monitor’s LINE IN 
port(or AUDIO IN port)

. [For HDMI Input only]


Addendum related to Windows 7


When you encounter display problem under Windows 7, you need to do the following: 
 
1.  Make sure your PC computer (Hardware requirement) can support Windows 7. 
2.  Make sure your video card can run Windows 7. 
3.  If your video card can support Windows 7, need to install the latest Win 7 driver of your video 

card. 

 
Suggest to do the following: 
1.  Install the latest Windows 7 video driver of your video card. 
2.  Try to use the recommended display resolution that is supported by the monitor. 
3.  If the recommended display resolution is not working, try the second recommended display 

resolution. 


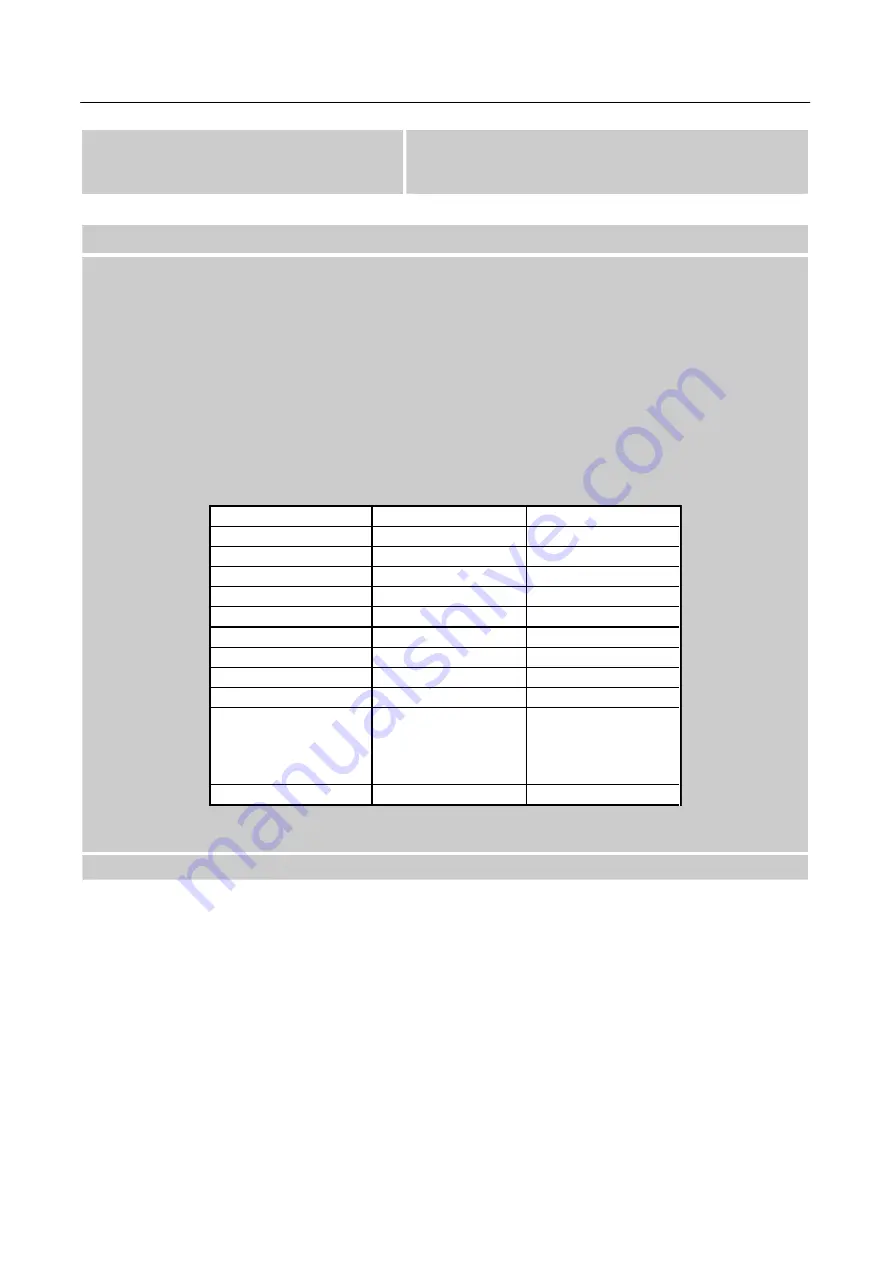
35,56cm / 14” (16:9) 

1366×768@60Hz 

1366×768@50Hz 

39,6cm / 15.6” (16:9) 

1366×768@60Hz 

1366×768@75Hz 

40,64cm / 16” (16:9) 

1366×768@60Hz 

1366×768@50Hz 

43,2cm / 17” (16:10) 

1440×900@60Hz 

1440×900@75Hz 

47cm / 18.5” (16:9) 

1366×768@60Hz 

1366×768@75Hz 

48,3cm / 19” (5:4) 

1280×1024@60Hz 

1280×1024@75Hz 

48,3cm / 19” (16:10) 

1440×900@60Hz 

1440×900@75Hz 

51cm / 20” (16:9) 

1600×900@60Hz 

1600×900@50Hz 

56cm / 22” (16:10) 

1680×1050@60Hz 

1680×1050@50Hz 

54,6cm / 21.5” (16:9) 
58,4cm / 23” (16:9) 
60cm / 23.6” (16:9) 
62,5cm / 24.6 (16:9) 

1920×1080@60Hz 

1920×1080@50Hz 

70cm / 27.5” (16:10) 

1920×1200@60Hz 

1920×1200@50Hz 

And if you still have display problem after doing the above procedure, please visit Hanns.G 
support and Service Website: http://www.hannsg.com
Windows is a registered trademark of Microsoft Corporation. 

20 

Summary of Contents for HK241

Page 1: ...HSG 1221 HK241...

Page 2: ...urning the equipment off and on the user is encouraged to try to correct the interference by one or more of the following measures Reorient or relocate the receiving antenna Increase the separation be...

Page 3: ...recycling of industrial technology devices at the end of life These devices contain recyclable materials which can be re decomposed and re integrated into brand new marvels On the contrary other mater...

Page 4: ...CKAGE 7 INSTALLATION INSTRUCTIONS 8 POWER 8 SETTING THE MONITOR ON THE WALL 9 MAKING CONNECTIONS 10 ADJUSTING THE VIEWING ANGLE 11 OPERATING INSTRUCTIONS 12 GENERAL INSTRUCTIONS 12 FRONT PANEL CONTROL...

Page 5: ...kit approved by the manufacturer and follow the kit instructions Slots and openings in the back and bottom of the cabinet are provided for ventilation To ensure reliable operation of the monitor and...

Page 6: ...ll of the time Due to the nature of the LCD screen an afterimage of the previous screen may remain after switching the image when the same image is displayed for hours In this case the screen is recov...

Page 7: ...ndows EPA ENERGY STAR GP Green Product Ergonomic Design Space Saving Compact Case Design CHECKING THE CONTENTS OF THE PACKAGE The product package should include the following items LCD Monitor Cables...

Page 8: ...re that the clips are fully engaged in the base REMOVAL 1 Flip over the monitor so that it is upside down 2 Press the 1 clip on the base that holds the monitor in place 3 Gently press and hold the 1 c...

Page 9: ...sing the 4 mount holes on the back and center of the Monitor Note Please read the instructions of your specific wall bracket to properly wall mount the Monitor The pitch of the mounting holes is 100mm...

Page 10: ...t one end of the DVI cable optional to the back of the monitor and connect the other end to the computer s DVI port 3 Connect the audio cable between the monitor s audio input and the PC s audio outpu...

Page 11: ...d the stand so you do not topple the monitor when you change the monitor s angle You are able to adjust the monitor s angle from 5 to 15 Figure 3 Monitor Angle NOTES Do not touch the LCD screen when y...

Page 12: ...picture can be adjusted to your personal preferences The power cord should be connected Connect the Signal cable from the monitor to the VGA card Press the power button to turn on the monitor The powe...

Page 13: ...elections may very depending on the models This function is only available in models with digital inputs 2 The OSD menu is used as confirmation function during start up 3 Press and hold this button mo...

Page 14: ...such as radiators or air dusts or in a place subject to direct sunlight or excessive dust or mechanical vibration or shock Save the original shipping box and packing materials as they will come in han...

Page 15: ...ct the INPUT SETTING option to change between analog VGA or Digital DVI source Enter the option and select Analog or Digital Dual input mode optional AUTO SEARCH From the Signal Selection menu select...

Page 16: ...just the sharpness of the display Set the value from 2 to 2 VIDEO MODE Choose VIDEO MODE or PC MODE for video transmission While using HDMI or HDMI to DVI ports for video transmission the video will a...

Page 17: ...or AUDIO IN port For HDMI Input only VOLUME Select the VOLUME option to change the volume level Enter the option and adjust the level This function applies only to models with incorporated audio By hi...

Page 18: ...ity and depending on the level of DDC used communicate additional information about its display capabilities The DDC2B is a bidirectional data channel based on the I C protocol The host can request ED...

Page 19: ...ke sure computer is operational by hitting the CAPS LOCK key on the keyboard while observing the CAPS LOCK LED The LED should either turn ON or OFF after hitting the CAPS LOCK key Missing one of the p...

Page 20: ...itor 3 If the recommended display resolution is not working try the second recommended display resolution 1 2 35 56cm 14 16 9 1366 768 60Hz 1366 768 50Hz 39 6cm 15 6 16 9 1366 768 60Hz 1366 768 75Hz 4...

Page 21: ...004 4 640 480 67Hz 35 000 66 667 5 640 480 72Hz 37 861 72 809 6 640 480 75Hz 37 500 75 000 7 720 400 70Hz 31 469 70 087 8 800 600 56Hz 35 156 56 250 9 800 600 60Hz 37 879 60 317 10 800 600 72Hz 48 077...

Page 22: ...67 500 60 000 Video mode MODE RESOLUTION 1 640 480p 60Hz 2 720 480p 60Hz 3 720 576p 50Hz 4 1280 720p 60Hz 5 1920 1080i 50Hz 6 1920 1080i 60Hz 7 1920 1080p 50Hz 8 1920 1080p 60Hz We ensure that the mo...

Page 23: ...Power 1 5 W rms Per channel Input Terminal VGA DVI Maximum Screen Size Hor 521 28mm Ver 293 22mm Power Source 100 240V 1 0A 50 60Hz Environmental Considerations Operating Temp 5 to 35 C Storage Temp...

Reviews: