background image

17

16

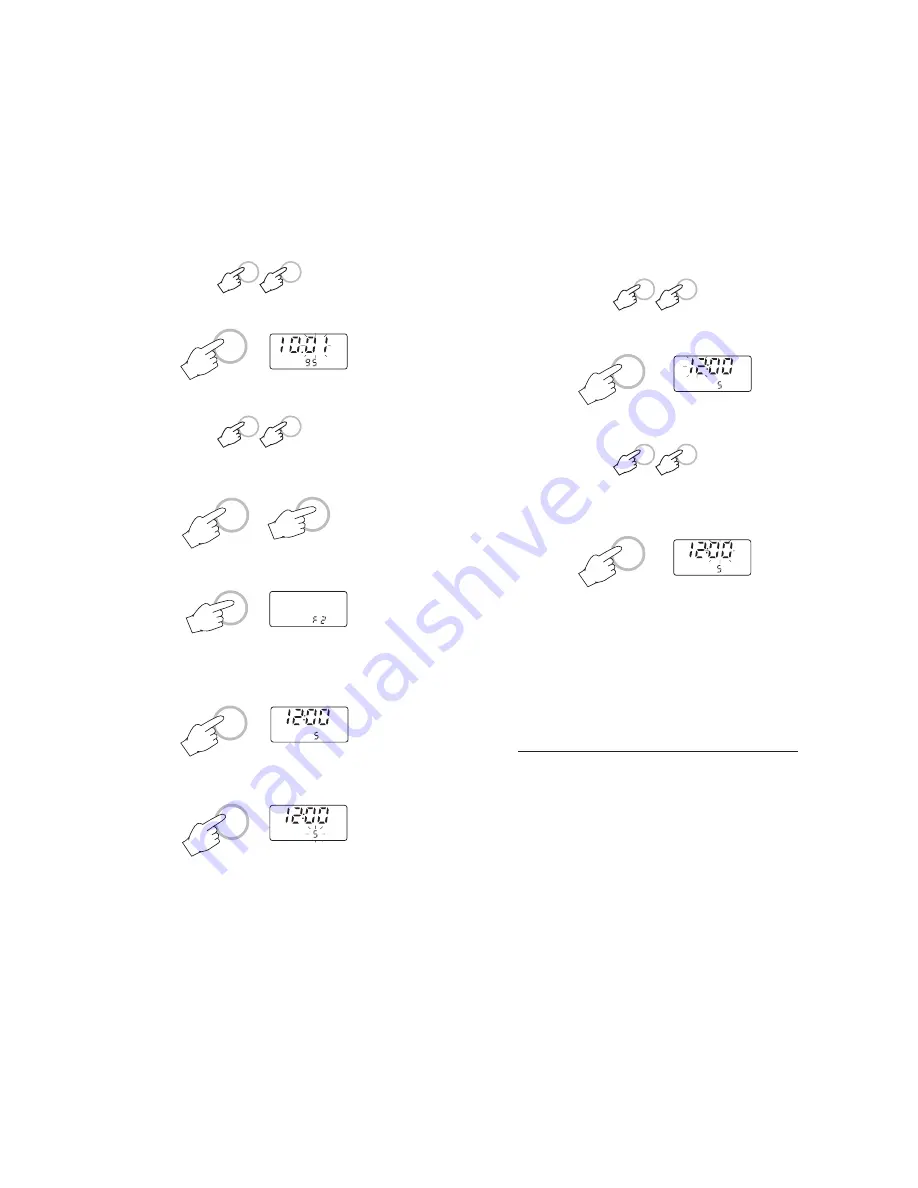
To select the hour, press the UP or DOWN
keys (24 hour clock).

Press CAL and the minutes will start blinking.

Use UP or DOWN keys to set the minutes.

Press the CAL key to confirm the selected
time and printing interval.

Press the FUNCTION key to leave the time
setting mode.
Press the FUNCTION key again to display
D.O. readings.
Selected time, date and printing interval are
now stored in the memory even when the
display is switched off.

TO VIEW DATE / TIME / TEMPERATURE

To view the temperature, press FUNCTION.

To view the date, press the FUNCTION key
to display "F1" and then press CAL.

To view the time, press the FUNCTION key
until the display shows "F2" and then press
CAL. This also displays the selected prinitng
interval.

Press the FUNCTION key until the display
returns to the D.O. readings.

TIME

INTV

TIME

INTV

CAL

CAL

UP

DOWN

Set the month with the UP or DOWN keys.

Press CAL, and the day will start blinking.

Use the UP or DOWN keys to set the day.

Press CAL to confirm the selected date, then
FUNCTION to leave the date setting mode.

Press FUNCTION key again to display  "F2".

Press CAL and the display will show the
time and printing interval setting.

Press the CAL key again and the printing
interval will start blinking.

Any interval can be selected from among 1,
2, 5, 10, 15, 30, 60, 120 or 180 minutes by
using the UP and DOWN keys.
Set the desired interval by pressing the CAL
key once and the hour starts blinking.

UP

DOWN

DATE

TIME

INTV

TIME

INTV

UP

DOWN

CAL

FUNCTION

FUNCTION

CAL

CAL

CAL

UP

DOWN

Summary of Contents for HI 91410

Page 1: ...nual HI 9141 HI 91410 Printing and Logging Dissolved Oxygen Meters ON OFF PAPER FUNCTION UP DOWN CAL PRINT LOG MICROPROCESSOR LOGGING DISSOLVED OXYGEN METER HI 91410 RANGE O2 0 19 99ppm w w w h a n n...

Page 2: ...Calibration 11 Taking Measurements 13 Setting Date Time Printing Interval 15 Printing Recording with HI9141 18 Printing Logging with HI91410 20 Altitude Compensation 24 Salinity Compensation 25 Temper...

Page 3: ...em for elaboration or perma nent storage An optional HI 9200 infrared transmitter can be used to take the data from HI 91410 and send it to a computer without any cords Simply place the meter on the c...

Page 4: ...9 10 4 5 3 2 1 MICROPROCESSOR LOGGING DISSOLVED OXYGEN METER HI 91410 RANGE O2 0 19 99ppm C 0 50 0 C FUNCTIONAL DESCRIPTION HI9141 1 Probe and power adapter sockets 2 UP key to set date time printing...

Page 5: ...ours of non use However the meter will continue to monitor the dissolved oxygen and temperature if in recording logging mode ON OFF SPECIFICATIONS Range 0 00 to 19 99 ppm mg L O2 0 0 to 50 0 C Resolut...

Page 6: ...p erly polarized Switch the meter on by pressing ON OFF The Cond message appears on the dis play to inform that the probe is in auto conditioning polarization mode Once the Cond disappears the instru...

Page 7: ...e is only several degrees ppm READINGS The meters display the con centration of the dissolved oxy gen directly in ppm mg L If the sample contains significant salinity concentration or measurements are...

Page 8: ...in such conditions see Alti tude Compensation and Salinity Compen sation sections for details Remember to set altitude and or salinity be fore taking ppm measurements and the meter will automatically...

Page 9: ...F2 and then press CAL This also displays the selected prinitng interval Press the FUNCTION key until the display returns to the D O readings TIME INTV TIME INTV CAL CAL UP DOWN Set the month with the...

Page 10: ...the RECORD key before set ting the new interval TO STOP RECORDING In order to quit the recording mode press the RECORD key This will generate a recording exit status printout 10 01 96 07 0005M 0016 16...

Page 11: ...e in ppm e Temperature value in C LOGGING MODE This function is suggested when remote mea surements have to be taken automatically without the necessity of an operator and for a long period of time In...

Page 12: ...ng with logging with print ing make sure there is enough paper for your measurements When the paper is finished the meter will not advise the op erator and the printouts could be lost Anyway data will...

Page 13: ...0 4 9 9 9 7 9 2 8 8 8 4 8 1 7 8 7 5 7 2 7 1 6 9 6 6 6 4 6 2 600 m 13 6 12 9 12 2 11 6 11 0 10 5 10 1 9 6 9 2 8 7 8 5 8 1 7 8 7 5 7 3 7 0 6 8 6 6 6 3 6 2 6 0 1200 m 12 7 12 0 11 4 10 8 10 3 9 8 9 4 9 0...

Page 14: ...nse carefully with distilled or deionized water If any imperfection still exists or any damage is evident such as wrinkles or tears holes the membrane should be replaced Make sure that the O Ring sits...

Page 15: ...is dis played on the secondary LCD Place the instrument on the HI 9200 infrared transmitter ensuring that the infrared LEDs of meter and interface match The memory can be downloaded to your PC through...

Page 16: ...logging period starts it automatically starts from a new page If LOGGING is still on and the available page is 0 the meter will overwrite the first LOT DATA in the existing meter memory During loggin...

Page 17: ...at tention to the cor rect polarity A 12 Vdc power source can also be used to power the unit Note The instrument uses the following con figuration It is recommended to use the HANNA HI710005 or HI7100...

Page 18: ...s requiring the operator to take all necessary steps to correct interferences Any variation introduced by the user to the supplied equipment may degrade the instrument s EMC performance To avoid elect...

Page 19: ...942 Japan Tel 03 3258 9565 Fax 03 3258 9567 Korea Tel 02 2278 5147 Fax 02 2264 1729 Malaysia Tel 603 5638 9940 Fax 603 5638 9829 Singapore Tel 6296 7118 Fax 6291 6906 SouthAfrica Tel 011 615 6076 Fax...

Reviews: