


iii
Important Safety Instructions
Please read the following instructions carefully. This manual should be retained
for future use.
1.
To clean the LCD Monitor screen, first, make sure the Monitor is in the
power off mode. Unplug the Monitor from its power source before cleaning
it. Do not spray liquid cleaners directly onto the unit. Stand away from the
LCD Monitor and spray cleaning solution onto a rag. Without applying ex-
cessive pressure, clean the screen with the slightly dampened rag.
2.
Do not place your LCD Monitor near a window. Exposing the Monitor to
rain, water, moisture or sunlight can severely damage it.
3.
Do not place anything on top of the Monitor-to-PC signal cord. Make sure
the cord is placed in an area where it will not be stepped on.
4.
Do not apply pressure to the LCD screen. Excessive pressure may cause
permanent damage to the display.
5.
Do not remove the cover or attempt to service this unit by yourself. You
may void the warranty. Servicing of any nature should be performed only
by an authorized technician.
6.
Safe storage of the LCD Monitor is in a range of -20°C to +60°C (-4°F ~
140°F). Storing your LCD Monitor outside this range could result in per-
manent damage.
7.
If any of the following occurs, immediately unplug your Monitor and call an
authorized technician.
•
The power or Monitor-to-PC signal cord is frayed or damaged.
•
Liquid has been spilled onto the Monitor, or it has been exposed to rain.
•
The Monitor has been dropped or the case has been damaged.
8.
Only with use of supplied adaptor, in case of loss or replacement contact the
retailer or service center.
Summary of Contents for L-1933
Page 1: ......
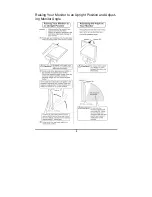
Page 11: ...5 Raising Your Monitor to an Upright Position and Adjust ing Monitor Angle...
Page 24: ...i LCD Copyright 2003 FCC FCC 15 1 2 FCC FCC 15 Class B...
Page 27: ...iv 1 2 3 4 5 6 1 7 EMI...
Page 28: ...v I V 1 1 1 2 2 LCD 3 4 AC 6 6 2 7 LCD 7 7 A 13 LCD 13 B 15 C 16 16...
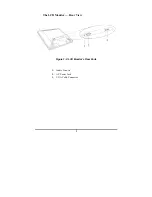
Page 29: ...1 1 LCD LCD LCD 15 Pin LCD...
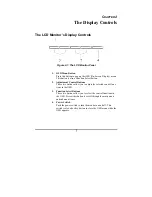
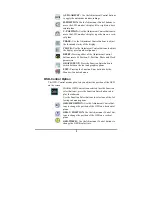
Page 30: ...2 1 1 1 FUNCTION 2 OSD 2 ADJUST 3 ADJUST 3 ADJUST 4 ADJUST 5 OSD...
Page 31: ...3 LCD 1 2 LCD 1 LCD 2 AC AC 3 VGA 15 D Sub VGA VGA...
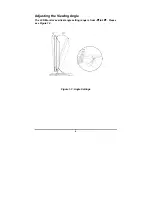
Page 32: ...4 LCD LCD 3 20 1 3 1 3 LCD LCD...
Page 33: ...5...
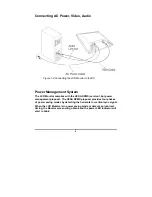
Page 34: ...6 AC 1 4 LCD PC LCD VESA DPMS 1 0p VESA DPMS LCD LED...
Page 35: ...7 2 LCD LCD OSD OSD OSD LCD LCD LCD OSD 2 1 1 OSD 2 ADJUST 3 FUNCTION 4 POWER 1 1...
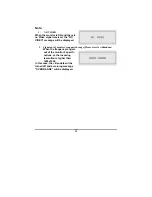
Page 40: ...12 Note 1 NO VIDEO 2 1280x1024 OVER RANGE...
Page 44: ...16 C VGA VGA VGA LCD VGA LCD VGA 1 Windows 2 OSD Clock 3 4 Phase...
Page 45: ...17 LCD 1 2 2 3 CRT CRT LED VGA VGA 4 CRT BIOS BIOS Dual Scan CRT 5 LED AC AC LED AC LED...
Page 53: ...5...
Page 73: ...5 Anheben des Monitors zur aufrechten Position und Einstellen des Monitorwinkels...
Page 86: ...18 Adapters nicht leuchtet wenden Sie sich bitte an Ihren H ndler f r Hilfe...
Page 94: ...5...
Page 114: ...5...
Page 127: ...i LCD Copyright 2003 FCC FCC 15 1 2 FCC FCC 15 Class B...
Page 130: ...iv 1 2 3 4 5 6 1 7 EMI...
Page 131: ...v I V 1 1 1 2 2 LCD 3 4 AC 6 6 2 7 LCD 7 7 A 13 LCD 13 B 15 C 16 16...
Page 132: ...1 1 LCD LCD LCD 15 Pin LCD...
Page 133: ...2 1 1 1 FUNCTION 2 OSD 2 ADJUST 3 ADJUST 3 ADJUST 4 ADJUST 5 OSD...
Page 134: ...3 LCD 1 2 LCD 1 LCD 2 AC AC 3 VGA 15 D Sub VGA VGA...
Page 135: ...4 LCD LCD 3 20 1 3 1 3 LCD LCD...
Page 136: ...5...
Page 137: ...6 AC 1 4 LCD PC LCD VESA DPMS 1 0p VESA DPMS LCD LED...
Page 138: ...7 2 LCD LCD OSD OSD OSD LCD LCD LCD OSD 2 1 1 OSD 2 ADJUST 3 FUNCTION 4 POWER 1 1...
Page 143: ...12 Note 1 NO VIDEO 2 1280x1024 OVER RANGE...
Page 147: ...16 C VGA VGA VGA LCD VGA LCD VGA 1 Windows 2 OSD Clock 3 4 Phase...
Page 148: ...17 LCD 1 2 2 3 CRT CRT LED VGA VGA 4 CRT BIOS BIOS Dual Scan CRT 5 LED AC AC LED AC LED...
Page 149: ......


