background image

3 - 18

Rev D

11/20/2007

 Dolphin® 7600 User’s Guide

Managing Main Battery Power

Data and files saved on the Dolphin terminal may be stored in RAM memory; therefore, maintain a continuous power supply to 
the terminal to help prevent data loss. When you remove a battery pack, insert another charged battery pack in the Dolphin. If 
the main battery pack is low, insert the terminal into a charging peripheral to power the terminal and begin recharging the battery.

Note: If the main battery is low and the terminal is in suspend mode, pressing the SCAN button does not wake the Dolphin 

terminal; you must replace the discharged battery with a fully charged battery.

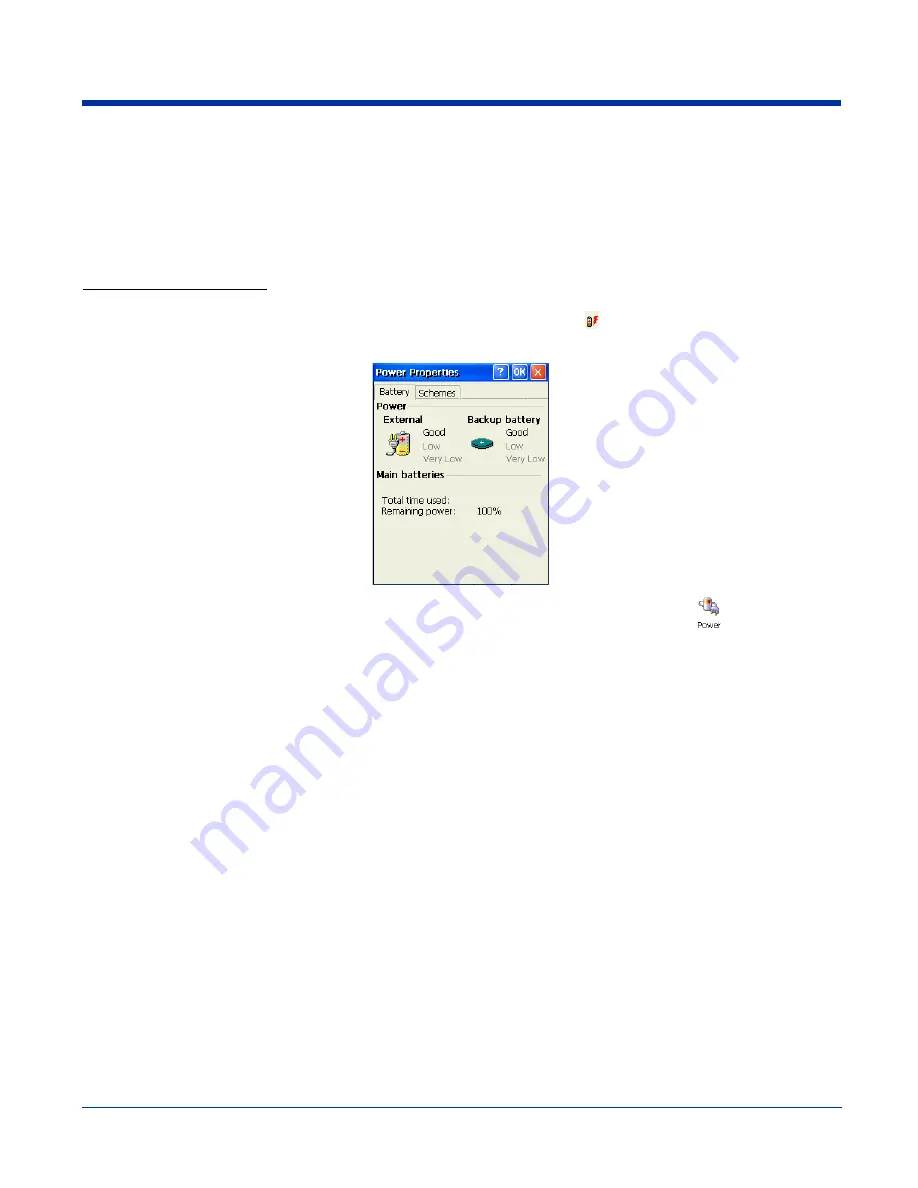
Checking Battery Power

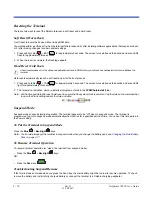
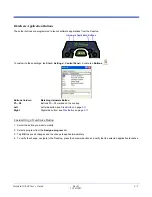
Power icons appear in the command bar at the bottom of the window. For example, 

 indicates a low battery. Double-tap on 

this icon at any time to open the Power system setting. The Battery tab opens displaying the charge status of both the main and 
backup batteries.   

Note: To manually check battery power, also tap Start > Settings > Control Panel > double-tap Power 

Storage Guidelines

To maintain optimal battery performance, follow these storage guidelines:

Avoid storing batteries outside the specified range of -4 to 122° F (-20 to 50°C) or in extremely high humidity.

For prolonged storage, do not keep batteries stored in a charger that is connected to a power source. 

Guidelines for Battery Use and Disposal

The following are general guidelines for the safe use and disposal of batteries:

Use only the battery supplied, recommended, or approved by Hand Held Products. 

Replace defective batteries immediately; using a defective battery could damage the Dolphin terminal.

Never throw a used battery in the trash. It contains heavy metals and should be recycled according to local guidelines. 

Don’t short-circuit a battery or throw it into a fire. It can explode and cause severe personal injury.

Excessive discharge damages a battery. Recharge the battery when your terminal indicates low battery power.

Although your battery can be recharged many times, it will eventually be depleted. Replace it after the battery is unable to 
hold an adequate charge.

If you are not sure the battery or charger is working properly, please send it to Hand Held Products or an authorized Hand 
Held Products service center for inspection.

Summary of Contents for 7600BP-112-B6EE - Hand Held Products Dolphin 7600

Page 1: ...with Microsoft Windows CE 5 0 User s Guide ...

Page 2: ...rotected by copyright All rights are reserved No part of this document may be photocopied reproduced or translated into another language without the prior written consent of Hand Held Products 2007 Hand Held Products Inc All rights reserved Web Address www handheld com Trademarks Dolphin Dolphin RF HomeBase Mobile Base and QuadCharger are trademarks or registered trademarks of Hand Held Products I...

Page 3: ... Features 3 10 Side Panel Features 3 11 Top Panel Features 3 12 Installing Memory Cards 3 12 Bottom Panel Features 3 14 Using the Accessory Attachment 3 15 Attaching a Belt Clip 3 15 Attaching the Hand Strap 3 15 Dolphin 7600 Peripherals 3 16 Dolphin 7600 Accessories 3 16 Battery Power 3 17 Resetting the Terminal 3 20 Soft Reset Warm Boot 3 20 Hard Reset Cold Boot 3 20 Suspend Mode 3 20 Changing t...

Page 4: ...ologies 5 2 Activating the Engine 5 3 Decoding 5 3 Capturing Images 5 5 Chapter 6 Communication Communication Options 6 1 Installing Additional Software 6 1 Connecting the USB Cable 6 2 ActiveSync Communication 6 3 Wireless Radios 6 6 Connecting the Terminal to a Wireless Network 6 6 WLAN 802 11b g Radio 6 6 Adding Programs From the Internet 6 7 Infrared Communication 6 8 Chapter 7 Bluetooth Manag...

Page 5: ...adCharger 9 2 Battery Charging 9 3 Recommendations for Storing Batteries 9 3 Mounting the QuadCharger 9 4 Troubleshooting 9 5 Dolphin QuadCharger Technical Specifications 9 6 Chapter 10 Dolphin Mobile Mount Overview 10 1 Mounting 10 3 Chapter 11 Customer Support Product Service and Repair 11 1 Online Product Service and Repair Assistance 11 1 Technical Assistance 11 2 Online Technical Assistance 1...

Page 6: ...vi Rev D 11 20 2007 Dolphin 7600 User s Guide ...

Page 7: ...in Text Dolphin 7600 Terminals with 802 11b g and or Bluetooth Dolphin 7600 RF terminals are designed to comply with the most current applicable standards on safe levels of RF energy developed by the Institute of Electrical and Electronics Engineers IEEE and the American National Standards Institute ANSI and has been recommended for adoption by the Federal Communications Commission FCC Compliance ...

Page 8: ...t This device has been tested in accordance with and complies with IEC60825 1 1993 A1 A2 and 21 CFR 1040 10 and 1040 11 except for deviations pursuant to Laser Notice No 50 dated July 26 2001 LASER LIGHT DO NOT STARE INTO BEAM CLASS 2 LASER PRODUCT 1 0 mW MAX OUTPUT 650nM Caution use of controls or adjustments or performance of procedures other than those specified herein may result in hazardous r...

Page 9: ...se the separation between the equipment and receiver Connect the equipment into an outlet on a circuit different from that to which the receiver is connected Consult the dealer or an experienced radio TV technician for help If necessary the user should consult the dealer or an experienced radio television technician for additional suggestions The user may find the following booklet helpful Somethi...

Page 10: ...ved including interference that may cause undesired operation To prevent radio interference to the licensed service this device is intended to be operated indoors and away from windows to provide maximum shielding Equipment or its transmit antenna installed outdoors is subject to licensing Cet appareil numérique de la Classe B est conforme à la norme NMB 003 du Canada For European Community Users ...

Page 11: ...dhere to the IEC 601 1 2 standard This standard requires devices to operate properly in an EM Field with a strength of 3V m over a frequency range of 26 to 1000MHz The maximum allowable field strength emitted by the Dolphin is 0 3V m according to Subpart B of Part 1 of the FCC rules Therefore the Dolphin RF has no effect on medical devices that meet the IEC specification Microwaves The radio in th...

Page 12: ...1 6 Rev D 11 20 2007 Dolphin 7600 User s Guide ...

Page 13: ...esult in damage to the Dolphin terminal or bat Step 2 Charge the Batteries Use only the peripherals power cables and power adapters from Hand Held Products Use of peripherals cables or power adapters not sold manufactured by Hand Held Products will void the warranty and may damage the terminal 2 1 Dolphin terminals ship with both the main battery pack and internal backup battery significantly disc...

Page 14: ...tem functions and programs Icons in the Command Bar The Command Bar see page 2 2 contains a number of icons that indicate the status of various functions on the terminal Status Icon Meaning Opens the Start menu Icons Between the Arrows Because there may be more icons than the device can display use the left and right arrows to scroll through the icons Accesses the Bluetooth radio Single tap this i...

Page 15: ...ograms To open a program tap the icon on the menu Pop Up Menus With pop up menus you can quickly choose an action for an item 1 Tap and hold the stylus on the item name The pop up menu appears 2 Lift the stylus and tap the action you want to perform The contents of pop up menus change according to the program you re in The USB communication cable is connected Indicates the status of battery power ...

Page 16: ...rer Use Windows Explorer to navigate through the files on your system On the desktop double tap the My Device icon and Windows Explorer opens to the root level Move files by tapping and holding on the file then tapping Cut Copy or Paste on the pop up menus that appear ...

Page 17: ...ung 2440 400 MHz 64MB RAM X 128 MB non volatile Memory 29 key numeric keyboard or 38 key alpha keyboard 2 8 1 4 VGA TFT color display Li ion battery 3 7V 2200 mAh 8 1 Wh 5300SR image engine Bluetooth radio Dolphin power cable each Dolphin 7600 device comes with this power cable in the box Microsoft Windows CE 5 0 Samsung 2440 400 MHz 128MB RAM X 128 MB non volatile Memory 29 key numeric keyboard o...

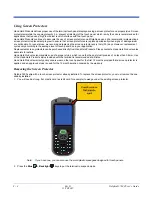
Page 18: ...uch screen lens The 2 8 1 4 VGA Video Graphic Array is TFT Thin Film Transistor color backlit and the resolution is 240 x 320 see Display Backlight on page 3 3 Dolphin 7600 devices ship with a screen protector already installed over the touch screen lens to help prevent damage to the touch screen Do NOT remove this screen protector before initial use Hand Held Products recommends using screen prot...

Page 19: ...is programmed to turn off after a specified period of time that the device is idle To change the default timeout parameters tap Start Settings Control Panel Display Backlight tab To adjust the intensity of the backlight tap Start Settings Control Panel double tap Backlight Move the slider to adjust the backlight ...

Page 20: ...your application Replacement screen protectors can be purchased directly from Hand Held Products Please contact a Hand Held Products sales associate for details Hand Held Products also mandates use of a proper stylus which is one that has a stylus tip radius of no less than 0 8mm Use of the Hand Held Products stylus included with the terminal is recommended at all times Hand Held Products warranty...

Page 21: ...per right corner of the touch panel Catch the edge of the screen protector and pull it up and away from the touch panel 4 Wipe the screen with a clean non abrasive lint free cloth Note Use ionized air if available to blow additional dirt or particles off the touch panel Touch Panel Screen Protector Credit Card ...

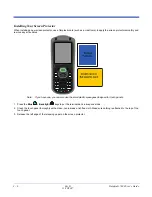
Page 22: ...ly and remove any air bubbles Note If you have one you can also use the small plastic squeegees designed for touch panels 1 Press the Blue Backlight keys to put the terminal back in suspend mode 2 Clean the touch panel thoroughly with a clean non abrasive lint free cloth Make sure nothing is attached to the top of the touch panel 3 Release the left edge of the releasing paper on the screen protect...

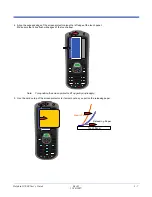
Page 23: ...ong the left edge of the touch panel Make sure that it lies flush with edges of the touch panel Note To reposition the screen protector lift up gently and reapply 5 Use the card on top of the screen protector to it smooth out as you pull on the releasing paper Touch Panel Releasing Paper Credit Card ...

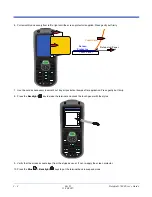
Page 24: ...h out any air pockets or bumps after application Press gently but firmly 8 Press the Backlight key to wake the terminal and check the touch panel with the stylus 9 Verify that the screen accepts input from the stylus as usual If not re apply the screen protector 10 Press the Blue Backlight keys to put the terminal back in suspend mode Touch Panel Screen Protector Releasing Paper Credit Card ...

Page 25: ...reen protector with a clean non abrasive lint free cloth 12 Press the Backlight key to wake the terminal again 13 For maximum performance recalibrate the screen Tap Start Control Panel double tap Stylus Calibration tab 14 Tap Recalibrate and follow the instructions on the screen ...

Page 26: ...or information about installing the battery see Changing the Main Battery Pack on page 3 17 For information about battery power see Battery Power on page 3 17 Speaker The integrated speaker sounds audio signals as you scan bar code labels and enter data but emits no ambient noise on system activity i e processor memory access radio traffic etc The speaker can also be used for playing sounds e g WA...

Page 27: ...cess IrDA communication functionality in the Bluetooth Manager For more information see Infrared Communication on page 6 8 Side Button There is a button like this on both side panels By default these buttons wake the terminal from suspend mode unless you are in a scanning application in which case these buttons activate the image scan engine Scanning with the side buttons can be a more comfortable...

Page 28: ...age engine reads and decodes most popular bar code symbologies and takes images like a digital camera For more information see Using the Image Engine on page 5 1 Installing Memory Cards The Dolphin 7600 supports Secure Digital SD memory cards of the following capacities 256 MB 512 MB 1 GB 2 GB To install an SD card you must open the access door on the top panel Top Panel Features page 3 12 Note Ac...

Page 29: ...The rubber gasket and surrounding O ring inside the access door are required for 1 proper functioning of the SD card and 2 preserving the environmental rating for water sealing Do not remove the gasket or the O ring Do NOT resume terminal operation while the access door is open Operating the terminal while the access door is open will void the warranty The access door must be properly sealed befor...

Page 30: ...rs the terminal charges the main battery and facilitates communication This connector supports full speed USB 1 1 communication up to 12 Mbps and RS 232 communications with a maximum speed of 115Kbps and seven baud rate settings Through this connector you can communicate with a host workstation via Microsoft ActiveSync see ActiveSync Communication on page 6 3 The I O connector supports the followi...

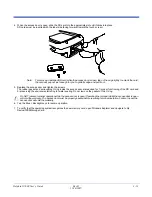
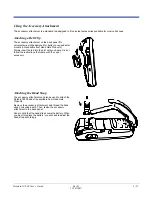
Page 31: ...and Held Products Simply insert the tab into the slot until you hear a click or follow the instructions that came with the clip or accessory Attaching the Hand Strap The accessory attachment can also be used to attach the Dolphin 7600 hand strap available from Hand Held Products Remove the accessory attachment and thread the hand strap hook underneath Then fasten the accessory attachment to the ba...

Page 32: ...ormation see Dolphin HomeBase on page 8 1 Dolphin QuadCharger The Dolphin QuadCharger is a four slot charging station for Dolphin Li ion battery packs that can charge each battery in less than four hours For more information see Dolphin QuadCharger on page 9 1 Dolphin 7600 Accessories Each of the following items is sold separately to enhance your Dolphin 7600 terminal s capabilities Protective Enc...

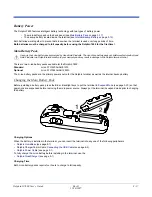
Page 33: ...o Li ion battery packs available for the Dolphin 7600 Standard Li ion 3 7V 2200mAh 8 1Wh Optional Li ion 3 7V 3240mAh 12 0Wh The Li ion battery packs are the primary power source for the Dolphin terminal as well as the internal backup battery Changing the Main Battery Pack Before installing a battery pack press the Blue Backlight keys to put the terminal in Suspend Mode see page 3 20 so that opera...

Page 34: ...rage Guidelines To maintain optimal battery performance follow these storage guidelines Avoid storing batteries outside the specified range of 4 to 122 F 20 to 50 C or in extremely high humidity For prolonged storage do not keep batteries stored in a charger that is connected to a power source Guidelines for Battery Use and Disposal The following are general guidelines for the safe use and disposa...

Page 35: ...ld boots when you install a fully charged battery pack and you need to reset the real time clock Charging The internal backup battery charges off the main battery pack and requires eight hours charge time to backup RAM data for 30 minutes You can begin using the Dolphin terminal after charging the main battery for four hours however the internal backup battery will continue to charge off the main ...

Page 36: ...e seconds 2 The terminal re initializes which re installs all programs stored in the IPSM Autoinstall folder Note Set the time and date after each hard reset to ensure that the system clock is accurate Tap the date on the command bar to open the Clock setting and set the time and date Suspend Mode Suspend mode suspends terminal operation The terminal appears to be off when in suspend mode The term...

Page 37: ...the data programs registry files and settings stored in this folder persist through cold boots and are not erased Store those items you would like to keep stored in the terminal on a permanent basis in this folder To access the IPSM folder tap Start Programs Windows Explorer IPSM The Format IPSM setting formats the IPSM file system Think of this like format c on your desktop it will erase all the ...

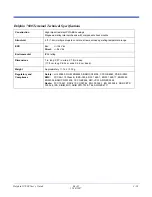
Page 38: ...gine 5300SR VGA Area Imager with High Vis bracket aimer Keyboards 29 key numeric keyboard with shifted alpha and six 6 programmable keys 38 key alpha keyboard with shifted numeric and two 2 programmable keys Backlit Sound Voice On board speaker and microphone and compatible with standard headsets Communications RS 232 USB connector IrDA port Power Li ion battery 3 7V 2200 mAh 8 1 Wh standard Li io...

Page 39: ...ing Dimensions 7 in long X 2 7 in wide X 1 8 in deep 17 8 cm long X 6 9 cm wide X 4 6 cm deep Weight Approximately 11 7 oz 332 g Regulatory and Compliance Safety cUL 60950 NOM EN60950 BSMI CN14336 CCC GB4943 PSB SIRIM EMC FCC Part 15 Class B ICES 003 EN 301 489 1 EN 301 489 17 EN55022 EN55024 BSMI CNS13438 CCC GB9254 MIC VCCI AS NZS 3548 Radio FCC 15 247 RSS 210 COFETEL EN 300 328 1 EN 300 328 2 S...

Page 40: ...3 24 Rev D 11 20 2007 Dolphin 7600 User s Guide ...

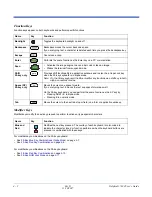
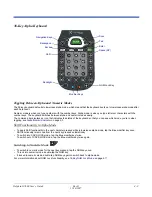
Page 41: ...he overlay for maximum durability and the panel is backlit for maximum viewability in various lighting conditions Suspend Resume Both keyboards provide multiple ways to suspend resume terminal operation Suspend Blue Backlight Resume Backlight Scan SCAN PG PG 1 ESC SFT TAB GHI 4 7 PQRS BKSP 0 START SP 8 TUV JKL 5 2 ABC 9 WXYZ 6 MNO DEF 3 29 Key Numeric Keyboard 38 Key Alpha Keyboard ...

Page 42: ...e same function as the Enter key on a PC or workstation Scan Activates the image engine to scan a bar code or take an image Wakes the terminal from suspend mode Shift 29 key only Provides shift functionality in application windows and is also the a Caps Lock key when the 29 key keyboard is in alpha mode Note On the 38 key keyboard the Blue modifier key functions as a shift key in both alpha an num...

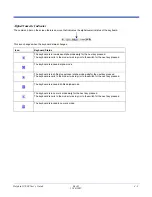
Page 43: ... keyboard reverts to the mode it was in prior to the switch for the next key pressed The keyboard is locked in alpha mode The keyboard is in shifted uppercase alpha mode only for the next key pressed The keyboard reverts to the mode it was in prior to the switch for the next key pressed The keyboard is locked in shifted alpha mode The keyboard is in numeric mode only for the next key pressed The k...

Page 44: ...ey Description Move the cursor up one row or line Move the cursor down one row or line Volume up or down Scroll page up or down Move the cursor one character to the right Move the cursor one character to the left SCAN PG PG 1 ESC SFT TAB GHI 4 7 PQRS BKSP 0 START SP 8 TUV JKL 5 2 ABC 9 WXYZ 6 MNO DEF 3 Backlight Modifier Keys Escape Navigation Keys Tab Shift Enter Scan Hardware Application Buttons...

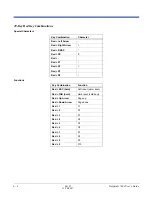
Page 45: ...4 Buttons P1 P4 marked on the overlay Left Left side button see Side Button on page 3 11 Right Right side button see Side Button on page 3 11 Customizing a Hardware Button 1 Select the button you want to modify 2 Select a program from the Assign a program list 3 Tap OK to save all changes and the change is applied immediately 4 To verify the change navigate to the Desktop press the hardware button...

Page 46: ... permanently Alpha Indicators Each number key has a blue section with white characters inside it that indicate which letter or symbol is typed when you press that key in alpha mode Please note that when typing in alpha mode you must use the same multi press method you would use when typing letters on a phone keypad Each key press types the next letter in the sequence as displayed by the alpha indi...

Page 47: ... is in numeric mode tap the Blue key once to achieve the following 29 Key Shift Functionality in Numeric Mode When the keyboard is in numeric mode the default state tap the SFT key once to produce several common characters Key Character Uppercase Double tap SFT 1 2 abc ABC 3 def DEF 4 ghi GHI 5 jkl JKL 6 mno MNO 7 pqrs PQRS 8 tuv TUV 9 wxyz WXYZ Key Combination Function Blue Up Arrow Volume up Blu...

Page 48: ...n Character Red Left Arrow Red Right Arrow Red BKSP Red SP Red Red P1 Red P2 Red P3 Red P4 Key Combination Function Red ESC hold Soft reset warm boot Red TAB hold Hard reset cold boot Red Up Arrow Page up Red Down Arrow Page down Red 1 F1 Red 2 F2 Red 3 F3 Red 4 F4 Red 5 F5 Red 6 F6 Red 7 F7 Red 8 F8 Red 9 F9 Red 0 F10 ...

Page 49: ...dicator on page 4 3 Shift Functionality in Alpha Mode To apply Shift functionality to the next character pressed while in lowercase alpha mode tap the Blue modifier key once Shift functionality is removed from the next key pressed automatically To switch into CAPS LOCK mode tap the Blue modifier key twice To switch out of CAPS LOCK mode tap the Blue modifier key twice again Switching to Numeric Mo...

Page 50: ...on Function Red Down Arrow P1 Red Up Arrow P2 Red Left Arrow P3 Red Right Arrow P4 Red Left Side Button P5 Red Right Side Button P6 Red ESC hold Soft reset warm boot Red TAB hold Hard reset cold boot Red A F1 Red F F2 Red K F3 Red P F4 Red U F5 Red E F6 Red J F7 Red O F8 Red T F9 Red Z F10 ...

Page 51: ...the NUM key once To lock into numeric mode double tap the NUM key If locked in numeric mode double tap NUM key again to switch back to alpha mode Numbers Special Characters Special Functions Key Character B 1 C 2 D 3 G 4 H 5 I 6 L 7 M 8 N 9 R 0 Key Character J Q S O T U V W X Y Z Key Character A Volume up F Volume down E SP ...

Page 52: ...4 12 Rev D 11 20 2007 Dolphin 7600 User s Guide ...

Page 53: ... damaged inventory The image engine is angled downward Available Image Engines Dolphin 7600 terminals are equipped with 5300 Standard Range 5300SR image engines Depth of Field 5300 Standard Range 5300SR Data characterized at 23 C and 0 lux ambient light 8 3 mil Linear 10 mil PDF417 13 mil UPC 15 mil Data Matrix 15 mil QR 35 mil MaxiCode Working Range 020cm 025cm 033cm 038cm 038cm 089cm Near 3 5 in...

Page 54: ...N 13 GS1 Databar Interleaved 2 or 5 Matrix 2 of 5 Plessey PosiCode Straight 2 of 5 IATA Straight 2 of 5 Industrial Telepen Trioptic Code UCC EAN 128 UPC and UPC A 2D Symbologies Aztec Code 16K Composite Data Matrix GS1 Databar MaxiCode OCR PDF417 QR Code Composite Codes Aztec Mesa Codablock F EAN UCC GS1 Databar 14 OCR OCR A OCR B OCR US Money Font Postal Codes Postnet and most international 4 sta...

Page 55: ...ights green when a scanned bar code is successfully decoded Decoding The Dolphin terminal supports two types of image decoding full area imaging and Advanced Linear Decoding ALD Full area Imaging Full area imaging means that the Dolphin terminal support omni directional aiming which means that a positive read can be obtained from many positions For details see Omni Directional Scanning Positions o...

Page 56: ...ce Note To achieve the best read the aiming beam should be centered horizontally across the bar code The aiming pattern is smaller when the terminal is held closer to the code and larger when the terminal is held farther from the code Symbologies with smaller bars or elements mil size should be read closer to the unit whereas larger bars or elements mil size should be read farther from the unit Sa...

Page 57: ...y the software application used to take the image The average size of the image file is approximately 4 8K However the size of the image depends on image content the more complex the content the larger the file size Taking an Image 1 Tap Start Programs Demos Image Demo 2 Point the Dolphin terminal at the object 3 Press the Scan key to activate the engine The touch screen displays a preview of the ...

Page 58: ...5 6 Rev D 11 20 2007 Dolphin 7600 User s Guide ...

Page 59: ...s such as printers workstations and even other Dolphin terminals For more information see Infrared Communication on page 6 8 Installing Additional Software Dolphin terminals ship with the operating system radio drivers and custom Hand Held Products software loaded onto the device These are the default programs that install when your terminal first boots up You can install additional software progr...

Page 60: ...his is a communication only cable until you plug the power cable into the power port Connecting the Power Cable The power port on the back end of the USB connector fits the power cable that comes with each Dolphin 7600 device To charge the device while communicating connect the power cable to the power port USB Cable I O Connector Host Workstation Power Port USB Connector Power Cable Power Port ...

Page 61: ...r see page 3 14 on the bottom panel USB The USB cable and hardware peripherals allow the Dolphin terminal to communicate with a workstation or to networked through a USB hub The Dolphin terminal supports full speed USB communication USB 1 1 maximum data transfer rate is 12 Mbps The Dolphin terminal defaults to USB communication out of the box RS 232 The RS 232 cable allows the Dolphin terminal to ...

Page 62: ...connection Communicating with the Dolphin Terminal After setting up both the workstation and the terminal ActiveSync connection should be automatic 1 Connect the Dolphin terminal to the a communication peripheral such as the Dolphin HomeBase 2 The Dolphin terminal automatically opens ActiveSync to establish a connection Synchronizing with the Host Workstation After setup synchronization begins aut...

Page 63: ...on double click the exe or setup exe file The installation wizard begins 2 Follow the directions on the workstation screen The installation process includes transferring the software to the terminal via ActiveSync If the File is Not an Installer Some programs cannot be installed on workstations because they are designed exclusively for Windows CE devices In these cases the appropriate files must b...

Page 64: ...hat uses Direct Sequence Spread Spectrum DSSS technology The radio is interoperable with other 802 11b g Wi Fi compliant products including access points APs PCs via PC card adapters and other wireless portable devices By default the 802 11b g radio is enabled after each hard reset which means that the radio begins transmitting a signal as soon as the terminal finishes booting up The next step is ...

Page 65: ...nd navigate to the program s location You may see a single exe or setup exe file or several versions of files for different device types and processors 2 Select the program version that matches your Dolphin terminal and processor 3 Read any installation instructions Read Me files or documentation that comes with the program Many programs provide special installation instructions 4 Download the pro...

Page 66: ... function will pick up MAC addresses as well as IrDA ports 1 Arrange the hardware so that the infrared port of the Dolphin terminal is aligned with and in range of the infrared port of the other device 2 Tap the Bluetooth icon to open the Bluetooth Manager and tap on the BT Service Tab see page 7 2 3 Tap Beam File OR Tap Start Programs Beam File 4 The device begins scanning for IrDA enabled device...

Page 67: ...tting the button at the bottom reads Sending and the command bar displays the percentage sent 9 When the file is sent a Success message displays Tapping OK brings you back to the BT Service tab Using ActiveSync for IrDA Communication 1 Align the IrDA ports of the Dolphin terminal and a host workstation 2 Tap Start Control Panel ActiveSync 3 Tap IrDA Sync The IrDA sync process begins immediately ...

Page 68: ...6 10 Rev D 11 20 2007 Dolphin 7600 User s Guide ...

Page 69: ...he ON button to activate the Bluetooth radio Use the left and right arrows in the upper right corner to scroll through the tab windows Tab Window Description See Page Setting Tab Enables and disables the Bluetooth radio 7 2 BT Service Tab Scans for Bluetooth services on other devices see page 7 8 Transfers files via infrared see page 6 8 7 2 Serial Port Tab Manages the registration of serial ports...

Page 70: ...e MAC address from the radio driver Name The first time you open the Bluetooth manager the default name of the Dolphin device appears Rename Click this button to type in a unique name for the Dolphin terminal The name change here is not specific to Bluetooth When you change the name here it has the same effect as changing the name in the control panel for the whole device Start Settings Control Pa...

Page 71: ... current COM ports in use Port Name Displays the name of the port e g COM1 COM9 Role Identifies the COM port as a server or client COM port Server Address For client ports this field displays the server address Register New Server Port Tap this button to register a virtual COM port used by the Dolphin terminal to host its Bluetooth services Register New Client Port Tap this button to register a cl...

Page 72: ...nter as a new client port on the Serial Port tab 1 In the Bluetooth Manager tap the Serial Port tab and tap Register New Client Port 2 The terminal automatically scans for devices in range and displays them 3 Tap the printer you want to connect to 4 Authenticate only if the printer has a PIN or if a PIN is known Most printers don t have a PIN ...

Page 73: ...olphin 7600 User s Guide Rev D 11 20 2007 7 5 5 Select Serial Printer and tap OK 6 Select COM from the COM Prefix drop down list 7 Select the appropriate COM port number from the COM Index drop down list ...

Page 74: ...r s Guide 8 Tap OK When you have successfully connected a Registered O K dialog box appears 9 On the Serial Port tab verify that the COM port is connected to the printer The MAC address of the printer will appear in the Server Addr column ...

Page 75: ...f what the icons on this window mean see Scan Device Window on page 7 8 3 Double tap on one of the services and select Trusted 4 Authenticate if required by the device 5 If you tap Yes enter the same PIN on both the Dolphin terminal and on the device you re connecting to If you don t need to authenticate tap No and you return to the list of retrieved devices and services on the Scan Device window ...

Page 76: ... icon that indicates whether it s a trusted or untrusted device Indicates Untrusted Indicates Trusted Found devices also appear with icons to indicate what kind of service is on that device Service Icon The found device contains the following service ActiveSync For details see Bluetooth ActiveSync on page 7 10 Printer For details see Connecting to Bluetooth Printers on page 7 4 For details about c...

Page 77: ...device Active Select Active to activate a connection to the device and service Active appears inactive is the device is not Trusted A checkmark appears next to this item if the connection is active Authenticate Select Authenticate to require the Dolphin terminal to authenticate on connecting Authenticate appears inactive is the device is not Trusted Authenticate appears with a checkmark to the lef...

Page 78: ...up menu Note You may need to authenticate the connection by entering a PIN If not tap No on the authentication popup window For more details see Connecting to Other Bluetooth Devices on page 7 7 3 The Bluetooth ActiveSync service is now active Tap OK to close the Scan Device window 4 Tap Start Settings Control Panel double tap ActiveSync 5 Select BT Sync The PC Connection is changed to Bluetooth a...

Page 79: ...cate via USB or serial RS 232 Data transmission for USB is up to 12 Mbps Data transmission for serial RS 232 is up to 115 Kbps HomeBases cannot be physically connected to each other sometimes referred to as daisy chaining but can be networked together via serial or USB hubs Convenient Storage The battery charging system makes the HomeBase a safe and convenient storage receptacle for your Dolphin t...

Page 80: ...ck LED Turns solid green when the Dolphin terminal is properly seated in a powered HomeBase When this light is on the terminal is connected to the HomeBase Rubber Feet The bottom panel has four rubber feet one at each corner to stabilize the unit on a flat surface You can set the HomeBase on a dry stable surface such as a desktop or workbench near an electrical outlet Terminal Well Dock LED ...

Page 81: ...unication Powering the Dolphin HomeBase The terminal requires 5 volts DC input for communication and battery charging the power adapter on the power cable converts the voltage from the power source to 5 volts DC Only power adapter cables from Hand Held Products convert the voltage appropriately The same power cable that ships with each terminal can be used to power the HomeBase This cable contains...

Page 82: ...nitors changes in temperature current and voltage Inserting a Terminal 1 Install the battery pack in the terminal see Install the Main Battery on page 2 1 2 Power the Dolphin HomeBase see Powering the Dolphin HomeBase on page 8 3 3 Slide the terminal into the terminal well until the Dock LED lights green to indicate that the terminal is properly seated 4 The battery pack begins charging Checking B...

Page 83: ...the HomeBase Back Panel Dimensions Mounting Guidelines 1 Before you begin make sure you have two screws that are size 4 diameter measurement of 0 112 in 2 845 mm 2 Drill two holes into the wall The holes should be located approximately 1 44 in 36 7 mm apart 3 Insert a screw into each hole leaving 0 2 in 5 mm of its head exposed 15 in 3 85 mm 1 44 in 36 7 mm 3 99 in 101 42 mm 1 85 in 46 87 mm 4 35 ...

Page 84: ...lphin 7600 User s Guide Bottom Panel Dimensions Note The pivot connector should be facing straight out the bottom panel as shown when mounting the HomeBase to a vertical surface 3 73 in 94 88 mm 55 in 14 07 mm 67 in 16 97 mm ...

Page 85: ... 8 KVA immunity on all surfaces Humidity 90 relative humidity non condensing Power Supply Input Universal from the power source 100 240 Volts 0 5 A 50 60Hz Included with Dolphin terminal Output to the HomeBase 5 Volts DC 3 0 A Charging Standard Charge Four hours or less Max Charging Current 2A Max Standby Current 100mA Status LED Green Dolphin terminal is properly seated in the HomeBase Communicat...

Page 86: ...8 8 Rev D 11 20 2007 Dolphin 7600 User s Guide ...

Page 87: ...d Held Products in a Dolphin terminal will void your warranty and may result in damage to the Dolphin terminal or battery Front Panel Charging Slots The QuadCharger contains four charging slots Each slot holds one battery When a battery is placed in a slot it immediately begins charging and its Status LED lights Power LED This LED lights green after power has been applied and the QuadCharger compl...

Page 88: ...comes with the Dolphin QuadCharger so that the input voltage is adjusted appropriately 1 Locate the AC power adapter cable and plug it into the power source 2 Connect the power cable to the power adapter 3 Connect the power cable to the power supply connector on the back of the QuadCharger 4 Press the power switch to the ON position 5 The device performs the following power up diagnostic routine f...

Page 89: ...o 35 C Temperature has a significant effect on charging For best results battery packs should be at room temperature before inserting in the QuadCharger When the battery temperature exceeds 40 C the QuadCharger may exceed the stated four hour charge time The QuadCharger stops charging if the battery temperature is greater than 40 C but will begin charging again when the battery temperature is less...

Page 90: ...ount the QuadCharger slide the DIN Rail into the slot on the bottom panel Then using the appropriate nuts and bolts secure the DIN rail to the desk or wall Bottom Panel Mounting Dimensions DIN Rail Dimensions Mounting Guidelines 1 Before you begin make sure you have two screws that are size 5 diameter measurement of 0 125 in 3 18 mm 2 Drill two holes into the wall using the slots of the DIN Rail t...

Page 91: ...tch is ON and the battery pack is properly seated The Status LED lights red during charging Try to charge the battery in one of the other charging slots If the red Status LED comes on again then the problem is associated with the battery pack If the red status stays with the charging slot the problem is associated with the charging circuitry The Status LED lights red and stays on without a battery...

Page 92: ... Environmental Operating Temperature 32 to 104 F 0 to 40 C Storage Temperature 4 to 140 F 20 to 60 C Charging Temperature 32 to 104 F 0 to 40 C Electrical Static Discharge 8 KVA immunity on all surfaces Humidity 90 relative humidity non condensing Power Supply Input Universal 100V 240V 0 8 A 50 60Hz Included with the QuadCharger Output 12Volts DC 2 5 A Charging Standard Charge Four hours or less S...

Page 93: ...e Dolphin 7600 terminal A standard RAM 101 B mounting bracket with two universal ball joints The nuts and bolts required for installation Note The Dolphin Mobile Mount is not intended for use the imaging scanning applications Inserting a Terminal Note It is recommended that you install one of the ball mounts on the back panel before inserting a terminal see Mounting on page 10 3 1 Insert the back ...

Page 94: ...10 2 Rev D 11 20 2007 Dolphin 7600 User s Guide 2 The latch at the top should grip the back of the image engine window slot Image Engine Window Latch ...

Page 95: ...600 User s Guide Rev D 11 20 2007 10 3 Mounting The Dolphin Mobile Mount ships with a standard RAM mount 101B You attach one ball joint that you attach to the back panel of the mount with the fasteners provided ...

Page 96: ...10 4 Rev D 11 20 2007 Dolphin 7600 User s Guide Then you attach the rest of the RAM mount Then affix the RAM mount to a stable surface ...

Page 97: ...ail naservice handheld com Latin America Telephone 803 835 8000 Telephone 800 782 4263 Fax 239 263 9689 E mail laservice handheld com Brazil Telephone 55 21 3535 9100 Fax 55 21 3535 9105 E mail brservice handheld com Mexico Telephone 52 55 5203 2100 Fax 52 55 5531 3672 E mail mxservice handheld com Europe Middle East and Africa Telephone 31 0 40 2901 633 Fax 31 0 40 2901 631 E mail euservice handh...

Page 98: ...35 9100 Fax 55 21 3535 9105 E mail brsuporte handheld com Mexico Telephone 803 835 8000 E mail latechsupport handheld com Europe Middle East and Africa Telephone 31 0 40 7999 393 Fax 31 0 40 2425 672 E mail eurosupport handheld com Asia Pacific Telephone Hong Kong 852 3188 3485 or 2511 3050 Telephone China 86 21 6361 3818 E mail aptechsupport handheld com Japan Telephone 813 5770 6312 E mail aptec...

Page 99: ...IDENTAL OR CONSEQUENTIAL DAMAGES AND IN NO EVENT SHALL ANY LIABILITY OF HAND HELD PRODUCTS ARISING IN CONNECTION WITH ANY PRODUCT SOLD HEREUNDER WHETHER SUCH LIABILITY ARISES FROM A CLAIM BASED ON CONTRACT WARRANTY TORT OR OTHERWISE EXCEED THE ACTUAL AMOUNT PAID TO HAND HELD PRODUCTS FOR THE PRODUCT THESE LIMITATIONS ON LIABILITY SHALL REMAIN IN FULL FORCE AND EFFECT EVEN WHEN HAND HELD PRODUCTS M...

Page 100: ...11 4 Rev D 11 20 2007 Dolphin 7600 User s Guide ...

Page 101: ......

Page 102: ... Hand Held Products Inc 700 Visions Drive P O Box 208 Skaneateles Falls NY 13153 0208 76 CE UG Rev D 11 20 2007 ...

Reviews: