H&B JK 20-S User Manual Download Page 4


MINIMUM SYSTEM REQUIREMENTS 

§


Windows 98SE / ME / 2000 / XP.  

§


Pentium 200 MHz or above. 

§


Disk Drive 16MB free hard disk space (to download and upload files from the player).


§


32MB system memory 

§


USB port (A -Type). 


NOTE: 

l


This specification is for the download driver software supplied with this player only. An increased PC specification 

is likely to be required for application software for music file creation. 

l


It is highly recommended that charge the battery first before you power on the Digital Jukebox player. 


INSTALLING THE DRIVER SOFTWARE 

Under 

Win98

 OS, if you plug the Digital Jukebox player into the USB port on your PC, the windows will automatically detect it as 

a new hardware and pop out a “New Hardware Found” message. After the above step, the “Add Device Driver Wizard” will show 
up automatically. Click the “next” button to follow the on screen instructions to finish the installation process. 

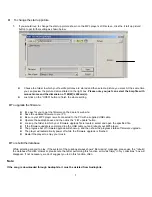
1.  Click the “search for a suitable driver for my device (recommend)” item and then click the “next” button to continue. 

2.  In this dialog box, the wizard will ask you to check the optional search location. Please insert the installation CD to CD  ROM 

drive firstly, check the “specify a location” item, press the “browse” button to specify the driver  location  selected as the 
following path:

 Audio/HDD Jukebox/Driver 

and click “OK” button to complete the whole installation. 

3. 

Click My Computer icon at desktop, you will find one “Jukebox” drive in the My Computer window.


INSTALLING THE MUSIC MANAGEMENT SOFTWARE, AudioPhile.exe. 

Now it’s time to introduce our sophisticated 

AudioPhile.exe

, music management software between the computer operating 

system and the Digital JukeBox player. This section will describe PC System Requirements, installation method and detailed 
introduction on 

Audiophile.exe

 by steps as follows: 

     
1. 

PC System Requirements 

l


Microsoft Windows 98,Me, 2000 or XP 

l


Pentium II with 32MB RAM and 64 MB RAM (Recommended)   

l


USB port 

l


CD-ROM drive   

l


Internet connection recommended 

l


32MB free hard drive space 

2. 

Installation method 

l


Insert the installation CD into your PC’s CD-ROM drive and go into the windows explorer.  

l


Click the icon of CD-ROM drive, follow the path: 

driver CD\Audio\HDD Jukebox\AP\AudioPhile.exe 

and then just 

drag and drop the 

Audio Phile.exe

 to anywhere you want it to be stored on your desktop.  
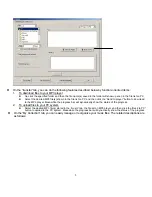
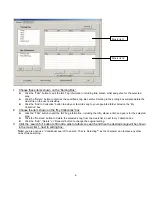
 

3. 

Executing the 

AudioPhile.exe


l


Make sure the supplied USB cable has been connected right between the PC and MP3 player.  

l


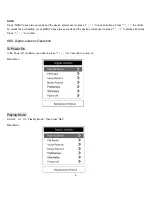
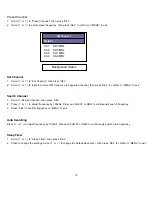
Double-click audiophile.exe icon to start the following music management functions and firstly you will see the window 
shown below.  


INSTALLING SOFTWARE 

Summary of Contents for JK 20-S

Page 1: ...1...

Page 2: ...ce or to the user Keep this device away from water Water may cause fire electric shock or mechanical or electrical breakdown DO NOT leave this device in a car or other places where there is the possib...

Page 3: ...MUSICMATCH Software 1 Under Copyright laws the user is liable to obtain the license before playing or recording copyright protected music except for personal use That is if you make one recording onl...

Page 4: ...browse button to specify the driver location selected as the following path Audio HDD Jukebox Driver and click OK button to complete the whole installation 3 Click My Computer icon at desktop you will...

Page 5: ...then click the Send to player button to download to the MP3 player Meanwhile the progress bar will dynamically show the status of the progress 2 To upload files to your PC system l Select the desired...

Page 6: ...the item shown on the My Collections box l Click the TAG button to edit the ID3 Tag information including the title album artist and genre for the selected song l Click the Remove button to delete the...

Page 7: ...ied USB cable l Operate the audiophile exe and then click the F W update button l Look up the folder in which your firmware upgrade file is located select and open the specified file l If the firmware...

Page 8: ...transmitting data This may cause the data in the HDD to be written in error If necessary you just need to proceed with scanning disk or defragment Once the transfer of files has been started you may p...

Page 9: ...lock the hold setting press MENU above two seconds and the device prompt user to press to unlock all buttons Press to confirm HDD Digital Jukebox Operation To Power On In the Power off condition you n...

Page 10: ...2 Choose the favorite play list or then press SEL Play List Menu 3 Choose title of song or press SEL or to playback Playback FM Recorded Play Lists Recorded songs ID3 Message ID3 information 0 05 36 0...

Page 11: ...Playing then press SEL or idle for 18 seconds to Song Content Display My Music Menu Playback Songs NOTE The contents of Recorded songs and FM Recorded are what user recorded from line in or FM sources...

Page 12: ...to Add Music and then press l Under Select Source dialog box it will show you four options Artists Albums Songs and Search For Please choose any option to pick up desired tune 3 2 Delete Music l Under...

Page 13: ...3 Scroll to favorite title or press SEL or to playback 4 While navigating is underway use navigating function to My Music Menu Scroll indicating bar to Now Playing then press SEL or idle for 18 secon...

Page 14: ...ess SEL or to play selected song and postpone the scheduled songs until the single song playback is completed Useful tips for searching 1 Selecting as the character can replace any other ones while se...

Page 15: ...press SEL or idle for 18 seconds to Song Content Display NOTE Only one sub directory is available under My Music directory Song Content Display While playback is underway song content information will...

Page 16: ...equency settings 4 Press MENU to return A B Mode 1 Scroll or to A B mode A then press SEL to set the beginning point 2 Press SEL again to set the end point 3 Press SEL to terminate A B mode and resume...

Page 17: ...While pause recording is underway scroll to Resume and press SEL or press to resume recording 3 Scroll or to Volume and press SEL to change earphone output volume while recording 4 Scroll to Stop Reco...

Page 18: ...nnel then press SEL 2 Press or to adjust frequency by 100kHz Press and hold FF or REW to continuously search frequency 3 Press SEL to confirm frequency or MENU to exit Auto Searching Press or to adjus...

Page 19: ...adjust earphone output volume 5 Scroll or to Stop Recording and press SEL to terminate recording FM Record Recording from FM Radio Please refer to FM section Music Record Recording from Line in Source...

Page 20: ...rminate recording NOTE You can follow the path Preferences Record Quality to select your desired record quality Preferences Scroll to Preferences then press SEL Main Menu Settings Menu Volume Preset 1...

Page 21: ...Date Time 1 Scroll or to Date Time then press SEL 2 Scroll or to Year Month Date Hour or Min respectively then press SEL 3 Scroll or to modify and press SEL to confirm or MENU to exit Language 1 Scrol...

Page 22: ...22 To Power Off 3 Scroll or to Power Off under Main Menu then press SEL to confirm Main Menu 4 In the Stop mode status of idle you also can press for 2 second to power off...

Page 23: ...ber on the product is fully legible 2 The obligations of H B are limited either to repair or replacement of defective components The repair or replacement of defective components is based on an assess...

Page 24: ...24...

Reviews: