background image


WHAT IS MP3/WMA FORM AT? 

MP3 / WMA format files are compressed digital audio files, which consumers can listen to with near CD quality 

Commercial CD audio files can be compressed to MP3 / WMA format files, which are suitable for internet transmission due to 
their compact size and can be stored in a portable audio device. The users, for example, can record their own favorite music 
album, storing it in HDD in a digital audio player.  


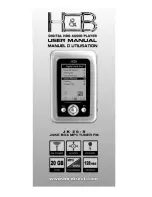
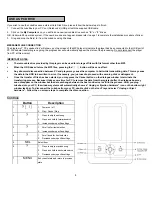
WHAT IS THIS DIGITAL JUKEBOX PLAYER? 

This Digital Jukebox Player is a portable device, which can be used for MP3 music files playback and MP3 files record/playback, 
and it additionally can be used as a drive while connected to PC. 

You can enjoy CD quality music with the mass storage capacity device, in which you can store up to 5000 songs, because the 
digital music files accessed by this Digital Jukebox player are stored in 2.5”HDD. 

Furthermore, it can be recognized as portable removable drives when connected to PC or notebook by the USB 
interface cable. 


PACKING LIST 


Please check the following items that can be found in this package. 

  Digital Jukebox Player 

  Earphone   

  USB cable; A to Mini USB type 

  AC/DC Adapter   

  Carry Case 

  User Manual 

  Driver installation CD incl. MUSICMATCH Software 


1.  Under Copyright laws the user is liable to obtain the license, before playing or recording copyright protected music, except for 

personal 

use. 

That is, if you make 

one recording only

 for playing to yourself, or for personal use at home. 

This applies to music files on Web 

pages too!


2.  The moment you give only one copy to someone else, you are distributing or duplicating the music and it is no longer for your personal use, 

you must obtain a license to do this first. 


The supplier holds no liability for any claims if the product ceases to function correctly due to misuse, because it has been dropped, subjected to 
violent vibration, extremes of temperature or if any attempt has been made to open the case, apart from the battery cover, to replace batteries. 

1.  Normal vibration will not affect the operation of  the Digital Jukebox  player. However, dropping or shocking may cause damage to the 

product. 

2.  The product is not designed for water-resistant usage. Drenching the product may cause damage. 

3.  Do not clean up the product with chemicals such as thinners, benzene and alcohol that may deface the surface. 

4.  Avoid placing the Digital Jukebox player in places of high humidity or close to a heat source. 
5.  Unintentional electrostatic discharge may shut down or damage the product. You may need to remove then replace the batteries to reset it. 

INTRODUCTION 

PRECAUTIONS 

WARNINGS 

Summary of Contents for JK 20-S

Page 1: ...1...

Page 2: ...ce or to the user Keep this device away from water Water may cause fire electric shock or mechanical or electrical breakdown DO NOT leave this device in a car or other places where there is the possib...

Page 3: ...MUSICMATCH Software 1 Under Copyright laws the user is liable to obtain the license before playing or recording copyright protected music except for personal use That is if you make one recording onl...

Page 4: ...browse button to specify the driver location selected as the following path Audio HDD Jukebox Driver and click OK button to complete the whole installation 3 Click My Computer icon at desktop you will...

Page 5: ...then click the Send to player button to download to the MP3 player Meanwhile the progress bar will dynamically show the status of the progress 2 To upload files to your PC system l Select the desired...

Page 6: ...the item shown on the My Collections box l Click the TAG button to edit the ID3 Tag information including the title album artist and genre for the selected song l Click the Remove button to delete the...

Page 7: ...ied USB cable l Operate the audiophile exe and then click the F W update button l Look up the folder in which your firmware upgrade file is located select and open the specified file l If the firmware...

Page 8: ...transmitting data This may cause the data in the HDD to be written in error If necessary you just need to proceed with scanning disk or defragment Once the transfer of files has been started you may p...

Page 9: ...lock the hold setting press MENU above two seconds and the device prompt user to press to unlock all buttons Press to confirm HDD Digital Jukebox Operation To Power On In the Power off condition you n...

Page 10: ...2 Choose the favorite play list or then press SEL Play List Menu 3 Choose title of song or press SEL or to playback Playback FM Recorded Play Lists Recorded songs ID3 Message ID3 information 0 05 36 0...

Page 11: ...Playing then press SEL or idle for 18 seconds to Song Content Display My Music Menu Playback Songs NOTE The contents of Recorded songs and FM Recorded are what user recorded from line in or FM sources...

Page 12: ...to Add Music and then press l Under Select Source dialog box it will show you four options Artists Albums Songs and Search For Please choose any option to pick up desired tune 3 2 Delete Music l Under...

Page 13: ...3 Scroll to favorite title or press SEL or to playback 4 While navigating is underway use navigating function to My Music Menu Scroll indicating bar to Now Playing then press SEL or idle for 18 secon...

Page 14: ...ess SEL or to play selected song and postpone the scheduled songs until the single song playback is completed Useful tips for searching 1 Selecting as the character can replace any other ones while se...

Page 15: ...press SEL or idle for 18 seconds to Song Content Display NOTE Only one sub directory is available under My Music directory Song Content Display While playback is underway song content information will...

Page 16: ...equency settings 4 Press MENU to return A B Mode 1 Scroll or to A B mode A then press SEL to set the beginning point 2 Press SEL again to set the end point 3 Press SEL to terminate A B mode and resume...

Page 17: ...While pause recording is underway scroll to Resume and press SEL or press to resume recording 3 Scroll or to Volume and press SEL to change earphone output volume while recording 4 Scroll to Stop Reco...

Page 18: ...nnel then press SEL 2 Press or to adjust frequency by 100kHz Press and hold FF or REW to continuously search frequency 3 Press SEL to confirm frequency or MENU to exit Auto Searching Press or to adjus...

Page 19: ...adjust earphone output volume 5 Scroll or to Stop Recording and press SEL to terminate recording FM Record Recording from FM Radio Please refer to FM section Music Record Recording from Line in Source...

Page 20: ...rminate recording NOTE You can follow the path Preferences Record Quality to select your desired record quality Preferences Scroll to Preferences then press SEL Main Menu Settings Menu Volume Preset 1...

Page 21: ...Date Time 1 Scroll or to Date Time then press SEL 2 Scroll or to Year Month Date Hour or Min respectively then press SEL 3 Scroll or to modify and press SEL to confirm or MENU to exit Language 1 Scrol...

Page 22: ...22 To Power Off 3 Scroll or to Power Off under Main Menu then press SEL to confirm Main Menu 4 In the Stop mode status of idle you also can press for 2 second to power off...

Page 23: ...ber on the product is fully legible 2 The obligations of H B are limited either to repair or replacement of defective components The repair or replacement of defective components is based on an assess...

Page 24: ...24...

Reviews: