background image

SC-9

1.

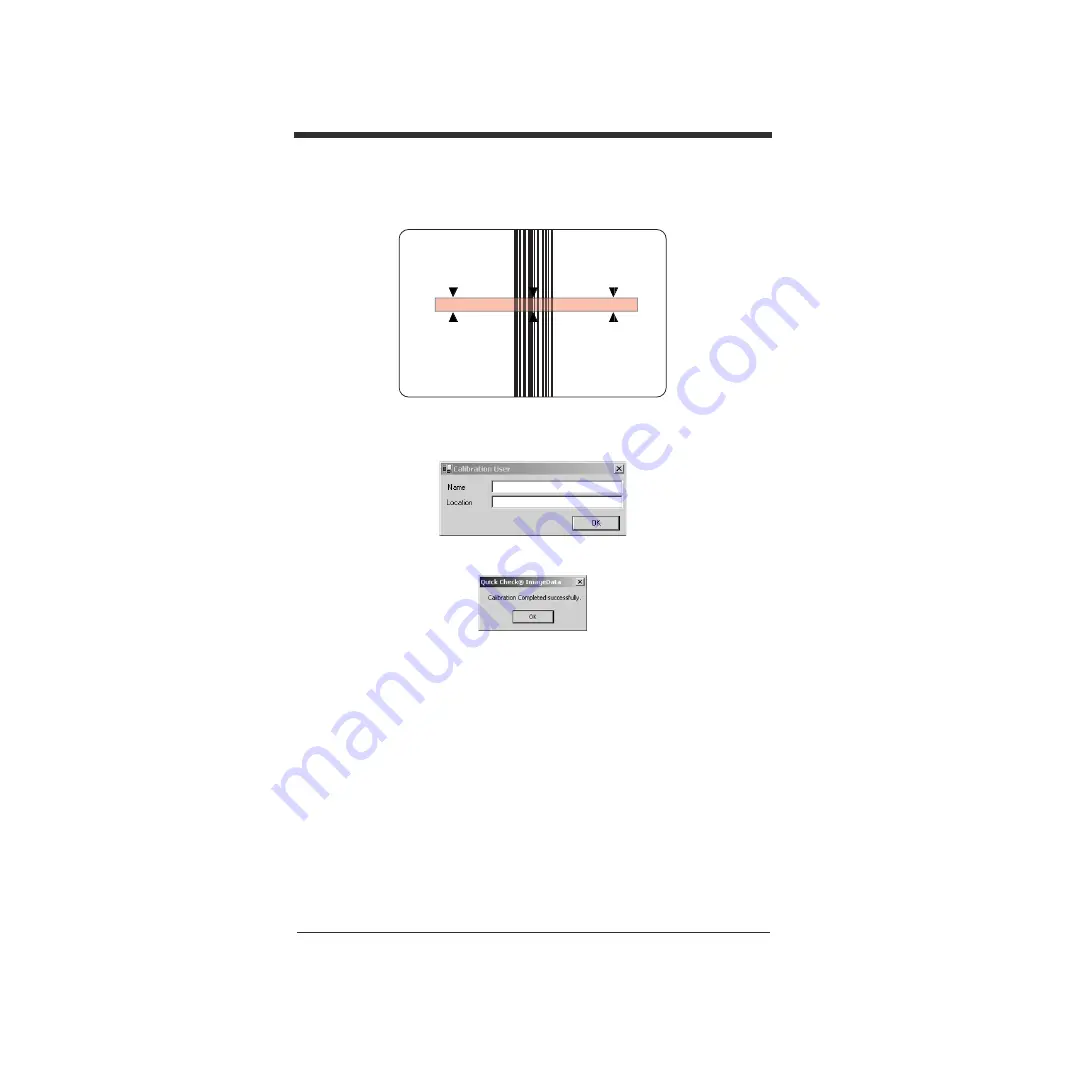
将校验装置置于校准卡 (包括在工具包中)的顶端。使用符号对齐视窗将校准卡居中。

2.

按下装置顶端的扫描按钮,开启照明来协助进行对齐。

3.

再次按下装置顶端的扫描按钮以读取条码符号。

QC890 Verifier 

会自动读取符号并执

行校准。如果校准处理成功,则会显示以下屏幕。

4.

输入您的姓名和执行校准的位置,然后单击 “

OK

” (确定)。显示下列屏幕。

5.

如果装置无法校准,请联系

 Hand Held Products Technical Support

若要访问校准日志,请转到“

Settings

->

Calibration

->

Calibration LogSettings

(设置

->

校准

->

校准日志)。输入密码


visions07

附注

:

如外部设备需要校准的话,请参阅 《

QC890 Verifier User's Guide

》。

技术协助

如果您在对图像仪进行安装或故障排除时需要协助,请致电您的经销商或最近的


Hand Held Products 

技术支持部门:

北美

/

加拿大

Summary of Contents for QUICK CHECK 890

Page 1: ... Quick Start Guide Guía de Inicio Rápido Guia Rápido de Operação Guide de démarrage rapide Kurzanleitung 快速入门指南 快速入門手冊 クイック スタート ガイド Quick Check 890 Quick Check ImageData ...

Page 2: ...ditorial errors or omissions contained herein nor for incidental or consequential damages resulting from the furnishing performance or use of this material This document contains proprietary information that is protected by copyright All rights are reserved No part of this document may be photocopied reproduced or translated into another language without the prior written consent of Hand Held Prod...

Page 3: ...er It allows you to save verification results for later reference For additional information about QCID refer to the User s Guide or help file Unpacking the QC890 Verifier After you open the shipping carton containing the product take the following steps Check to make sure everything you ordered is present Save the shipping container for later storage or shipping Check for damage during shipment R...

Page 4: ...rface on page EN 2 and RS 232 Serial Communication Interface on page EN 4 for details on connecting your unit LED Indicators Communication Interfaces The QC890 Verifier system supports the following interfaces USB RS 232 and Bluetooth USB Communication Interface Before connecting the QC890 Verifier you must load Quick Check ImageData software from the CD that was included in your kit Install Quick...

Page 5: ...it Click on Next 5 A message will appear Unable to find any drivers for this device This is OK Click on the Have Disk button 6 The Install From Disk window opens Click on Browse 7 Browse to the location where you saved the ImageData software when you installed it from the CD and open the drivers USBCOMPortEmulation folder If you used the default location it will be in C Program Files Hand Held Pro...

Page 6: ... available COM Port USB COM Port Emulation is the default interface for the QC890 Verifier Note No additional configuration e g baud rate is necessary RS 232 Serial Communication Interface An RS 232 interface requires no additional drivers Connect the QC890 Verifier to the host as shown in the illustration below RS 232 Selections Scan the following barcode to select RS 232 communications USB COM P...

Page 7: ... the Bluetooth barcode below to enable the Bluetooth option Default Off Once the Bluetooth option is enabled scan the appropriate barcode that follows to connect to a PC or laptop or a PDA Mobility Systems device To establish a Bluetooth connection to a PC or a laptop scan the barcode below follow the instructions supplied with your Bluetooth device to locate the QC890 Verifier and connect to it I...

Page 8: ...r devices a display similar to the one below appears on the host device The serial number display allows you to confirm that the correct QC890 Verifier has been found Refer to the Quick Check 890 Verifier User s Guide for details on the making the Bluetooth connection Using Quick Check ImageData For the PC version of Quick Check ImageData go to Start All Programs Hand Held Products Quick Check Ima...

Page 9: ...ich the QCID is attached You may select the port by clicking on File Preferences After you make the selection QCID attempts to connect to the attached QC890 Verifier When a connection is established the main screen of the application as shown below displays PC Main Screen PDA Main Screen ...

Page 10: ...er of the symbol to the center arrows 3 Press the scan button on top of the unit again while the illumination is on to scan and verify the barcode Scanning a Barcode Symbol Using Quick Check ImageData 1 Place the QC890 Verifier on top of the symbol 2 If necessary press the scan button on top of the unit to turn on illumination to aid in alignment of the symbol 3 For the PC version click the Scan b...

Page 11: ...EN 8 1 Place the verifier on top of the reflectance page that is included in your kit Use the symbol alignment window to center the reflectance page 2 Press the scan button on top of the unit to turn on illumination to aid in alignment 3 Press the scan button on top of the unit a second time to read the barcode symbol The QC890 Verifier automatically reads the symbol and performs calibration If th...

Page 12: ...chsupport handheld com Latin America Telephone 803 835 8000 Telephone 800 782 4263 E mail latechsupport handheld com Brazil Telephone 55 21 3535 9100 Fax 55 21 3535 9105 E mail brsuporte handheld com Mexico Telephone 803 835 8000 E mail latechsupport handheld com Europe Middle East and Africa Telephone 31 0 40 7999 393 Fax 31 0 40 2425 672 E mail eurosupport handheld com Asia Pacific Telephone Hon...

Page 13: ...d attached Contact the appropriate location below to obtain a Return Material Authorization number RMA before returning the product North America Telephone 800 782 4263 Fax 803 835 8012 E mail naservice handheld com Latin America Telephone 803 835 8000 Telephone 800 782 4263 Fax 239 263 9689 E mail laservice handheld com Brazil Telephone 55 21 3535 9100 Fax 55 21 3535 9105 E mail brservice handhel...

Page 14: ...Japan Telephone 813 5770 6312 Fax 813 5770 6313 E mail apservice handheld com Online Product Service and Repair Assistance You can also access product service and repair assistance online at www handheld com ...

Page 15: ...futura referencia Para obtener información adicional sobre QCID consulte la Guía del usuario o el archivo de ayuda Apertura del Verificador QC890 Después de abrir el cartón de embarque que contiene el producto siga los pasos a continuación Verifique que todo lo que pidió le haya sido enviado Guarde el contenedor de embarque para futuros almacenamientos o envíos Verifique que el producto no haya su...

Page 16: ...terfaz de comunicación de la conexión serial RS 232 en la página LS 4 para obtener información detallada sobre cómo conectar la unidad Indicadores LED Interfaces de comunicación El sistema Verificador QC890 es compatible con las siguientes interfaces USB RS 232 y Bluetooth Interfaz de comunicación USB Antes de conectar el Verificador QC890 deberá cargar el software Quick Check ImageData desde el C...

Page 17: ...arla Haga clic en Siguiente 5 Aparecerá el mensaje No se pueden encontrar controladores para este dispositivo Esto es correcto Haga clic en el botón Utilizar disco 6 Aparece la ventana Instalar desde disco Haga clic en Explorar 7 Explore para seleccionar la ubicación donde guardó el software ImageData al instalarlo desde el CD y abra la carpeta drivers USBCOMPortEmulation Si utilizó la ubicación p...

Page 18: ... los puertos COM y USB es la interfaz predeterminada para el Verificador QC890 Nota No se requiere de ninguna configuración adicional por ejemplo la velocidad en baudios Interfaz de comunicación de la conexión serial RS 232 Un interfaz RS 232 no requiere de controladores adicionales Conecte el Verificador QC890 al servidor como se indica en la siguiente ilustración Selecciones RS 232 Escanee el si...

Page 19: ... Bluetooth para habilitar la opción Bluetooth Predeterminada Apagada Una vez que la opción Bluetooth se encuentre habilitada escanee el código de barras apropiado para conectarse a una PC computadora portátil o asistente personal digital dispositivo móvil Para conectar el Bluetooth a una PC o computadora portátil escanee el siguiente código de barras siga las instrucciones que vienen con su dispos...

Page 20: ...úsqueda de dispositivos aparecerá una pantalla en el dispositivo anfitrión similar a la que se muestra abajo El número de serie que se muestra le permite confirmar que se ha encontrado el Verificador QC890 correcto Consulte la Guía del usuario del Verificador Quick Check 890 para obtener información detallada sobre la conexión con el Bluetooth Uso del Quick Check ImageData Para la versión para PC ...

Page 21: ...ID la aplicación le solicitará que seleccione el puerto COM al que se encuentra adherido QCID Podrá seleccionar el puerto haciendo clic en File Preferences Archivo Preferencias Una vez que lo haya seleccionado QCID intentará conectarse al Verificador QC890 adherido Una vez que se establece una conexión aparece la pantalla principal de la aplicación como se indica a continuación Pantalla principal ...

Page 22: ...ire a través de la ventana de la unidad para poder alinearla con el código de barras Nota Los mejores datos de verificación se recopilan alineando el centro del símbolo con las flechas del centro 3 Presione el botón Scan escanear ubicado en la parte superior de la unidad nuevamente mientras la iluminación se encuentre encendida para escanear y verificar el código de barras Pantalla principal del a...

Page 23: ...datos de escaneo Calibración del Verificador QC890 La calibración es un requerimiento de las normas ISO IEC Consulte la Guía del usuario del Verificador QC890 o el archivo de ayuda para obtener información adicional sobre la calibración Al calibrar el sistema Verificador QC890 el Verificador QC890 debe estar conectado al software Quick Check ImageData Durante la calibración es importante alinear e...

Page 24: ...llevó a cabo la calibración y haga clic en OK aceptar Aparece la siguiente pantalla 5 Si la unidad experimenta problemas de calibración comuníquese con el Soporte técnico de Hand Held Products Para acceder a los registros de calibración vaya a Settings Calibration Calibration Log Configuración Calibración Registro de calibración A continuación ingrese la contraseña visions07 Nota Para la calibraci...

Page 25: ...ente Próximo y África Teléfono 31 0 40 7999 393 Fax 31 0 40 2425 672 Email eurosupport handheld com Pacífico Asiático Teléfono Hong Kong 852 3188 3485 o 2511 3050 Teléfono China 86 21 6361 3818 Email aptechsupport handheld com Japón Teléfono 81 3 5770 6312 Email aptechsupport handheld com Malasia Teléfono 603 6201 7020 E mail aptechsupport handheld com Asistencia técnica en línea También puede obt...

Page 26: ...olución RMA Return Material Authorization antes de devolver el producto Norteamérica Teléfono 800 782 4263 Fax 803 835 8012 Email naservice handheld com Latinoamérica Teléfono 803 835 8000 Teléfono 800 782 4263 Fax 239 263 9689 Email laservice handheld com Brasil Teléfono 55 21 3535 9100 Fax 55 21 3535 9105 Email brservice handheld com México Teléfono 52 55 5203 2100 Fax 52 55 5531 3672 Email mxse...

Page 27: ...LS 13 Asistencia en línea del servicio posventa y de reparación de productos También puede obtener asistencia en línea del servicio posventa y de reparación de productos en www handheld com ...

Page 28: ...LS 14 ...

Page 29: ...onsulta Para obter informações adicionais sobre QCID consulte o Guia do Usuário ou o arquivo de ajuda Abertura da embalagem do Verificador QC890 Depois de abrir a caixa de transporte que contém o produto siga as seguintes etapas Verifique se tudo o que foi solicitado consta na embalagem Guarde a embalagem para armazenamento ou remessa posterior Verifique se houve danos no transporte Comunique dano...

Page 30: ...rface de comunicação USB na página BP 2 e Interface de comunicação Serial RS 232 na página BP 4 para obter detalhes sobre a conexão da unidade LED Indicadores Interfaces de comunicação O verificador QC890 suporta as seguintes interfaces USB RS 232 e Bluetooth Interface de comunicação USB Antes de conectar o verificador QC890 você deve instalar o software Quick Check ImageData do CD que acompanha o...

Page 31: ...que nesse item para realçar Clique em Avançar 5 A mensagem Não foi possível encontrar drivers para este dispositivo é exibida Clique no botão Com disco 6 A janela Instalar do disco aparece Clique em Procurar 7 Navegue até o local onde você salvou o software ImageData que estava no CD e abra a pasta drivers USBCOMPortEmulation Se você utilizou o local padrão ela estará em C Arquivos de programas Ha...

Page 32: ...xima porta COM disponível Emulação da porta USB COM é a interface padrão do do QC890 Verifier Nota Não é necessária nenhuma configuração adicional Interface de comunicação Serial RS 232 Uma interface RS 232 não exige drivers adicionais Conecte o verificador QC890 ao host como mostra a ilustração abaixo Conexão RS 232 Leia o código de barras a seguir para selecionar a conexão RS 232 Emulação de por...

Page 33: ...ia o código de barras do Bluetooth abaixo para ativar a conexão Bluetooth Padrão Desligado Assim que a conexão Bluetooth for ativada leia o código de barras a seguir para conectar a um PC um laptop ou um dispositivo PDA Dispositivo Móvel Para estabelecer uma conexão Bluetooth com um PC ou um laptop leia o código de barras abaixo siga as instruções fornecidas com o dispositivo Bluetooth para locali...

Page 34: ...no dispositivo host A exibição do número de série permite confirmar que o verificador QC890 correto foi encontrado Consulte o Guia do Usuário do Verificador Quick Check 890 para obter detalhes sobre como fazer a conexão Bluetooth Uso do Quick Check ImageData Na versão para PC do Quick Check ImageData vá para Start All Programs Hand Held Products Quick Check ImageData Iniciar Programas Hand Held Pr...

Page 35: ...izará Você pode selecionar a porta clicando em File Preferences Arquivo Preferências Depois que você fizer a seleção o QCID tenta realizar a conexão com o verificador QC890 Depois de estabelecida uma conexão a tela principal do aplicativo é exibida como mostrado abaixo Tela principal do PC Tela principal do PDA ...

Page 36: ...rais 3 Pressione o botão de leitura na parte de cima da unidade novamente enquanto a iluminação está ligada e verifique o código de barras Lendo um código de barras usando o Quick Check ImageData 1 Posicione o verificador QC890 sobre o símbolo 2 Se necessário pressione o botão de leitura na parte de cima da unidade para ligar a iluminação e auxiliar no alinhamento do símbolo 3 Na versão para PC cl...

Page 37: ...s instruções na página BP 8 1 Posicione o verificador no topo da página de reflexão que faz parte do kit Use a janela de alinhamento do símbolo para centralizar a página de reflexão 2 Pressione o botão de leitura na parte de cima da unidade para ligar a iluminação e auxiliar no alinhamento 3 Pressione o botão de leitura na parte de cima da unidade pela segunda vez para fazer a leitura do símbolo d...

Page 38: ...ico da Hand Held Products mais próximo América do Norte Canadá Telefone 800 782 4263 das 08h00 às 18h00 horário da costa leste dos Estados Unidos Fax 315 554 6705 E mail natechsupport handheld com América Latina Telefone 803 835 8000 Telefone 800 782 4263 E mail latechsupport handheld com Brasil Telefone 55 21 3535 9100 Fax 55 21 3535 9105 E mail brsuporte handheld com México Telefone 803 835 8000...

Page 39: ...a nota fiscal de compra Entre em contato com o local adequado abaixo para obter um número de autorização de devolução do material nº RMA antes de devolver o produto América do Norte Telefone 800 782 4263 Fax 803 835 8012 E mail naservice handheld com América Latina Telefone 803 835 8000 Telefone 800 782 4263 Fax 239 263 9689 E mail laservice handheld com Brasil Telefone 55 21 3535 9100 Fax 55 21 3...

Page 40: ...3 5770 6312 Fax 813 5770 6313 E mail apservice handheld com Assistência on line para reparo e manutenção do produto Também é possível acessar a assistência para manutenção e reparo do produto on line no site www handheld com ...

Page 41: ...ultez le guide d utilisation ou le fichier d aide Déballage du vérificateur QC890 Après ouverture du carton d expédition contenant le produit procédez comme suit Vérifiez que tous les éléments commandés sont inclus dans la livraison Conservez l emballage d expédition en vue du rangement ultérieur ou d une éventuelle réexpédition Vérifiez que le produit n a pas été endommagé pendant le transport Si...

Page 42: ...ement de l unité consultez les sections Interface de communication USB à la page FR 2 et Interface de communication série RS 232 à la page FR 4 Voyants DEL Interfaces de communication Le vérificateur QC890 prend en charge les interfaces suivantes USB RS 232 et Bluetooth Interface de communication USB Avant de connecter le vérificateur QC890 lancez le logiciel Quick Check ImageData à partir du CD R...

Page 43: ... dessus pour la sélectionner Cliquez sur Suivant 5 Le message Impossible de trouver des pilotes pour ce périphérique apparaît ce qui est tout à fait normal Cliquez sur le bouton Disque fourni 6 La fenêtre Installer à partir du disque s ouvre Cliquez sur Parcourir 7 Accédez au répertoire créé lors de l installation du logiciel ImageData à partir du CD ROM et ouvrez le dossier drivers USBCOMPortEmul...

Page 44: ...M USB est l interface par défaut du vérificateur QC890 Remarque aucune configuration supplémentaire par exemple de la vitesse en bauds n est nécessaire Interface de communication série RS 232 L interface RS 232 ne requiert aucun pilote supplémentaire Connectez le vérificateur QC890 sur l hôte comme indiqué dans l illustration ci dessous Choix de l interface RS 232 Scannez le code à barres suivant ...

Page 45: ...option Bluetooth Par défaut ce paramètre est désactivé Une fois l option Bluetooth activée scannez le code à barres de connexion à un ordinateur personnel un ordinateur portable ou un PDA périphérique mobile voir ci dessous Pour établir une connexion Bluetooth avec un ordinateur personnel ou un ordinateur portable scannez le code à barres ci dessous et suivez les instructions fournies avec le péri...

Page 46: ...paraît sur l ordinateur hôte L affichage du numéro de série permet de vérifier que votre vérificateur QC890 a été localisé Pour plus d informations sur l établissement d une connexion Bluetooth consultez le guide d utilisation du vérificateur Quick Check 890 Utilisation de Quick Check ImageData Pour la version PC de Quick Check ImageData cliquez sur Start All Programs Hand Held Products Quick Chec...

Page 47: ...é Vous pouvez sélectionner le port en cliquant sur File Preferences Fichier Préférences Le QCID tente ensuite de se connecter au vérificateur QC890 correspondant Lorsqu une connexion est établie l écran principal du logiciel s affiche comme illustré ci dessous Écran principal de l ordinateur Écran principal du PDA ...

Page 48: ...es 3 Lorsque la source lumineuse est activée appuyez de nouveau sur le bouton de lecture pour scanner et vérifier le code à barres Lecture d un symbole de code à barres avec Quick Check ImageData 1 Placez le symbole sous le vérificateur QC890 2 Si nécessaire pressez le bouton de lecture sur le dessus de l unité pour activer la source lumineuse et procéder à l alignement du symbole 3 Pour la versio...

Page 49: ... au symbole Consultez les instructions à la page FR 8 1 Placez le vérificateur sur la page de réflectance incluse dans le kit Utilisez la fenêtre d alignement du symbole pour centrer la page de réflectance 2 Pressez le bouton de lecture sur le dessus de l unité pour activer la source lumineuse et procéder à l alignement 3 Pressez de nouveau le bouton de lecture pour scanner le symbole de code à ba...

Page 50: ... 782 4263 8h00 à 18h00 heure de la côte est Fax 315 554 6705 E mail natechsupport handheld com Amérique latine Téléphone 803 835 8000 Téléphone 800 782 4263 E mail latechsupport handheld com Brésil Téléphone 55 21 3535 9100 Fax 55 21 3535 9105 E mail brsuporte handheld com Mexique Téléphone 803 835 8000 E mail latechsupport handheld com Europe Moyen Orient et Afrique Téléphone 31 0 40 7999 393 Fax...

Page 51: ...accompagné d une copie de la preuve d achat datée Contactez le centre de votre région pour obtenir un numéro d autorisation de retour n RMA Return Material Authorization avant de renvoyer le produit Amérique du Nord Téléphone 800 782 4263 Fax 803 835 8012 E mail naservice handheld com Amérique latine Téléphone 803 835 8000 Téléphone 800 782 4263 Fax 239 263 9689 E mail laservice handheld com Brési...

Page 52: ...3 5770 6313 E mail apservice handheld com Assistance en ligne pour la maintenance et la réparation des produits Vous pouvez également accéder à l assistance en ligne pour la maintenance et la réparation des produits à l adresse www handheld com ...

Page 53: ... können Sie die Verifizierungsergebnisse für die spätere Bezugnahme speichern Weitere Informationen über QCID sind dem Benutzerhandbuch oder der Hilfedatei zu entnehmen Auspacken des QC890 Verifier Nach dem Öffen des Versandkartons sollten Sie prüfen ob alle bestellten Teile vorhanden sind den Versandkarton für spätere Aufbewahrung oder Versand aufheben prüfen ob Transportschäden aufgetreten sind ...

Page 54: ...chließen des Geräts finden Sie unter USB Kommunikationsschnittstelle auf Seite DE 2 und Serielle RS 232 Kommunikationsschnittstelle auf Seite DE 4 LED Anzeigen Kommunikationsschnittstellen Das QC890 Verifier System unterstützt folgende Schnittstellen USB RS 232 und Bluetooth USB Kommunikationsschnittstelle Vor dem Anschließen des QC890 Verifier müssen Sie die Quick Check ImageData Software von der...

Page 55: ...en Sie auf Weiter 5 Es wird die Meldung Es wurden keine Treiber für dieses Gerät gefunden eingeblendet Das ist normal Klicken Sie auf die Schaltfläche Diskette 6 Das Fenster Von Datenträger installieren wird eingeblendet Klicken Sie auf Durchsuchen 7 Navigieren Sie zu der Stelle an der Sie die ImageData Software beim Installieren von der CD gespeichert haben und öffnen Sie den Ordner drivers USBCO...

Page 56: ... USB COM Anschlussemulation ist die Standardschnittstelle für den QC890 Verifier Hinweis Es ist keine zusätzliche Konfiguration z B Baudrate erforderlich Serielle RS 232 Kommunikationsschnittstelle Für eine RS 232 Schnittstelle werden keine zusätzlichen Treiber benötigt Schließen Sie den QC890 Verifier an den Host an wie in der Abbildung unten dargestellt RS 232 Auswahlen Scannen Sie den folgenden...

Page 57: ...u aktivieren Standardeinstellung Aus Nachdem die Bluetooth Option aktiviert ist müssen Sie den entsprechenden Strichcode unten scannen um eine Verbindung mit einem PC oder Laptop oder mit einem PDA Mobilsystemgerät herzustellen Wenn Sie eine Bluetooth Verbindung mit einem PC oder Laptop herstellen möchten scannen Sie den Strichcode unten und befolgen Sie die Anweisungen die mit dem Bluetooth Gerät...

Page 58: ...eine Anzeige eingeblendet die ungefähr der in der Abbildung entspricht Die Seriennummer wird eingeblendet damit Sie feststellen können ob der korrekte QC890 Verifier gefunden wurde In dem Quick Check 890 Verifier Benutzerhandbuch finden Sie nähere Angaben zum Herstellen einer Bluetooth Verbindung Gebrauch von Quick Check ImageData Für die PC Version von Quick Check ImageData rufen Sie Start All Pr...

Page 59: ...ählen Sie den Anschluss aus indem Sie auf File Preferences Datei Voreinstellungen klicken Nach der Auswahl versucht QCID eine Verbindung mit dem angeschlossenen QC890 Verifier herzustellen Nach Herstellung der Verbindung wird der Haupbildschirm der Anwendung eingeblendet unten dargestellt PC Hauptbildschirm PDA Hauptbildschirm ...

Page 60: ...liegt 3 Drücken Sie die Scan Taste oben auf dem Gerät noch einmal bei eingeschalteter Beleuchtung um den Strichcode zu scannen und zu verifizieren Scannen eines Strichcode Symbols mit Quick Check ImageData 1 Platzieren Sie den QC890 Verifier auf dem Symbol 2 Drücken Sie die Scan Taste oben auf dem Gerät um die Beleuchtung einzuschalten und das Ausrichten des Symbols zu erleichtern 3 Bei der PC Ver...

Page 61: ...itgelieferten Reflexionscode Zentrieren Sie den Code mit Hilfe des Symbolausrichtungsfensters 2 Drücken Sie die Scan Taste oben auf dem Gerät um die Beleuchtung einzuschalten und das Ausrichten zu vereinfachen 3 Drücken Sie die Scan Taste oben auf dem Gerät noch einmal um das Strichcode Symbol zu scannen Der QC890 Verifier liest das Symbol automatisch ab und führt die Kalibrierung durch Wenn der K...

Page 62: ...telle USA und Kanada Telefon 800 782 4263 8 00 18 00 Uhr EST Faxnummer 315 554 6705 E Mail natechsupport handheld com Lateinisches Amerika Telefon 803 835 8000 Telefon 800 782 4263 E mail latechsupport handheld com Brasilien Telefon 55 21 3535 9100 Faxnummer 55 21 3535 9105 E mail brsuporte handheld com Mexiko Telefon 803 835 8000 E mail latechsupport handheld com Europa Naher Osten und Afrika Tel...

Page 63: ...rvice zu erhalten Wenden Sie sich an die für Sie zuständige Niederlassung siehe unten um eine Warenrücksendenummer RMA Nummer zu erhalten bevor Sie das Produkt zurücksenden Nordamerika Telefon 800 782 4263 Option 4 Faxnummer 704 566 6015 E Mail naservice handheld com Lateinisches Amerika Telefon 803 835 8000 Telefon 800 782 4263 Faxnummer 239 263 9689 E Mail laservice handheld com Brasilien Telefo...

Page 64: ...er 813 5770 6313 E Mail apservice handheld com Online Produktservice und Unterstützung bei der Instandhaltung Auf unserer Website unter www handheld com haben Sie auch Zugriff auf Online Produktservice und Unterstützung bei der Instandhaltung ...

Page 65: ... 安装软件包含在校验装置随附的光盘中 QCID 是 Quick Check 890 Verifier 的图形界面 可以利用它来保存检测结果供日后参 考 有关 QCID 的详细信息 请参阅 用户指南 或帮助文件 QC890 Verifier 拆包验货 在打开产品的装运箱之后 请进行下列步骤 检查是否您订购的所有物品都在 保存装运箱 以便日后储存或装运可用 检查是否有装运过程中的损坏 如有损坏 请立即向交货承运人报告 电池充电 建议您在使用前给电池充电至少 2 个小时 电池充电时可以使用装置 1 将电源插入装置背面的端口 2 将电源插入交流主电源 安装 Quick Check ImageData 若要安装 Quick Check ImageData 请插入光盘并按照显示的指令操作 物理连接 装置背面的直流电源接头连接到用于外部供电和电池充电的电源 装置上的 DB9 端口连接到光笔读入器 鼠标读...

Page 66: ...2 和 Bluetooth 蓝牙 USB 通信接口 在连接 QC890 Verifier 之前 必须通过工具包中的光盘装载 Quick Check ImageData 软件 将 Quick Check ImageData 软件从光盘安装到主机系统 如下图所示 将 QC890 Verifier 连接到主机 接下来必须安装 QC890 的 USB 驱动程序 1 将 USB 电缆插入 PC 后 Windows 找到新的硬件向导打开 不要让 Windows 尝试 自动安装驱动程序 单击不 这次不 然后单击下一步 2 选择从列表或指定位置安装 高级 然后单击下一步 LED 指示 原因 绿色常亮 正在充电 绿色闪烁 读取正常 红色闪烁 电池电量低 橙色常亮 电池电量太低 装置无法正常工作 插入外部电源 1 2 ...

Page 67: ...使用默认位置 则该软件保存在 C Program Files Hand Held Products Quick Check ImageData drivers USBCOMPortEmulation 中 单击文件 hhpcdc inf 然后单击打开 8 您现在返回到 从磁盘安装 窗口 单击确定 9 在下一个屏幕上 您会看见 QC890 Verifier 作为其中一个硬件选项 单击它 然后单击下一步 单击完成关闭 找到新的硬件向导 USB 模拟成 COM 端口 扫描下列代码 使 QC890 Verifier 按指令模拟基于 RS 232 的 COM 端口 连接好 QC890 Verifier 并成功安装 USB 驱动程序之后 驱动程序会使用下一个可用的 COM 端 口 USB 模拟成 COM 端口是 QC890 Verifier 的默认接口 附注 无需其它配置 例如 波特率 USB 模拟成 ...

Page 68: ...QC890 Verifier 连接到主机 RS 232 选项 扫描如下条码 选择 RS 232 通讯方式 RS 232 设置为 蓝牙 蓝牙实现 使用 SPP 串行接口定义 将 QC890 Verifier 连接到主机系统 QC890 SPP 是一种标准的蓝牙定义实现 这使得 QC890 系统与大多数蓝牙设备兼容 QC890 装置可与便携式计算机 PC 或 PDA 内置的蓝牙无线接收装置搭配使用 波特率 115 200 奇偶校验 无 数据位 8 停止位 1 流控制 无 RS 232 通讯方式 ...

Page 69: ...式计算机的连接 请扫描下面的条码 按照蓝牙设备提供的指令 找到 QC890 Verifier 并进行连接 如果超出了 QC890 Verifier 的工作范围 则 QC890 Verifier 在返回范围之内后就会自动重新连接到蓝牙设备 启用了蓝牙通信之后 默认为 PC 便携式计算机 若要建立蓝牙与 PDA 或 Hand Held Products 移动无线系统设备的连接 请扫描下面的 条码 按照蓝牙设备提供的指令找到 Hand Held Products 并进行连接 如果超出了 QC890 Verifier 的工作范围 则 QC890 Verifier 不会重新连接 只能由主机设备重新连 接到 QC890 Verifier 蓝牙开启 蓝牙连接 PC 便携式计算机 蓝牙连接 PDA 移动无线系统设备 ...

Page 70: ...erifier User s Guide 使用 Quick Check ImageData 对于 Quick Check ImageData 的 PC 版本 转到 Start All Programs Hand Held Products Quick Check ImageData 开始 所有程序 Hand Held Products Quick Check ImageData 或双击桌面上的 Quick Check ImageData 图 标 安装时设置 对于 PDA 版本 则通过单击 Start Programs 开始 程序 来启动 Quick Check ImageData 选择 Quick Check ImageData 图标 ...

Page 71: ...SC 7 当您首次使用 QCID 时 应用程序会要求您选择连接到 QCID 上的 COM 端口 您可以 通过单击 File Preferences 文件 首选项 来选择端口 在您作出选择之 后 QCID 会尝试连接到该端口所连接的 QC890 Verifier 建立连接后 会显示如下的 应用程序主屏幕 PC 主屏幕 PDA 主屏幕 ...

Page 72: ...Data 扫描条码符号 1 将 QC890 Verifier 置于条码顶端 2 如有必要 可按下装置顶部的扫描按钮 开启照明来协助进行符号对齐 3 对于 PC 版本 单击 Main Display 主显示 窗口上的 Scan 扫描 按钮 对于 PDA 版本 请选择 Scan Data 扫描数据 选项卡上的 Device 设备 然后选择 Scan 扫描 校准 QC890 Verifier 校准是 ISO IEC 标准的一项要求 有关校准的详细信息 请参阅 QC890 Verifier User s Guide 或帮助文件 校准 QC890 Verifier 系统时 QC890 Verifier 必须连接到 Quick Check ImageData 软件 校准时 必须将条码符号的中心与中心箭头对齐并保持符号与 装置平行 请参阅第 SC 8 页上的指令 ...

Page 73: ...号并执 行校准 如果校准处理成功 则会显示以下屏幕 4 输入您的姓名和执行校准的位置 然后单击 OK 确定 显示下列屏幕 5 如果装置无法校准 请联系 Hand Held Products Technical Support 若要访问校准日志 请转到 Settings Calibration Calibration LogSettings 设置 校准 校准日志 输入密码 visions07 附注 如外部设备需要校准的话 请参阅 QC890 Verifier User s Guide 技术协助 如果您在对图像仪进行安装或故障排除时需要协助 请致电您的经销商或最近的 Hand Held Products 技术支持部门 北美 加拿大 ...

Page 74: ...eld com 墨西哥 电话 803 835 8000 电子邮件 latechsupport handheld com 欧洲 中东和非洲 电话 31 0 40 7999 393 传真 31 0 40 2425 672 电子邮件 eurosupport handheld com 亚太地区 电话 电话 香港 852 3188 3485 或 2511 3050 电话 中国 86 21 6361 3818 电子邮件 aptechsupport handheld com 日本 电话 813 5770 6312 电子邮件 aptechsupport handheld com 馬来西亞 电话 603 6201 7020 电子邮件 aptechsupport handheld com 在线技术协助 您也可以从 www handheld com 获取在线技术协助 其他信息 若要下载这些产品的完整用户指南 请...

Page 75: ...2 4263 传真 239 263 9689 电子邮件 laservice handheld com 巴西 电话 55 21 3535 9100 传真 55 21 3535 9105 电子邮件 brservice handheld com 墨西哥 电话 52 55 5203 2100 传真 52 55 5531 3672 电子邮件 mxservice handheld com 欧洲 中东和非洲 电话 31 0 40 2901 633 传真 31 0 40 2901 631 电子邮件 euservice handheld com 亚太地区 电话 852 2511 3050 传真 852 2511 3557 电子邮件 apservice handheld com 日本 电话 813 5770 6312 传真 813 5770 6313 电子邮件 apservice handheld com 在...

Page 76: ...SC 12 ...

Page 77: ...軟體包含於校驗器隨附的光碟中 QCID 是 Quick Check 890 Verifier 的圖形介面 它可用來儲存校驗結果以供日後參考 如需有關 QCID 的其他資訊 請參閱使用手冊或說明檔 QC890 Verifier 拆封驗貨 拆開產品托運包裝後 請遵照下列步驟進行 核對所訂購項目是否齊備 保留運送包裝箱 以便日後存放或托運時使用 檢查是否有裝運過程中的損壞 如有損壞請立即告知送貨人員 為電池充電 我們建議您在使用電池之前至少先充電 2 小時 您可以在充電期間使用本機組 1 將電源供應器插入機組背面的連接埠 2 將電源供應器插入 AC 主要電源 Quick Check ImageData 的安裝 安裝 Quick Check ImageData 時 請插入光碟 並遵循畫面上的指示操作 連接硬體 機組背面的直流電源接頭 連接到外部供電和電池充電的電源 機組的 DB9 連接埠連至光筆輸...

Page 78: ... QC890 Verifier 之前 您必須從套件中隨附的光碟載入 Quick Check ImageData 軟體 請將 Quick Check ImageData 軟體從光碟安裝到您的主機系統上 將 QC890 Verifier 連接至主機 如下圖所示 接下來您必須為 QC890 安裝 USB 驅動程式 1 在將 USB 纜線插入您的個人電腦後 會出現 Windows 尋找新增硬體精靈 請勿讓 Windows 嘗試自動安裝驅動程式 請按一下否 現在不 然後按下下一步 2 選擇從清單或特定位置安裝 進階 然後按下下一步 3 按下不要搜尋 我將選擇要安裝的驅動程式 然後按下下一步 LED 指示 原因 綠色持續亮起 正在充電 綠色閃爍 正常讀取 紅色閃爍 電池電量不足 橘色持續亮起 電池電量過低 機組無法運作 請插入外部電源供應器 1 2 ...

Page 79: ...Quick Check ImageData drivers USBCOMPortEmulation 按一下 hhpcdc inf 檔案 並按一下開啟 8 您現在會回到 從磁片安裝 視窗 按一下確定 9 您會在下一個畫面上看到 QC890 Verifier 列在硬體選項之中 請按一下該選項 並按 一下下一步 按一下完成以關閉 尋找新增硬體精靈 USB 模擬 COM 連接埠 請掃描下列條碼 將 QC890 Verifier 程式設定為模擬 RS 232 架構的 COM 連接埠 在 連接 QC890 Verifier 且成功安裝 USB 驅動程式後 驅動程式會使用下一個可用的 COM 連接埠 USB 的 模擬COM連接埠是 QC890 Verifier 的預設介面 附註 不需要任何額外的設定 例如傳輸速率 RS 232 序列通訊介面 RS 232 介面並不需要其他驅動程式 請將 QC890 Ve...

Page 80: ...tooth 設定檔的標準運作方式 可使 QC890 系統與大部分的 Bluetooth 裝置相容 QC890 機組可搭配筆記型電腦 PC 或 PDA 內建的 Bluetooth 無 線傳輸 QC890 Verifier 搭配 Bluetooth 裝置 附註 在使用 USB 或 RS 232 介面時 Bluetooth 通訊介面會自動關閉 請掃描下方的 Bluetooth 條碼 以啟用 Bluetooth 選項 預設 關閉 在啟用 Bluetooth 選項後 請掃描下面的條碼 以連接至個人電腦或筆記型電腦 或是 PDA Mobility System 裝置 傳輸速率 115 200 同位檢查 無 資料位元 8 停止位元 1 流量控制 無 RS 232 通訊 啟用 Bluetooth ...

Page 81: ... Held Products Mobility Systems 裝置建立 Bluetooth 連線 請 掃描下面的條碼 依照 Bluetooth 裝置隨附的指示尋找並連上 QC890 Verifier 如果您離 開了 QC890 Verifier 的範圍 QC890 Verifier 不會重新連線 必須要靠主機裝置重新連 線至 QC890 Verifier Bluetooth QC890 裝置搜尋結果範例 開始搜尋裝置後 主機裝置上會出現如下畫面 您可以藉著顯示的序列編號 判斷找到的 QC890 Verifier 是否正確 如需進行 Bluetooth 連線的詳細資訊 請參閱 Quick Check 890 Verifier User s Guide Bluetooth 連線 PC 筆記型電腦 Bluetooth 連線 PDA Mobility Systems 裝置 ...

Page 82: ...有程式 Hand Held Products Quick Check ImageData 或連按兩下您桌面上的 Quick Check ImageData 圖示 已在安裝時設定 若您使用 PDA 版本 請按下Start Programs 開始 程式集 來啟動 Quick Check ImageData 接著選取 Quick Check ImageData 圖示 初次使用 QCID 時 應用程式會要求您選取 QCID 連接的 COM 連接埠 您可以依序按 一下 File Preferences 檔案 參數設定 來選取連接埠 選取完畢後 QCID 會嘗試 與連接上的 QC890 Verifier 連線 建立連線後 會出現應用程式的主畫面 如下所示 PC 主畫面 ...

Page 83: ...ifier 掃描條碼 1 將 QC890 Verifier 置於條碼上 2 按下機組頂端的掃描按鈕 開啟照明 查看機組視窗 將機組與條碼對齊 附註 條碼中間對準中央箭頭時可蒐集最完整的校驗資料 3 在照明開啟時再次按下機組頂端的掃描按鈕 以掃描並檢查條碼 使用 Quick Check ImageData 掃描條碼 1 將 QC890 Verifier 置於條碼上 2 必要時 按下機組頂端的掃描按鈕開啟照明 以便對準條碼 PDA 主畫面 ...

Page 84: ...籤中選取 Device 裝置 再選取 Scan 掃描 校準 QC890 Verifier ISO IEC 標準規定必須進行校準 如需其他的校準資訊 請參閱 QC890 Verifier User s Guide 或說明檔 在校準 QC890 Verifier 系統時 QC890 Verifier 必須連線至 Quick Check ImageData 軟體 在校準期間 請務必將條碼的中心與中央箭頭對齊 並將機組 保持與條碼平行 請參閱第 TC 7 頁的指示 1 將校驗器放在套件中隨附的校準卡上 使用條碼對齊視窗對準校準卡的中間 2 按下機組頂端的掃描按鈕 開啟照明以協助對齊 ...

Page 85: ...校準 校 準記錄 請輸入密碼 visions07 附註 如需校準外部裝置 請參閱 QC890 Verifier User s Guide 技術協助 安裝或疑難排解成像器時如需協助 請聯絡您的經銷商或最近的 Hand Held Products 技術支服務中心 北美 加拿大 電話 800 782 4263 早上 8 到下午 6 點 美國東岸時間 傳真號碼 315 554 6705 電子郵件 natechsupport handheld com 拉丁美洲 電話 803 835 8000 電話 800 782 4263 電子郵件 latechsupport handheld com 巴西 電話 55 21 3535 9100 傳真 55 21 3535 9105 電子郵件 brsuporte handheld com 墨西哥 電話 803 835 8000 電子郵件 latechsupport ...

Page 86: ...20 電子郵件 aptechsupport handheld com 線上技術協助 您也可以在 www handheld com 線上取得技術援助 其他資訊 要下載這些產品的完整使用手冊 請到我們的網站 網址是 www handheld com 產品服務與維修 Hand Held Products 透過全球各地的服務中心提供其所有的產品服務 若要取得 保固或非保固服務 請將機組連同註明日期的購買記錄影本寄回 Hand Held Products 郵資付訖 寄回產品前請與下列辦事處聯絡 以取得退回器材授權 碼 Return Material Authorization Number RMA 北美地區 電話 800 782 4263 傳真 803 835 8012 電子郵件 naservice handheld com 拉丁美洲 電話 803 835 8000 電話 800 782 4263 ...

Page 87: ... 52 55 5531 3672 電子郵件 mxservice handheld com 歐洲 中東及非洲 電話 31 0 40 2901 633 傳真 31 0 40 2901 631 電子郵件 euservice handheld com 亞太地區 電話 852 2511 3050 傳真 852 2511 3557 電子郵件 apservice handheld com 日本 電話 813 5770 6312 傳真 813 5770 6313 電子郵件 apservice handheld com 線上產品服務與維修協助 您也可以在 www handheld com 取得線上產品服務與維修協助 ...

Page 88: ...TC 12 ...

Page 89: ... ソフトウェアは 検証装置に同梱されている CD ROMに収録されています QCIDは Quick Check 890検証機のグラフィカル インターフェイスです これを使用 して 検証結果を保存し 後で参照できます QCID の詳細については ユーザーズ ガ イドまたはヘルプ ファイルを参照してください QC890 検証機の開梱 製品が梱包されている箱を開けて 次の手順に従います 注文した品目がすべて揃っていることを確認してください 梱包の箱は 今後の保管または配送用に保存しておいてください 配送中に製品の損傷がなかったかどうかを確認してください 損傷があった場合は 直ちに配送業者に報告してください バッテリーの充電 少なくともご使用の2時間前にバッテリーの充電を行うようお勧めします バッテリーを 充電しながら装置を使用できます 1 電源を装置の背面にあるポートに差し込みます 2 電源を ...

Page 90: ... 装置の接続方法の詳細については JA 2 ページの USB 通信インター フェイス および JA 4ページの RS 232シリアル通信インターフェイス を参照して ください LED インジケータ 通信インターフェイス QC890 検証機システムでは USB RS 232 および Bluetooth のインターフェイス をサポートしています USB 通信インターフェイス QC890検証機を接続する前に キットに含まれているCDからQuick Check ImageData ソフトウェアを読み込む必要があります Quick Check ImageDataソフトウェアをCD からホスト システムにインストールします LED の表示 原因 緑色 点灯 充電中 緑色 点滅 読み取り良好 赤色 点滅 バッテリー残量不足 オレンジ色 点灯 バッテリー残量が少ないため 装置が動作しません 外部電源に接続...

Page 91: ...ルし クリックして強調表示します 次へ を クリックします 5 このデバイスのドライバが見つかりません というメッセージが表示されます ディスク使用 ボタンをクリックします 6 フロッピー ディスクからインストール ウィンドウが開きます 参照 をクリックし ます 7 CD から ImageData ソフトウェアをインストールしたときに保存した場所を参照 し drivers USBCOMPortEmulation フォルダを開きます デフォルトの場所を 使用した場合 C Program Files Hand Held Products Quick Check ImageData drivers USBCOMPortEmulation です ファイル hhpcdc inf をクリックし 開く をクリックします 8 フロッピー ディスクからインストール ウィンドウに戻ります OK をクリックし ...

Page 92: ...890 検証機を接続し USB ドライバを正常にインストールする と ドライバは次に使用可能なCOMポートを使用します USB COMポート エミュレー ションは QC890検証機のデフォルトのインターフェイスです 注 その他の設定 ボーレートなど は不要です RS 232 シリアル通信インターフェイス RS 232 インターフェイスでは ドライバは必要ありません 次の図に示すように QC890検証機をホストに接続します RS 232 の選択 次のバーコードをスキャンして RS 232通信を選択します USB COM ポート エミュレーション RS 232 通信 ...

Page 93: ...ンターフェイスを使用すると Bluetooth 通信インターフェ イスは自動的にオフになります 次の Bluetooth バーコードをスキャンして Bluetooth オプションをオンにします デ フォルトではオフになっています Bluetoothオプションがオンになったら 適切なバーコードをスキャンして PC ラップ トップまたはPDA モバイル デバイスに接続します PC ラップトップへの Bluetooth 接続を確立するには 次のバーコードをスキャンし Bluetooth デバイスに同梱されているマニュアルに従い QC890 検証機を探して接続し ます QC890 検証機との通信範囲を超えた場合 QC890 検証機は 通信範囲内に戻っ たときに自動的にBluetoothデバイスに再接続します Bluetooth通信が有効である場合 ホスト デバイスのデフォルト設定はPC ラップトッ...

Page 94: ...機が検出されたかどうかを確認できま す Bluetooth接続の詳細については Quick Check 890検証機 User s Guide を参 照してください Quick Check ImageData の使用方法 Quick Check ImageData を PC で使用している場合 Start All Programs Hand Held Products Quick Check ImageData スタート すべてのプログ ラム Hand Held Products Quick Check ImageData の順に選択するか デ スクトップ上で Quick Check ImageData アイコンをダブルクリックします インストー ル時のセットアップでアイコンをデスクトップ上に表示するようにした場合 PDAで使用している場合は Start Programs スタート プログ...

Page 95: ...A 7 QCIDを初めて使用する際は QCIDが接続されているCOMポートを選択するよう求め られます File Preferences ファイル 基本設定 をクリックすると ポー トを選択できます ポートを選択すると QCIDは 接続されたQC890検証機への接続 を試みます 接続が確立されると 次の図に示すようにアプリケーションのメイン画面 が表示されます PC のメイン画面 PDA のメイン画面 ...

Page 96: ... 最良の検証データが得られます 3 照明が点灯している間に 装置の上部にあるスキャン ボタンをもう一度押し バー コードをスキャンして検証します Quick Check ImageData を使用したバーコードシンボル のスキャン 1 QC890 検証機をバーコードシンボルの上に置きます 2 必要に応じて 装置の上部にあるスキャン ボタンを押して照明を点灯させると バー コードシンボルを調整しやすくなります 3 PC で使用している場合 Main Display メイン表示 ウィンドウで Scan スキャ ン ボタンをクリックします PDA で使用している場合は Device デバイス を選択し Scan Data デー タのスキャン タブから Scan スキャン ボタンをクリックします ...

Page 97: ...ーコードシンボルの中心を中央の矢印に合わせ 装 置とバーコードシンボルの位置を平行に保つことが重要です JA 8 ページの指示を参照 してください 1 キットに含まれている反射ページの上に検証装置を置きます バーコードシンボルの 調整ウィンドウを使用して反射ページを中心に合わせます 2 装置の上部にあるスキャン ボタンを押して照明を点灯させると調整しやすくなり ます 3 装置の上部にあるスキャン ボタンをもう一度押して バーコードシンボルを読み取り ます QC890 検証機は自動的にバーコードシンボルを読み取り キャリブレーショ ンを実行します キャリブレーション プロセスが正常に終了すると 次の画面が表示 されます 4 名前とキャリブレーションを行った場所を入力して OK をクリックします 次の 画面が表示されます 5 装置のキャリブレーションが行われない場合は Hand Held Pr...

Page 98: ...午前 8 時 午後 6 時 東部標準時 ファックス番号 315 554 6705 電子メール natechsupport handheld com 中南米 電話番号 803 835 8000 電話番号 800 782 4263 電子メール latechsupport handheld com ブラジル 電話番号 55 21 3535 9100 ファックス番号 55 21 3535 9105 電子メール brsuporte handheld com メキシコ 電話番号 803 835 8000 電子メール latechsupport handheld com ヨーロッパ 中東 およびアフリカ 電話番号 31 0 40 7999 393 ファックス番号 31 0 40 2425 672 電子メール eurosupport handheld com アジア太平洋 電話番号 香港 852 3188...

Page 99: ... 保証期間内または保証期間外のサービスを受ける には 日付の入ったご購入記録のコピーとともに装置を Hand Held Products に お送りください 送料はご負担願います 製品をお送りいただく前に 以下の該当する HandHeld 支社にご連絡のうえ 返品許可 RMA 番号を取得してください 北米 電話番号 800 782 4263 ファックス番号 803 835 8012 電子メール naservice handheld com 中南米 電話番号 803 835 8000 電話番号 800 782 4263 ファックス番号 239 263 9689 電子メール laservice handheld com ブラジル 電話番号 55 21 3535 9100 ファックス番号 55 21 3535 9105 電子メール brservice handheld com メキシコ 電話番号...

Page 100: ...01 631 電子メール euservice handheld com アジア太平洋 電話番号 852 2511 3050 ファックス番号 852 2511 3557 電子メール apservice handheld com 日本 電話番号 813 5770 6312 ファックス番号 813 5770 6313 電子メール apservice handheld com オンラインによる製品サービスと 修理サポート www handheld com でオンラインによる製品サービスと修理のサポートをお受 けいただくこともできます ...

Page 101: ...roducts In the event that the product is returned to Hand Held Products or its authorized service center within the Warranty Period and Hand Held Products determines to its satisfaction that the product is defective due to defects in materials or workmanship Hand Held Products at its sole option will either repair or replace the product without charge except for return shipping to Hand Held Produc...

Page 102: ...her provisions hereof Use of any peripherals not manufactured sold by Hand Held Products voids the warranty This includes but is not limited to cables power supplies cradles and docking stations Hand Held Products Inc extends these warranties only to the first end users of the products These warranties are nontransferable The limited duration of the warranty for the Quick Check 890 Verifier is for...

Page 103: ......

Page 104: ...Hand Held Products Inc 700 Visions Drive P O Box 208 Skaneateles Falls NY 13153 0208 QC890 ML QS Rev A 2 08 ...

Reviews: