background image

F11 to Recovery Zone....

■ Recovery Solution 

(Optional)

F11 to Recovery Zone....

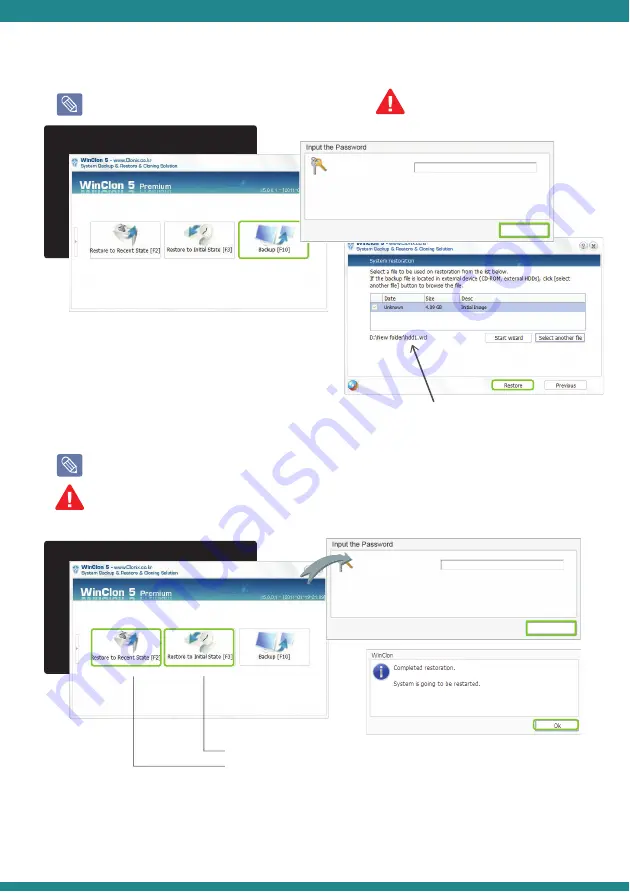
1. Turn on the system and follow the on-screen instructions: Press <F11> when the “F11 to WinClon ...” message

    appears on the screen within 2 to 4 seconds (PC POST process).

2. When WinClon appears on the screen, press <F2> or <F3> key on your keyboard or use your mouse to select

    “Recover to Recent State” or “Recover to Initial State”.

3. After entering the password, press the <OK> button to continue restore. (Password: pos)

※ "Recover to Recent State” will restore to the most recent backup of Windows.

※ "Recover to Initial State” will restore to the factory default settings.

● Restore

When you recover the Hard Disk, all the data in the system will be deleted.

Please save all important data in external storage before you start recovery.

You can still recover quickly even if you are not able to boot from the OS.

Keyboard and mouse must be connected.

pos

Password

OK

① Turn on the system and follow the on-screen instructions:

    Press <F11> when the “F11 to WinClon ...”

    message appears on the screen within 2 to 4 seconds

    (PC POST process).
② When WinClon appears on the screen, press <F10> key on your

    keyboard or use your mouse to select “Backup”.
③ After entering the password, press the <OK> button to continue backup. (Password: pos)

Location of backup image

● Backup

Back up your current Window user environment into restore field.

It is much easier to operate if you know where the data is

being backed up.

Keyboard and mouse must be connected

(Recovery program may vary depending on model))

pos

Password

OK

Summary of Contents for HW-9000

Page 1: ...Cover Please always check the directions Detach the Stand Side Covers as shown in the illustration Detach the I O Ports Cover Connect the Power Adapter Press the Power Button to turn on the system Connecting DC Power Supply Cable Turning System On 3 3 Standard I O Ports Layout Parts Description Power Lamp MSR SCR iButton Error Lamp Reset Button Card Reader External USB 2 ports Storage Lamp Lan Lam...

Page 2: ...n of the arrow Click Start All Programs eGalaxTouch Configure Utility Click the Tools tab then 4 Points Calibration The touch screen input points are calibrated Touch Screen Calibration When using the touch screen for the first time or if the pointer does not precisely match your touch calibrate the touch screen using the eGalaxTouch tool Depending on the operating system the calibration process m...

Page 3: ... the data in the system will be deleted Please save all important data in external storage before you start recovery You can still recover quickly even if you are not able to boot from the OS Keyboard and mouse must be connected pos Password OK Turn on the system and follow the on screen instructions Press F11 when the F11 to WinClon message appears on the screen within 2 to 4 seconds PC POST proc...

Page 4: ...ift the Lever ⓐ Pull the stand in the direction of the arrow indicated Lift up and remove the stand The stand is heavy so please be careful For your safety you must put the lever in the correct insertion point when reassembling Stand Separation Lever Insertion Point 1 2 3 I O Ports Cover When reassembling the card reader you must assemble tightly otherwise the card will not be recognized by the re...

Reviews: