background image


HAMWORTHY HEATING LTD  


18 

WESSEX 100 M 


500001080/F 

11.7 User’s Instructions 
 

When the above is complete, the boiler owner or 
their representative should be made aware of the 
lighting and operating instructions fitted onto the top 
face of the control panel.  A practical demonstration 
should be given describing each functional step.  
This Installer's Guide and User’s Instructions should 
then be handed over and be kept in a safe place for 
easy reference. 

11.6  Installation Noise 
 

In order to avoid the possibility of noise from the 
installation, care should be taken to follow the 
manufacturer’s instructions. Particular attention 
should be paid to minimum water flow rates. If 
acoustic insulation is added to the boiler, care 
must be taken not to impede combustion or 
ventilation air flow. If in doubt contact the 
manufacturer. 

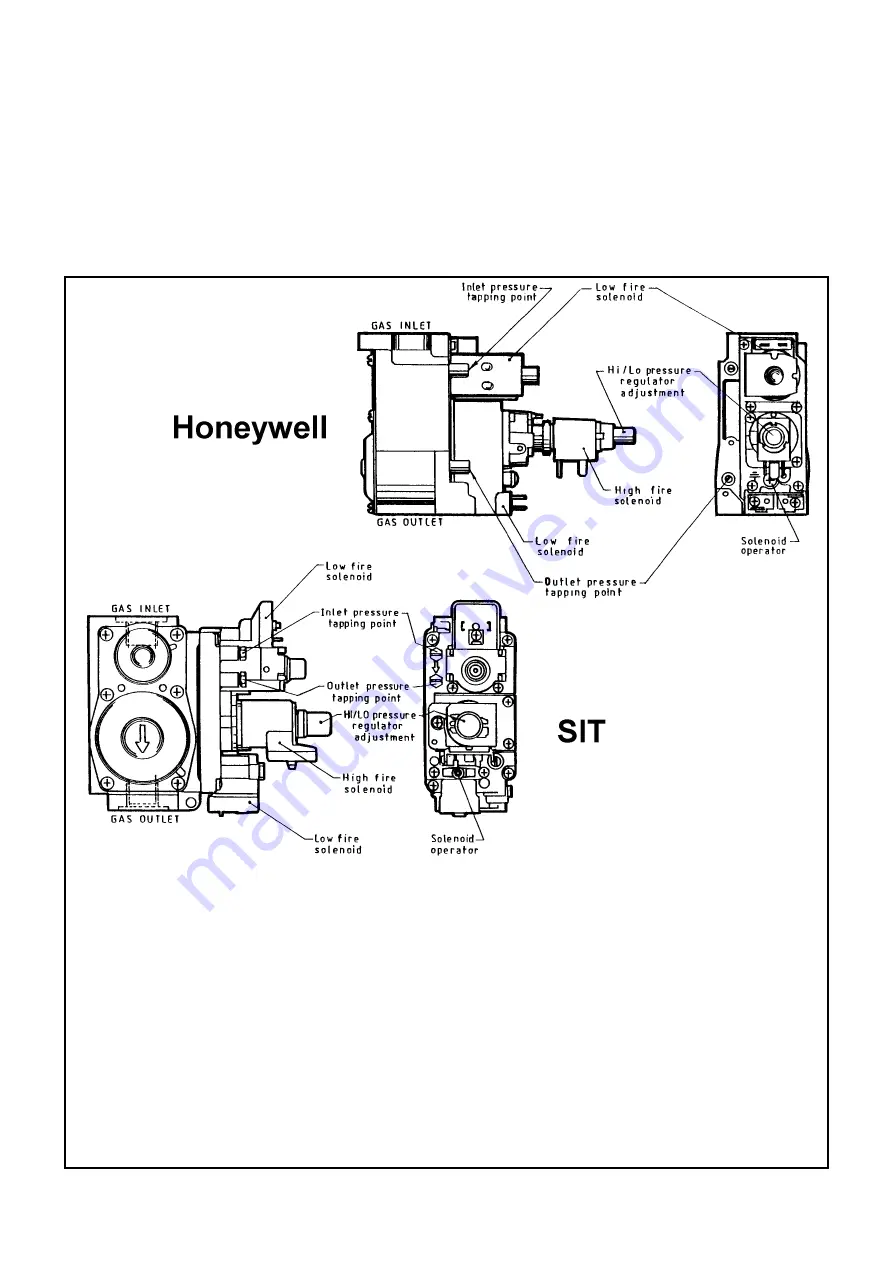
Figure 11.4.3 Diagram of Automatic Gas Valves


To adjust the low fire gas pressure, remove link G3 - 
G4 on PCB. Nominally set the low fire gas pressure 
by rotating the inner crosshead screw, c/w to increase 
pressure, anti c/w to decrease pressure, whilst 
keeping the outer nut from rotating. Turn the boiler off 
then on again and fine trim the gas pressure. 
 
Insert the high fire link G3 - G4 on the PCB; the 
boiler should drive to high fire. Replace the 
protective cap on the Hi/Lo pressure regulator. 
 

Note! The low fire setting must always be set 
last of all. The valves operation may be incorrect 
if this is omitted. 


Note!

 It is also advisable to carry out this procedure 

with all boilers firing.  

ADJUSTMENT PROCEDURE.


Refer to Figure 2.2 to determine the low fire and 
high fire gas pressures for the boiler being fired. 
 
Information relating to propane firing can be found in 
Appendix ‘A’.  
 
Attach a manometer (suitable for 30mbar) onto the 
gas valve outlet pressure test point. 
 
Light up the boiler. Then remove the protective 
cover from the Hi/Lo pressure regulator. 
 
To adjust the high fire gas pressure, turn the outer 
nut on the hi/lo pressure regulator, c/w to increase 
pressure, anti c/w to decrease pressure. 

Summary of Contents for Wessex 100 M100

Page 1: ...ING OPERATING OR SERVICING EQUIPMENT Wessex 100 M Series Boilers High Efficiency High Low Pre Mix Gas Fired Modular Boilers for Heating and Domestic Hot Water Installations Installation Commissioning and Servicing Instructions Wessex 100 M100 M200 M300 Models NATURAL GAS I2H LPG PROPANE I3P ...

Page 2: ...rating safely and efficiently Maintenance Agreements 01202 662555 Regular routine servicing of equipment by Hamworthy service engineers inspects the safety and integrity of the plant reducing the risk of failure and improving performance and efficiency Maintenance agreements enable our customers to plan and budget more efficiently Breakdown service repair replacement 01202 662555 Hamworthy provide...

Page 3: ... FAMILY I3P PLEASE ENSURE RELEVANT INFORMATION REQUIRED WITHIN DOCUMENT IS FOUND RELATING TO SPECIFIC GAS TO BE FIRED BEFORE FIRING BOILER THIS BOILER COMPLIES WITH ALL RELEVANT EUROPEAN DIRECTIVES EC TYPE CERTIFICATE Nos GAD BG EC 87 98 79 BED BE 87 98 16 PRODUCT IDENTIFICATION No 87AT79 PUBLICATION NO 500001080 ISSUE F August 2003 Wessex 100 M Series Boilers High Efficiency High Low Pre Mix Gas ...

Page 4: ...neral Requirements 6 2 Design Waste Gas Volume and Temperature 6 3 Materials 6 4 Suction 6 5 Disconnection 6 6 Flue Discharge 6 7 Surface Temperatures 6 8 Flue System Location 6 9 Condensate Discharge 7 0 AIR SUPPLY 8 7 1 Air Supply By Natural Ventilation 7 2 Air Supply By Mechanical Ventilation 8 0 WATER CIRCULATION SYSTEM 9 8 1 General 8 2 Pressure Relief Valve Safety Valve 8 3 Open Vent and Col...

Page 5: ...ater Circulation System 11 4 Commissioning the Boiler 11 4 1 Boiler Checks Prior to Lighting 11 4 2 Procedure for Initial Lighting 11 4 3 Checking Adjusting Inlet and Setting Pressures 11 4 4 Combustion Check 11 4 5 Air Inlet Damper 11 4 6 Safety Checks 11 5 External Controls 11 6 Installation Noise 11 7 User s Instructions 12 0 FAULT FINDING 19 12 1 Safety Features Summary 12 2 Fault Finding Proc...

Page 6: ...w Rates 9 Figure 8 3 Cold Feed and Vent Pipe Sizes 9 Figure 8 12 Site Wiring Diagram 12 Figure 9 1 Wiring Schematic 13 Figure 11 0 General Layout Front View 15 Figure 11 4 3 Diagram of Automatic Gas Valves 18 Figure 11 4 5 Diagram of Damper Mechanism 19 Figure 12 2 Fault Finding Procedures 21 22 Figure 14 1 Diagram of Hot Surface Igniter and Sensing Probe Assembly 25 Figure 14 2 Pressure Sensing T...

Page 7: ...risation unit must also incorporate a low level water switch which protects the water pumps and will directly or indirectly shut down the boiler plant should a low water condition occur Consideration should also be given to the maximum working pressure of the boiler as given in Section 2 TECHNICAL DATA p4 Consult Hamworthy Heating Technical Department for help or assistance if in doubt 1 5 The Wes...

Page 8: ...ule 3 Hamworthy Modular Boilers P T Circulation pump System Heating load Valve Drain valve Circulation pump Primary loop UNVENTED SYSTEM Primary loop Hamworthy recommended system Expansion pipe Float valve Valve Mains water Feed expansion tank Feed pipe Circulation pump Primary loop Module 1 Module 2 Module 3 Hamworthy Modular Boilers Drain Safety valve P T Pressure Temperature Gauges Valve Circul...

Page 9: ...de of the boiler can be reduced to a min of 100 on one side 650 500 400 400 The 500 dimensions must be increased to 570 without valves or 720 with valves if an HHL Water ManifoldKit is used M100 100kW 931 800 972 250 O D 230 102 701 245 43 43 125 104 406 104 70 133 624 520 Close coupled flue removed for clarity M200 200kW M300 300kW 1451 153 I D 520 1444 701 520 406 Gas connection Condensate drain...

Page 10: ...eaders litres 5 10 15 Design Water Flow Rate 11 C T Rise litre s 2 2 4 3 6 5 Waterside Pressure Loss 11 C T Rise mbar 480 Minimum Water Flow Rate 15 C T Rise litre s 1 6 3 2 4 8 Waterside Pressure Loss 15 C T Rise mbar 265 ELECTRICAL DATA Normal Supply Voltage 230V 50Hz Power Consumption maximum W 150 300 450 Start and Run Current per module A 2A 2 0 TECHNICAL DATA 2 1 The Wessex 100 M boiler can ...

Page 11: ...Guidance note PM5 Automatically controlled steam and hot water boilers CIBSE Publications CIBSE Guide It is impractical in this document to specify all relevant information but the following extracts from the above references are emphasized since failure to comply with these requirements will almost certainly result in an unsatisfactory installation 3 2 Feed water Quality If the boiler feed water ...

Page 12: ...ed on a level non combustible surface that is capable of adequately supporting its weight when filled with water and any ancillary equipment Any combustible material adjacent to the boiler and the flue system must be so placed or shielded to ensure that its temperature does not exceed 65 C Further details regarding boiler location are given in BS 6644 5 0 GAS SUPPLY 5 1 Service Pipes The local gas...

Page 13: ...esign Waste Gas Volume and Temperature It is recommended that the volume and temperature of the waste gases used for design of the flue system be as shown in Figure 2 2 p4 6 3 Materials Materials used for the flue system must be mechanically robust resistant to internal and external corrosion non combustible and durable under the conditions to which they are likely to be subjected Consideration sh...

Page 14: ...both low and high level openings are used the grilles shall have a total minimum free area of Low Level inlet 540cm plus 4 5cm per Kilowatt in excess of 60kW total rated input High Level outlet 270cm plus 2 25cm per Kilowatt in excess of 60kW total rated input 6 4 Suction The flue system should be designed to maintain atmospheric pressure or a slight suction at the boiler flue connection at all ti...

Page 15: ...Mechanical means should be as follows 1 Mechanical inlet and mechanical extract can be utilised providing design extraction rate does not exceed one third of the design inlet rate 2 Mechanical extract ventilation with natural inlet ventilation MUST NOT be used NOTE For Mechanical ventilation systems an automatic control should be provided to cut off the gas supply to the boiler in the event of fai...

Page 16: ...cludes the over pressure condition should a safety valve lift 8 5 Thermometer See Figure 1 1 p2 for typical position A thermometer complete with pocket should be fitted in the pipework to indicate water flow temperature 8 6 Drain Valves Each boiler should have a 15mm NB drain valve not H H L supply fitted to drain the boiler only The heating system in total should have drain valves as recommended ...

Page 17: ...vice or maintenance procedures are carried out Consideration should also be given to sizing of the safety valve s in the system See BS 6759 Part 1 for information See also BS 6880 Part 1 for design considerations 8 12 Modular Boiler Control Schemes For modular installations of the Wessex 100M range of boilers Hamworthy Heating can supply an optional Milton boiler sequence control system This syste...

Page 18: ...AC 50Hz 230V AC 50Hz 230V AC 50Hz 230V AC 50Hz 230V AC 50Hz 230V AC 50Hz BOILER PCB TO SIM BOILER PCB TO SIM LOW VOLTAGE LOW VOLTAGE 230V AC 50Hz 230V AC 50Hz 230V AC 50Hz 230V AC 50Hz 230V AC 50Hz 230V AC 50Hz VOLT FREE SIGNAL OUTPUTS RATED UP TO 250V AC 5A SUPPLY SUPPLY SUPPLY SUPPLY SUPPLY SUPPLY INTERFACE TERMINALS INTERFACE TERMINALS INPUTS OUTPUTS INPUTS OUTPUTS OUTPUT OUTPUT OUTPUT OUTPUT O...

Page 19: ...S 1000 IGNITION CONTROL KEY WIELAND ST18 SERIES PCB MOUNT SOCKET TERMINAL FOR SITE WIRING CONNECTIONS MOLEX MINI FIT JUNIOR PCB HEADER CRIMP TERMINAL IGNITION CONTROL TERMINAL J1 J2 J3 J4 31 32 33 34 MARSHALL EXTERNAL TIMECLOCK CONNECTION OPTION MARSHALL SAFETY INTERLOCK CONNECTION OPTION 230V 50Hz SUPPLY CONTROL STAT c 2 1 PCB MOUNT 6 35mm SPADE CONNECTOR G1 G2 E1 E2 E3 E5 E6 E7 E8 E9 E10 R2 R1 W...

Page 20: ...nal reverse return water manifold kits are available for models M200 and M300 Refer to Section 1 8 p1 9 3 Milton Boiler Sequence Control and Sequencing Interface Module Optional Refer to the Milton boiler sequence control manuals for details of its installation The sequencing interface module is supplied as a kit for site assembly to the boiler control panel s Refer to the installation instruction...

Page 21: ...A and IGE UP 2 as appropriate 11 0 COMMISSIONING AND TESTING For general layout of the boiler refer to Figures 2 1 p3 11 0 11 1 Electrical Installation Wiring MUST be checked by a suitably competent person Power supply required is 230 volts 50 Hz single phase An isolator correctly fused at 6A should be sited close to the boiler Access to the controls is achieved by rotating the two 1 4 turn latche...

Page 22: ...his procedure should be read and understood for later use when required 7 Ensure air pressure switch sensing tubes are correctly fitted without twists or kinks between the switches in the control panel and the airflow sensing device on the inlet damper assembly Refer to Figure 14 2 p25 for provisional pressure switch setting s Ensure that the inlet damper mechanism is intact and free to operate ov...

Page 23: ...hting Ensure gas service valve is in the OFF position Replace 2A fuse in fascia Press lockout button on fascia to re set the controls wait at least 15 seconds before pressing again if the lockout neon is not extinguished The combustion fan will start and run for a pre purge period approximately 30 seconds During this time the fan on neon should illuminate After a delay and if airflow is proved the...

Page 24: ...remove link G3 G4 on PCB Nominally set the low fire gas pressure by rotating the inner crosshead screw c w to increase pressure anti c w to decrease pressure whilst keeping the outer nut from rotating Turn the boiler off then on again and fine trim the gas pressure Insert the high fire link G3 G4 on the PCB the boiler should drive to high fire Replace the protective cap on the Hi Lo pressure regul...

Page 25: ...ause See Figure 12 2 p21 22 for possible corrective scenarios False flame signals at the start and during pre purge will cause the boiler to lockout 12 0 FAULT FINDING 12 1 Safety Features Summary Should the control thermostat s fail the temperature limiter will trip thus creating an immediate shutdown regardless of firing mode An overheat neon on the controls fascia will indicate this condition h...

Page 26: ...thdraw the igniter and probe Remove the loose flange and Mica sight glass Pressure switches are fitted to monitor the correct operation of the fan and air inlet damper assembly at both High and Low fire They ensure sufficient airflow through the boiler to facilitate correct combustion at all times Should the position of the air inlet damper be tampered with the performance of the air pressure swit...

Page 27: ...cia as Overheat Is there a demand from the thermostat Is remote control link C1 C2 secure Is there power at the ignition controller Is Fan On neon illuminated on fascia Replace ignition controller Check fuse s time clock etc Re set ignition controller Lockout button on fascia Check thermostats Check air sensing venturi and pressure switch connecting tubes Check that the probe and electrode connect...

Page 28: ...alve Does the boiler operate at Low fire Does the boiler cycle On Off rapidly The boiler is operating correctly Thermostat faulty Poor circulation due to air in system or faulty pump Check setting of High Low thermostats Check damper operation Poor circulation due to air in system or faulty pump Poor circulation Thermostat set too high or faulty Boiler waterways scaled up Gas pressure incorrect Ch...

Page 29: ...ocedure Check thermostat settings and adjust if required Re fit door and tidy floor around boiler as necessary noting the position for re assembly Check condition of igniter assembly and probe for damage clean as required 8 Check the burner and clean using a soft brush if required if possible use compressed air to blow out the dust inside the burner tube Alternatively the burner tube can be washed...

Page 30: ... to 100 C for high temperature option set to a maximum of 120 C Re assemble temperature limiter into controls housing ensuring correct cable notation Refer to thermostat diagram if terminal identification differs from those given in Figure 9 1 p13 14 0 REPLACEMENT OF FAILED COMPONENTS There are a number of components listed below which can be replaced simply and quickly by following the given proc...

Page 31: ...ace by the screws holding the window from accidentally being misplaced ensure that only one probe screw is removed at a time 16 12 5 25 17 17 C L 1 0 88 41 55 Figure 14 2 Pressure Sensing Tubes TR3 TR2 TR1 BOILER IGNITION SEQUENCE CONTROLLER VENTURI FAN AND DAMPER ASSEMBLY P C B BOILER CONTROL PANEL HIGH FIRE AIR PRESSURE SWITCH SETTING LOW FIRE AIR PRESSURE SWITCH SETTING 1 2mbar 0 4mbar High fir...

Page 32: ... the low fire and high fire gas pressures refer to Figure 2 2 p4 for correct settings If necessary refer to Section 11 4 COMMISSIONING THE BOILER p16 for correct procedures 14 5 Main Gas Valve Part Nos Refer to Hamworthy Heating NOTE Some gas valve components can be replaced without completely removing the whole assembly from the boiler However Hamworthy Heating strongly recommend that a new gas v...

Page 33: ...ntegrity at all joints using a proprietary leak detector 14 6 Motor Assembly fan Part No 533901328 Ensure power supply is isolated before removing the front cover and gaining access to the controls panel 1 Unplug the fan harness from the socket below the control panel 2 Undo the 4 M5 pozi head screws holding the motor assembly to the fan housing and remove complete motor and impeller unit Due to t...

Page 34: ...h 1 Connect manometer to pressure tapping 2 Close the gas service valve to lock up mains pressure Reduce pressure by loosening inlet test point or the gas control valve until the desired pressure is achieved 3 Determine operation of switch using a suitable multi meter Figure 14 10 Gas Pressure Switch Adjustment SCREW M4x6 POZI PAN NYLOCK NUT M3 EYELET ...

Page 35: ...V Four Pole Relay 533901296 230V Double Pole Time Delay Relay 533924001 Fan Motor Spare 533901328 Air Pressure Switch 533901334 Damper Solenoid 533901321 Low Gas Pressure Switch 533901336 Gas Valve REFER TO HAMWORTHY HEATING LIMITED Sequencing Interface Module 533901421 Mechanical Items Burner Assembly 533301007 Set of Gaskets Major Service 563605165 Gas Orifice Plate Natural Gas 531101007 Gas Ori...

Page 36: ...placed to indicate the appropriate gas for which the boiler is set up to fire The following tables and paragraphs using the same numbering system as the main installer s guide highlight the different values and procedures to be used when firing propane and should be used in conjunction with the Main Installer s Guide Figure 2 2 Performance and General Data Information NOTE Flue gas volumes are bas...

Page 37: ...and limit stop discs 1 and 2 from the inside of the setting knob 3 Insert limit stop disc 1 into the setting knob so that its stop arm locks onto that rib having the guide number 5 which corresponds to the start value of the desired setting range 4 Insert the limit stop disc 2 in the same manner but this time choosing the rib and guide number Appendix B Wessex 100 M Series CONTROL THERMOSTAT SETTI...

Page 38: ...HAMWORTHY HEATING LTD 32 WESSEX 100 M 500001080 F NOTES INSTALLER SITE ADDRESS BOILER TYPE BOILER SIZE S UNIT NO S SERIAL NO S FLUE DATE OF COMMISSIONING USEFUL USER INFORMATION ...

Page 39: ...Notes ...

Page 40: ...hy reserves the right to make changes and improvements which may necessitate alteration to the specification without prior notice Connect direct Direct Dial Telephone and Fax Numbers Direct Email Addresses Hamworthy Heating Accredited Agents Website www hamworthy heating com boilers controllers water heaters pressurisation sets North West England Gillies Modular Services 210 218 New Chester Road B...

Reviews: