background image

Installation manual Blue

 | 

V4.5

11

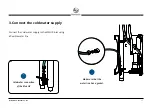
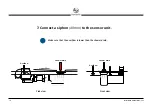
3. Connect the cold water supply

Connect the cold water supply to the WWHR inlet using 

a flexible water line.

Cold water connection

of the Blue HE

Make sure that the 

water line has a gasket.

Summary of Contents for Blue 12

Page 1: ...Installation manual Blue 12 16 21 HE EN V4 5 Blue...

Page 2: ...production of all or part of this document is strictly prohibited except with the written permission of Hamwells Nederland B V The contents of this document are subject to change without notice The il...

Page 3: ...ymbols 4 Warranty 5 Dimensions Blue basic 6 1 Installation Blue base 7 Installation instructions 8 Parts checklist 8 Parts Blue base 9 2 Installation options glass panel thermostat shower set 17 Parts...

Page 4: ...ocal safety regulations These are persons who are technically skilled through education or training and who are familiar with the possible dangers and risks They are also familiar with local regulatio...

Page 5: ...r purposes other than twater line described in this manual Incorrect assembly or alterations by the customer or third parties This also includes the use of non original replacement parts Incompetence...

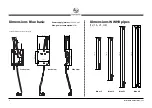
Page 6: ...210 cm 35 cm 38 cm 37 5 cm 15 cm 55 cm Blue HE Blue 21 Blue 16 Blue 12 Front view Back view Side view Including WWHR pipe of desired length Dimensions Blue basic Dimensions WWHR pipes 12 16 21 HE Powe...

Page 7: ...1 Installation Blue base...

Page 8: ...speci c to the Blue HE are included separately Tools such as drills screwdrivers mounting kit and wrenches are not included Installation instructions The parts of the Blue base are delivered complete...

Page 9: ...water 1x water line 50 cm cold tap water 2x 3x 5x 1x Blue basic pre assembled WWHR Waste Water Heat Recovery frame WWHR pipe 12 16 21 HE Pump Power supply with cable without plug Water line 100 cm WW...

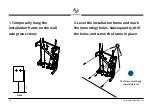
Page 10: ...1 Temporarily hang the installation frame on the wall using two screws 90 cm 130 cm 2 Level the installation frame and mark the mounting holes Subsequently drill the holes and screw the frame in plac...

Page 11: ...ion manual Blue V4 5 11 3 Connect the cold water supply Connect the cold water supply to the WWHR inlet using a exible water line Cold water connection of the Blue HE Make sure that the water line has...

Page 12: ...lue V4 5 12 4 Connect the drain set to the WWHR pipe s Blue HE Blue HE 5 Connect the drain set to the sewer system Use the proper drain pipes and gaskets to connect the drains The WWHR has drain pipes...

Page 13: ...nd level the sensor unit 7 Connect the supplied bend 32 mm to the back of the sensor unit and connect it to your drain We do not recommend pouring concrete around the sensor unit Use PVC adhesive afte...

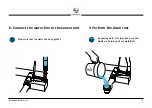
Page 14: ...lation manual Blue V4 5 14 7 Connect a siphon 40 mm to the sensor unit Shower drain Finished oor Over ow Make sure that the overflow is lower than the shower drain Side view Front view Shower drain Ov...

Page 15: ...manual Blue V4 5 15 8 Connect the water line to the sensor unit Make sure that the water line has a gasket 9 Perform the drain test By pouring water into the siphon you test whether all drain parts ar...

Page 16: ...anual Blue V4 5 16 10 Connect the wiring harness to the sensor unit Only connect the main power after everything else is connected 11 Check if the Blue is working properly See chapter 3 Calibration an...

Page 17: ...2 Installation options glass panel thermostat shower set...

Page 18: ...supplied connection water lines for the supplied thermostatic tap and shower set If you opt for a different type of thermostatic tap or shower set you must purchase suitable connection water lines Ma...

Page 19: ...ower 1x hand shower set 1x water line 150 cm main shower to the thermostatic tap 1x water line 80 cm thermostatic tap to the hand shower 1x set of control buttons 1x thermostatic tap 1x water line 50...

Page 20: ...nstallation manual Blue V4 5 20 1 Mount the frame of the secondary wall There are various options such a metal stud or wooden framework This varies by location Frame and retaining wall are not include...

Page 21: ...cluded and connect the water water lines from the hand and main shower head The water line of the hand shower can be connected to either the left or right side This is connected to the thermostatic ta...

Page 22: ...uded With the shower set option you must also mark and cut out drill the holes for the connections Hand shower and main shower head can be placed at the desired height Dimensions frame Dimensions hole...

Page 23: ...Installation manual Blue V4 5 23 4 Place the waterproof wall 5 Tile the wall...

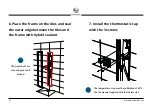
Page 24: ...with the 3 screws The temperature stop must be calibrated at 38 C See the manual supplied with the thermostat 6 Place the frame on the tiles and seal the outer edge between the tiles and the frame wi...

Page 25: ...8 Connect the water lines to the thermostatic tap Hot water supply Hand shower option shower set WWHR output Main shower option shower set Make sure that the water line has a gasket Handle in line wit...

Page 26: ...The glass panel is secured with magnets Use glass suction cups to place the glass panel Place the glass panel without holes if you are not using the supplied thermostat 11 Install the control knobs S...

Page 27: ...Installation manual Blue V4 5 27 12 Mount the main shower Use PTFE sealing cord 13 Mount the hand shower Elbow connection is not included...

Page 28: ...3 Calibration and maintenance...

Page 29: ...ly approx 2 liters of water 38 Off When you turn on the Blue for the first time or when the power is reconnected or turned on you will hear the sound of the pump pumping out the water This will take a...

Page 30: ...describes the cleaning and maintenance intervals The table below is an overview of maintenance We recommend that you never use aggressive cleaning agents such as thinner or acetone This may vary per...

Reviews: