©1999 Hamtronics, Inc.; Hilton NY; USA. All rights reserved. Hamtronics is a registered trademark. Revised: 1/28/00
- Page 6 -
type of switch can be used. The
only thing that matters is which
lines are grounded
at the start
of a
record or playback cycle. It doesn't
even matter if you change an ad-
dress setting in the middle of a cy-
cle; that would be ignored. You can
devise any sort of switching scheme
you like as long as you set the
starting address as defined earlier.
Remember that the diodes are instal-
led for those address lines that are to
be programmed lo (ground), not hi
(+5Vdc). The pull-up resistors provide
the logic hi voltage for those address
lines which are not grounded through
diodes.
Remote Control of Multiple Mes-
sages.
If you want to be able to control
which of several messages is used,
and do it by remote control, you can
use a unit, such as our TD-2 DTMF
Decoder/Controller to select a pa r-
ticular group of diodes, as shown in
the schematic for multiple message
addressing. Just make sure that
you don't turn on remote control
latches for more than one address
at once or the address will be mixed
up.
THEORY OF OPERATION.
General.
Following is a thorough discus-
sion of the operation, first of the
digital voice recorder ic, and then of
the support circuitry. You will need
a background in digital electronics
to understand some of it, although it
isn't too complicated.
Recording Technology.
The ISD-1020A ic is an analog
sampled data system, with on-chip
microphone preamp, agc, anti-
aliasing and smoothing filters, stor-
age array, speaker driver, control
interface, and internal precision
reference clock. This system uses
eeprom technology to directly record
analog signals so no d-a and a-d
converters are required.
The 1020A ic uses a sampling
rate of 6.4 kHz for 20 seconds of
storage time, and it has an anti-
aliasing filter which cuts off at 2700
Hz. If the frequency response was
higher, the recording time would be
less, because at least two samples
per cycle are required to reproduce
any frequency.
Audio Recording Circuits.
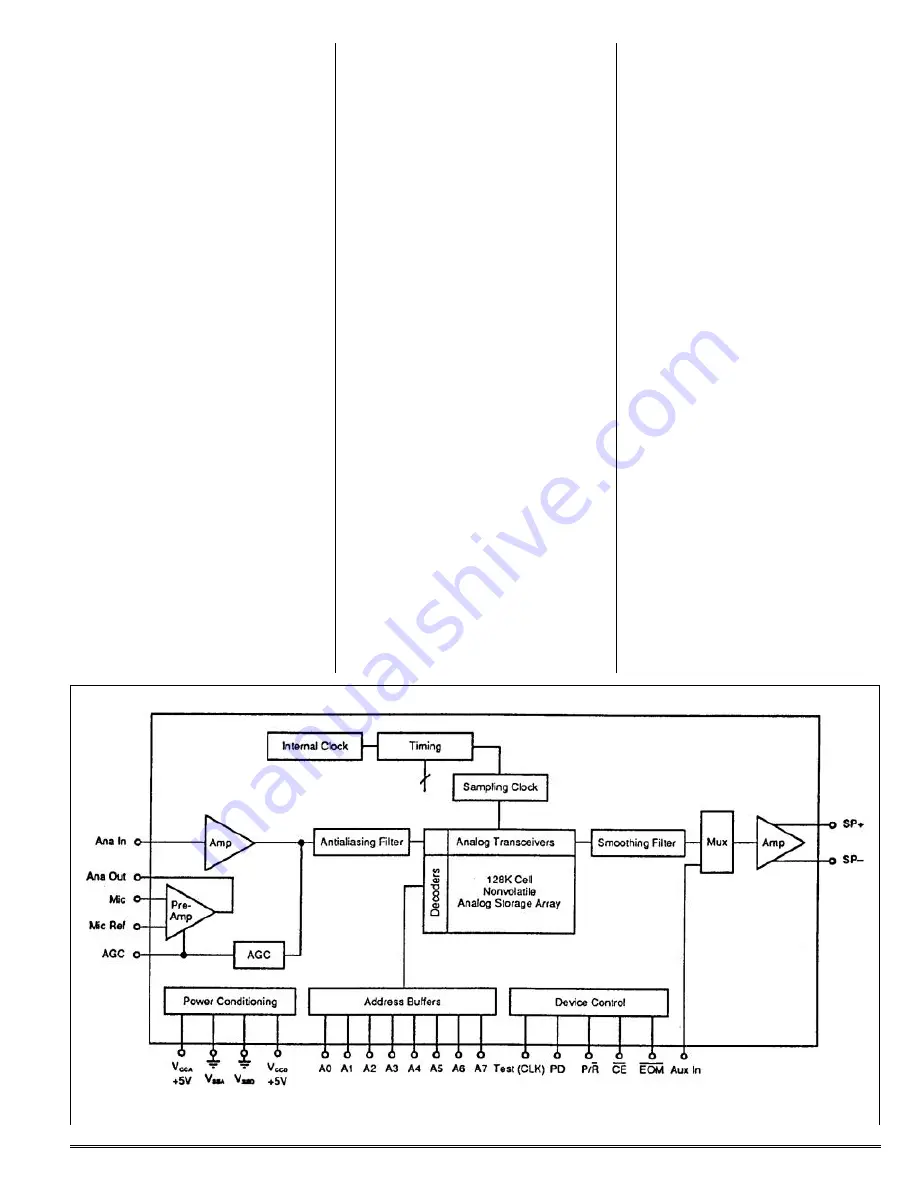
Refer to schematic diagram at the
rear of the manual and the block dia-
gram of the ic below.
The DVR-3 re-
cords audio from the receiver audio
signal taken from the feedthrough
capacitor which feeds the audio to
the COR-5 board for repeater audio.
R6 and R7 is a voltage divider to
provide the proper level to recorder
ic U1 at pin 17. Pin 18 of the ic pr o-
vides an reference input to the in-
put op-amp. This is connected to
the ground plane of the board to
cancel any hum or noise pickup.
The analog preamp output at pin 21
is coupled through blocking capaci-
tor C6, which also serves to tailor
the frequency response and level to
match the repeater audio input.
During recording, the 1020A chip
performs several stages of signal
conditioning before the actual stor-
age operation takes place. The first
stage is the amplification of the in-
put signal to a level optimized for
the dynamic range of the storage
circuits. This is done by the pream-
plifier, amplifier, and agc circuits in
the chip. Amplification is done in
two steps
initially by the input
preamplifier and then by a fixed
gain amplifier. The signal path be-
tween the preamplifier and the fixed
gain amplifier is completed by a
blocking capacitor, which allows the
fixed amplifier to be connected to a
line input instead in some applica-


