background image

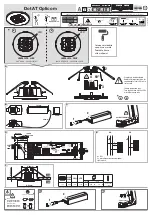
Mounting the fixture 

Place the back plate of the fixture body (A) 
onto the fixture mounting screws (EE) and 
secure it into place by using the lock nuts 
(AA) provided. 

Caulk the upper 2/3

rds

  of the back plate on 

the fixture body (A). 

Leave the bottom 1/3

rd

 un-caulked for 

drainage of any water that may leak into 
the enclosure. 


Installation (continued) 

AA 

EE 

Operation 

Turn on power at the circuit breaker or fuse box.  

Turn the light switch on to activate the fixture. 


Care and Cleaning 

NOTE: 

Do not use any cleaners with chemicals, 

solvents, or harsh abrasives.  Use only a dry 
soft cloth to dust or wipe carefully. 

EXTERIOR MAINTENANCE 

Use a dry or slightly dampened clean 
cloth and wipe the surface of the 
fixture. 


INTERIOR MAINTENANCE 

Disconnect power to the fixture by 
turning off the circuit breaker or by 
removing the fuse at the fuse box.  

Use a dry or slightly dampened clean 
cloth to wipe the interior surface of the 
fixture. 


Summary of Contents for HB7024-05TP

Page 1: ...______ EXTERIOR LED WALL LANTERN THANK YOU We appreciate the trust and confidence you have placed in Hampton Bay through the purchase of this exterior LED wall lantern We strive to continually create...

Page 2: ...abuse accident modifications alterations neglect or mishandling WHAT IS NOT COVERED This warranty shall not apply to any product that is found to have been improperly installed set up or used in any...

Page 3: ...or cardboard NOTE Keep your receipt and these instructions for Proof of Purchase TOOLS REQUIRED HARDWARE REQUIRED NOTE Hardware not shown to actual size HAMPTONBAY COM Please contact 1 855 HD HAMPTON...

Page 4: ...Pre Installation continued PACKAGE CONTENTS 4 A Part Description Quantity A Fixture Body 1...

Page 5: ...screws EE Adjust the fixture mounting screws EE until they protrude out from the back plate 1 4 in Remove the fixture body A and secure the position of the fixture mounting screws EE by tightening th...

Page 6: ...on Turn on power at the circuit breaker or fuse box Turn the light switch on to activate the fixture Care and Cleaning NOTE Do not use any cleaners with chemicals solvents or harsh abrasives Use only...

Page 7: ...o guarantee that interference can be determined by turning the equipment off and on the user is encouraged to try to correct the interface by one or more of the following measures Reorient or relocate...

Page 8: ...Questions problems missing parts Before returning to the store call Hampton Bay Customer Service 8 a m 6 p m EST Monday Friday 1 855 HD HAMPTON HAMPTONBAY COM Retain this manual for future use...

Page 9: ..._____ FAROL DE PARED LED PARA EXTERIORES GRACIAS Le agradecemos la confianza que han depositado en Hampton Bay a trav s de la compra de este farol de pared LED para exteriores Nos esforzamos continuam...

Page 10: ...idente modificaciones alteraciones negligencia o mal manejo LO QUE NO EST CUBIERTO Esta garant a no se aplicar a cualquier producto que haya sido instalado de forma incorrecta o usado de manera que no...

Page 11: ...recibo y estas instrucciones para comprobante de compra HERRAMIENTA NECESARIAS FERRETER A NECESARIA NOTA La ferreter a no se muestra a tama o actual HAMPTONBAY COM Para obtener asistencia llama al 1...

Page 12: ...Pre Instalaci n continuado CONTENIDO DEL PAQUETE 12 A Parte Descripci n Cantidad A Cuerpo Principal 1...

Page 13: ...sobresalgan 1 4 pulgadas de la palca Quite la placa del cuerpo principal A y asegure la posici n de los tornillos del luminario EE al apretar las tuercas hexagonales BB contra la m nsula de montaje FF...

Page 14: ...Conecte la alimentaci n en el disyuntor o caja de fusibles Gire el interruptor de la luz para activar el aparato Cuidado y Limpieza NOTA No use limpiadores con qu micos solventes o abrasivos fuertes U...

Page 15: ...terferencia puede determinarse encendi ndolo y apag ndolo se recomienda al usuario que intente corregir la interfaz en una o m s de las siguientes medidas Reorientar o reubicar la antena de recepci n...

Page 16: ...lemas o piezas faltantes Antes de regresar a la tienda llama al Servicio al Cliente de Hampton Bay 8 a m 6 p m Hora del Este Lunes Viernes 1 855 HD HAMPTON HAMPTONBAY COM Conserve este manual para fut...

Page 17: ...MURALE D EXT RIEUR DEL MERCI Nous appr cions la confiance que vous avez plac e dans Hampton Bay gr ce l achat de cette lanterne murale d ext rieur DEL Nous nous effor ons de cr er continuellement la q...

Page 18: ...quat ou abusif d un accident de modifications d alt rations de n gligence ou d une mauvaise manipulation CE QUI N EST PAS COUVERT Cette garantie ne s applique pas tout produit qui se trouve avoir t in...

Page 19: ...ou un morceau de carton NOTE Conservez votre re u et ces instructions la preuve d achat OUTILS REQUIS MAT RIEL REQUIS NOTE Mat riel non illustr taille r elle HAMPTONBAY COM Veuillez contacter le 1 855...

Page 20: ...Pr Installation continue CONTENU DU PAQUET 20 A Partie Description Quantit A Corps du Luminaire 1...

Page 21: ...t partir de la plaque arri re du le corps du luminaire 6 35 mm Retirez la plaque arri re du le corps du luminaire A et fixez en place les vis du luminaire EE en serrant les crous hexagonaux BB contre...

Page 22: ...EE Op ration Mettez sous tension au niveau du disjoncteur ou des fusibles Allumez l interrupteur pour activer l appareil Entretien et Nettoyage ENTRETIEN EXT RIEUR Utilisez un linge sec ou l g rement...

Page 23: ...pareil est la cause d interf rences nuisibles pour la r ception des signaux de radio ou de t l vision ce qui peut tre d cel en fermant l quipement puis en le remettant en fonction l utilisateur pourra...

Page 24: ...robl mes pi ces manquantes Avant de retourner au magasin appeler Hampton Bay Service la client le 8 00 18 00 HNE lundi vendredi 1 855 HD HAMPTON HAMPTONBAY COM Conserver ce manuel pour un utilisation...

Reviews: