background image

11

WARNING

MAKE SURE THE POWER IS OFF AT THE ELECTRICAL PANEL BOX 

BEFORE YOU ATTEMPY ANY REPAIRS. REFER TO THE SECTION, 

“MAKING ELECTRICAL CONNECTIONS”.

Because of the fan's natural movement, some 
connections may become loose. Check the 
support connections, brackets, and blade 
attachments twice a year. Make sure they are 
secure. (It is not necessary to remove fan from 
ceiling.)

Clean your fan periodically to help maintain its 
new appearance over the years. Do not use 
water when cleaning. Use only a soft brush or 
lint-free cloth to avoid scratching the finish. 
The plating is sealed with a lacquer to 
minimize discoloration or tarnishing. Do not 
use water when cleaning. This could damage 
the motor, or the wood, or possibly cause an 
electrical shock.

You can apply a light coat of furniture polish to 
the wood blades for additional protection and 
enhanced beauty. Cover small scratches with a 
light application of shoe polish.

There is no need to oil your fan. The motor has 
permanently lubricated sealed ball bearings.

1.

2.

3.

4.

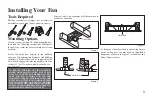
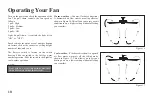
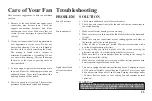
Here are some suggestions to help you maintain 
your fan.

Check main and branch circuit fuses or breakers.
Check line wire connections to the fan and switch wire connections in 
the switch housing. 

Make sure all motor housing screws are snug.
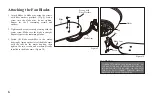
Make sure the screws that attach the fan blade bracket to the motor hub 
is tight.
Make sure wire nut connections are not rattling against each other or 
the interior wall of the switch housing.
Allow a 24-hour "breaking-in" period. Most noises associated with a 
new fan disappear during this time.
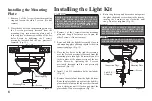
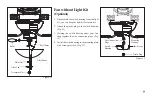
If using ceiling fan light kit, make sure the screws securing the 
glassware are tight. Check that the light bulb is also secure.
Make sure there is a short distance from the ceiling to the canopy. It 
should not touch the ceiling.
Make sure your ceiling box is secure and rubber isolator pads are used 
between mounting bracket and outlet box.

This unit is equipped with a wattage limiting device. Lamping in excess 
of 190 watts will disable your ceiling fan's light kit. To reset your light 
kit you must turn the power off and relamp, keeping the wattage under 
190 watts. Restore power to your ceiling fan and continue normal 
operation.

1.
2.

1.
2.

3.

4.

5.

6.

7.

1.

Fan will not start

Fan sounds noisy

Lights shut off and
will not come back
on.

Care of Your Fan Troubleshooting

PROBLEM SOLUTION

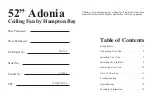
Summary of Contents for Adonia

Page 1: ...Adonia 52 in Ceiling Fan Owner s Manual Adonia Ventilador de Techo de 1 32 m Manual del Propietario 226 768...

Page 2: ...Adonia by Hampton Bay...

Page 3: ...r ceiling fan This product has been manufactured with the highest standards of safety and quality Table of Contents Safety Rules 1 Unpacking Your Fan 2 Installing Your Fan 3 Installing the Light Kit 8...

Page 4: ...ious when working around or cleaning the fan Do not use water or detergents when cleaning the fan or fan blades A dry dust cloth or lightly dampened cloth will be suitable for most cleaning After maki...

Page 5: ...mbly Motor housing Blade arms 5 Mounting plate 1 2 3 4 5 6 Light kit assembly Glass shade 40 Watt candelabra bulbs 3 Pull chains and fobs 2 Extra plastic plug 7 8 9 10 11 Blade Attachment Hardware 16...

Page 6: ...ot use plastic outlet boxes Tools Required Mounting Options WARNING TO REDUCE THE RISK OF FIRE ELECTRIC SHOCK OR PERSONAL INJURY MOUNT FAN ONLY TO AN OULET BOX MARKED ACCEPT ABLE FOR FAN SUPPORT AND U...

Page 7: ...black hot wire using a wire nut Figure 6 Connect the blue wire for light kit to the black household supply wire Turn wire nut connections upward spreading them apart so the green ground will be on on...

Page 8: ...he four mounting studs and secure with the provided washers and nuts Fig 7 Raise the motor housing up against the ceiling mounting bracket the four supports inside the housing should be placed against...

Page 9: ...maining blades Fasten the blade assemblies to the motor housing by lining up the slots of the blade arms with the tabs on the motor housing then tighten the two screws and washers already installed in...

Page 10: ...rom a point on the center of each blade to the point on the ceiling Measure this distance as shown in Figure 11 Rotate the fan until the next blade is positioned for measurement Repeat for each blade...

Page 11: ...nut against the glass shade and secure them to the stem by turning the decorative nut clockwise until snug Do not overtighten Fig 14 6 NOTE LIGHT BULBS HAVE NO WARRANTY CAN BE PURCHASED AT ANY HOME D...

Page 12: ...lding the switch housing under your fan snap together the wire connection plugs Fig 15 Install the switch housing to the mounting plate with screws provided Fig 15 Fan without Light Kit Optional Figur...

Page 13: ...ing your comfort Turn on the power and check the operation of the fan The pull chain controls the fan speed as follows 1 pull High 2 pulls Medium 3 pulls Low 4 pulls Off Light kit pull chain it contro...

Page 14: ...your fan Check main and branch circuit fuses or breakers Check line wire connections to the fan and switch wire connections in the switch housing Make sure all motor housing screws are snug Make sure...

Page 15: ...S AMPS WATTS RPM CFM N W G W C F 52 120 9 20 kgs 20 26 lbs 10 55 kgs 23 23 lbs 2 17 LOW MED HIGH 0 26 0 37 0 51 11 32 63 56 100 145 1831 3426 4850 These are approximate measures They do not include Am...

Page 16: ...nd should not be considered a defect Servicing performed by unauthorized persons shall render the warranty invalid There is no other express warranty Hampton Bay hereby disclaims any and all warrantie...

Reviews: