background image


HAMPTONBAY.COM 


Please contact 1-877-527-0313 for further assistance. 

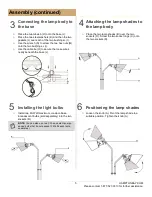
Assembly (continued) 


Connecting the lamp body to 
the base 


Attaching the lamp shades to 
the lamp body 

□  Place the two tubes b (H) onto the base (J). 
□  Place the two steel washers (K) and then the two 

gaskets (L) over each of the two bushings c (I). 

□  Use the wrench (N) to screw the two hex nuts (M) 

onto the two bushings c (I). 

□  Use the cable tie (O) to secure the loose wires 

neatly beneath the base (J). 


□  Place the two lamp shades (B) over the two 

sockets (D). Screw the two socket rings (C) onto 
the two sockets (D). 


Installing the light bulbs 


Positioning the lamp shades 

□  Install two 60-Watt maximum, medium-base 

incandescent bulbs (sold separately) into the two 
sockets (D).  


NOTE: 

You can also use  two CFL-equivalent energy-

saving bulbs that do not exceed 13 Watts each (sold 
separately).


□  Loosen the knob (A). Pivot the lamp shade to a 

suitable position. Tighten the knob (A). 


Summary of Contents for 455-695

Page 1: ...o enhance your home Visit us online to see our full line of products available for your home improvement needs Thank you for choosing Hampton Bay UPC 6940500314549 SKU 455 695 USE AND CARE GUIDE 2 LIG...

Page 2: ...ided that the product has not been damaged through misuse abuse accident modifications alterations neglect or mishandling This warranty shall not apply to any product that is found to have been improp...

Page 3: ...istance Pre Assembly continued PACKAGE CONTENTS Part Description Quantity A Knob 2 B Lamp shade 2 C Socket ring 2 D Socket 2 E Bushing a 2 F Tube a 2 G Bushing b 2 H Tube b 2 I Bushing c 2 J Base 1 K...

Page 4: ...4 Assembly 1 Connecting the top of the lamp body 2 Connecting the middle of the lamp body Screw the two tubes a F onto the two bushings a E Screw the two tubes b H onto the two bushings b G...

Page 5: ...onto the two bushings c I Use the cable tie O to secure the loose wires neatly beneath the base J Place the two lamp shades B over the two sockets D Screw the two socket rings C onto the two sockets D...

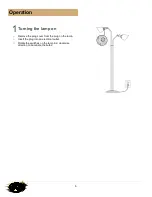
Page 6: ...Operation 1Turning the lamp on Remove the plug cover from the plug on the lamp Insert the plug into an electrical outlet Rotate the switches on the lamp in a clockwise direction to illuminate the bulb...

Page 7: ...b is burned out Replace the light bulb The power is off Ensure the power supply is On The cord is not plugged in Ensure the cord is plugged into the outlet The circuit breaker is off Ensure the circui...

Page 8: ...Questions problems missing parts Before returning to the store call Hampton Bay Customer Service 8 a m 6 p m EST Monday Friday 1 877 527 0313 HAMPTONBAY COM Retain this manual for future use...

Page 9: ...ver nuestra l nea completa de productos disponibles para las necesidades de mejoras de tu hogar Gracias por elegir Hampton Bay UPC 6940500314549 SKU 455 695 GU A DE USO Y MANTENIMIENTO L MPARA DE SUE...

Page 10: ...roducto siempre y cuando el defecto no sea resultado de un mal uso abuso accidente modificaciones alteraciones negligencia o manejo indebido Esta garant a no cubre ning n producto instalado configurad...

Page 11: ...ntinuaci n CONTENIDO DEL PAQUETE Pieza Descripci n Cantidad A Pomo 2 B Pantalla de la l mpar 2 C Aro del portal mpara 2 D Portal mpara 2 E Buje a 2 F Tubo a 2 G Buje b 2 H Tubo b 2 I Buje c 2 J Base 1...

Page 12: ...aje 1 Conectar la parte superior del cuerpo de la l mpara 2 Conectar la parte del medio del cuerpo de la l mpara Atornille los dos tubos a F el los dos bujes a E Atornille los dos tubos b H el los dos...

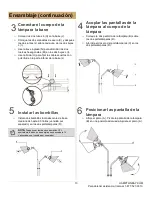
Page 13: ...ida O para fijar los cables sueltos con pulcritud en la parte inferior de la base J Coloque la dos pantalla de la l mpara B sobre los dos portal mparas D Atornille el dos aro del portal mparas C en lo...

Page 14: ...14 1 Encender la l mpara Retira la cubierta del enchufe en la l mpara Conecta el enchufe en un tomacorriente Rota el interruptor de la l mpara hacia la derecha para encender la bombilla Funcionamiento...

Page 15: ...electricidad est apagada Aseg rate de que el suministro de electricidad est encendido El cable de alimentaci n no est enchufado Verifica que el cable est enchufado al tomacorriente El cortacircuito es...

Page 16: ...zas faltantes Antes de regresar a la tienda llama al Servicio al Cliente de Hampton Bay de lunes a domingo entre 8 a m y 6 p m hora del Este de EE UU 1 877 527 0313 HAMPTONBAY COM Conserva este manual...

Page 17: ...e pour consulter notre gamme compl te de produits pour vos besoins de r novation r sidentielle Merci d avoir choisi Hampton Bay CUP 6940500314549 UGS 455 695 GUIDE D UTILISATION ET D ENTRETIEN LAMPE D...

Page 18: ...ar une utilisation inad quate ou abusive par un accident une modification une alt ration la n gligence ou une mauvaise manipulation Cette garantie ne s applique pas un produit qui est d clar avoir t m...

Page 19: ...Pr assemblage suite CONTENU DE L EMBALLAGE Pi ce Description Quantit A Bouton 2 B Abat jour de la lampe 2 C Bague de douille 2 D Douille 2 E Bague a 2 F Tube a 2 G Bague b 2 H Tube b 2 I Bague c 2 J...

Page 20: ...Assemblage 1 Relier la partie haute du corps de la lampe 2 Relier la partie m diane du corps de la lampe Visser le deux tubes a F sur la deux bagues a E Visser le deux tubes b H sur la deux bagues b...

Page 21: ...e de c ble O pour attentivement fixer les fils l ches sous la base J Place deux l abat jours de la lampes B sur deux douilles D Visser la deux bague de douilles C sur la deux douilles D 5 Installer le...

Page 22: ...tion 1 Allumer la lampe Retirez le bouchon m le de la fiche de la lampe Ins rez la fiche dans la prise lectrique Tournez l interrupteur de la lampe dans le sens des aiguilles d une montre pour allumer...

Page 23: ...acez l ampoule Le courant est coup Assurez vous que la source de courant lectrique est sous tension Le cordon n est pas branch V rifiez que le cordon est branch dans la prise de courant Le disjoncteur...

Page 24: ...s manquantes Avant de retourner au magasin veuillez communiquez avec le service la client le Hampton Bay entre 8h00 et 18h00 HNE du lundi au vendredi au 1 877 527 0313 HAMPTONBAY COM Conservez ce guid...

Reviews: