background image

92

WARRANTY

Emissions Control System Limited Warranty

WARRANTY COVERAGE

HAMMERHEAD warrants to the ultimate purchaser and each subsequent purchaser 

that, at the time it is first purchased, this emissions-certified engine is designed, built, 

and equipped so it conforms to applicable U.S. Environmental Protection Agency 

emission regulations. HAMMERHEAD warrants that the engine is free from defects in 

materials and workmanship that would cause it to fail to meet these regulations.
The emissions control system of your engine is covered by this warranty for a period of 

two years, beginning on the date the engine or small-off road vehicle equipped with the 

engine is sold to the ultimate purchaser. This warranty is transferable to each subsequent 

purchaser for the duration of the warranty period. This EPA emissions warranty period is 

extended for at least as long as the standard factory warranty that HAMMERHEAD 

provides on the engine as a whole. The EPA emissions warranty period does not further 

extend if additional warranty coverage in the form of a service contract or other paid 

warranty extension is purchased, but emission-related parts may be covered subject to 

the terms of any such paid service contract or paid warranty extension.
This emissions limited warranty covers components whose failure increases the 

vehicle's regulated emissions, and it covers components of systems whose only purpose 

is to control emissions. Repairing or replacing other components not covered by this 

warranty is the responsibility of the vehicle owner. This emissions limited warranty does 

not cover components whose failure does not increase the vehicle's regulated emissions. 

For exhaust emissions, emission-related components include any engine parts related to 
the following systems: 

The following parts are also considered emission-related components for exhaust 
emissions:

The following parts are considered emission-related components for evaporative 
emissions:

*As related to the evaporative emission control system.
If any emissions related component on your engine is defective, HAMMERHEAD will 

repair or replace the defective component without charge for diagnosis, parts, or labor. 

All defective parts replaced under this warranty become the property of 

HAMMERHEAD.

• Air-induction system

• Ignition system

• Fuel system

• Exhaust gas recirculation systems

• After-treatment devices

• Sensors

• Crankcase ventilation valves

• Electronic control units

• Fuel Tank

• Vacuum Control Diagrams*

• Fuel Cap

• Control Cables*

• Fuel Line

• Control Linkages*

• Fuel Line Fittings

• Purge Valves

• Clamps*

• Vapor Hoses

• Pressure Relief Valves*

• Liquid/Vapor Separator

• Control Valves*

• Carbon Canister

• Control Solenoids*

• Canister Mounting Brackets

• Electronic Controls*

• Carburetor Purge Port Connector

Summary of Contents for 2013 R 150

Page 1: ...1...

Page 2: ...ult between the actual vehicle and the information presented in this publication Depictions and or procedures in this publication are intended for reference use only No liability can be accepted for o...

Page 3: ...TABLE OF CONTENTS Introduction 4 Safety 7 Features and Controls 20 Operation 26 Emission Control Systems 40 Maintenance 41 Specifications 79 Troubleshooting 83 Warranty 87 Maintenance Log 96 Index 98...

Page 4: ...ntial personal injury hazard DANGER A DANGER indicates a hazardous situation that if not avoided will result in death or serious injury WARNING A WARNING indicates a hazardous situation that if not av...

Page 5: ...and have a valid driver s license to operate this vehicle No person under the age of 12 may ride as a passenger in this vehicle All riders must be able to sit with backs against the seat and both hand...

Page 6: ...__________________________________ Vehicle Identification Number ______________________________________________ Engine Serial Number ___________________________________________________ Key Number ____...

Page 7: ...ase stability or change performance may present a greater risk to inexperienced or younger operators and could result in loss of control and serious injury or death Use only HAMMERHEAD approved access...

Page 8: ...ssenger must wear helmet eye protection gloves long sleeve shirt long pants over the ankle boots and seat belt at all times Protective gear reduces the chance of injury Eye Protection Gloves Over the...

Page 9: ...al Protective Equipment PPE bearing markings such as VESC 8 V 8 Z87 1 or CE Make sure protective eye wear is kept clean Gloves Wear gloves for comfort and for protection from sun cold weather and othe...

Page 10: ...ate the vehicle properly in different situations and on different types of terrain Complete the New Operator Driving Procedures outlined on pages 32 33 All operators must read and understand this owne...

Page 11: ...e sure the seat belts are secured for both the operator and passenger before riding Using Alcohol or Drugs Riding in this vehicle after consuming alcohol or drugs could adversely affect operator judgm...

Page 12: ...ger in this vehicle can affect the operator s ability to steer and operate the controls which increases the risk of loss of control and accident or rollover Never carry more than one passenger in this...

Page 13: ...risk of an accident or rollover DO NOT do power slides donuts jumps or other driving stunts Avoid exhibition driving Crossing Hillsides Driving on a sidehill is not recommended Improper procedure coul...

Page 14: ...on hills Always follow proper procedures for hill climbing as described in this owner s manual See page 36 Never operate the vehicle on hills steeper than 15 degrees Stalling While Climbing a Hill Sta...

Page 15: ...use extra caution when operating on sand or on rough slippery or loose terrain Do not operate on excessively rough slippery or loose terrain Operating Improperly in Reverse Improperly operating in rev...

Page 16: ...llow proper procedures for operating in water as described in this owner s manual See page 38 Wet brakes may have reduced stopping ability After leaving water test the brakes Apply them lightly severa...

Page 17: ...and water and change clothing Exposure to Exhaust Engine exhaust fumes are poisonous and can cause loss of consciousness or death in a short time Never start the engine or let it run in an enclosed a...

Page 18: ...an result if you do not follow these instructions Read owner s manual and all labels before you operate this utility vehicle Never operate this utility vehicle without proper instructions Beginners re...

Page 19: ...lmet Secure long hair and loose clothing Wear protective eye wear and clothing Keep arms legs and feet inside the vehicle Do not use alcohol or drugs WARNING Moving parts can crush and cut Keep hands...

Page 20: ...20 FEATURES AND CONTROLS Component Locations Parking Brake Dump Bed Shifter Lever Headlights LCD Indicator 12V Auxiliary Plug Headlights Horn Turn Signals Brush Guards ABS Plastic Top Key Ignition...

Page 21: ...oss your chest The shoulder belt should fit against your chest If it is loose pull the belt out all the way and then let it retract 5 To release the ubckle firmly press the release button Seat Belt In...

Page 22: ...he electric starter while the engine is running or damage may occur Light Switch The ignition switch key must be in the ON position to operate the headlights Press the top of the rocker switch for hig...

Page 23: ...quipped with a 12 volt accessory outlet on the dash Use the outlet to power an auxiliary light or other optional accessories or lights For service the dash outlet connection is under the dash Horn The...

Page 24: ...ry and the engine is at idle Parking Brake The parking brake lever is located in between the driver seat and the passenger seat To operate the parking brake do the following To set the parking brake p...

Page 25: ...throttle pedal freeplay See page 60 for throttle pedal adjustment procedures Mechanical Speed Control System The adjustable throttle limiting screw is located behind the throttle pedal Use the follow...

Page 26: ...n your part is as important as a proper break in period Careful treatment of a new engine and drive components will result in more efficient performance and longer life for these components Perform th...

Page 27: ...Perform regular checks on fluid levels controls and areas outlined on the daily pre ride inspection checklist See page 28 7 Change the engine oil at five 5 hours 8 Adjust and lubricate the drive chai...

Page 28: ...ion 63 Tires Inspect condition and pressure 19 65 Wheels fasteners Inspect ensure fastener tightness 66 Frame nuts bolts fasteners Inspect ensure tightness Fuel and oil Ensure proper levels 25 47 Gras...

Page 29: ...vel roads 7 Drive in a manner appropriate for your skills and operating conditions Never operate at excessive speeds Never attempt wheelies jumps or other stunts Keep both hands on the steering wheel...

Page 30: ...5 Do not press the throttle pedal while starting the engine 6 Turn the ignition key past the ON RUN position to START Engage the starter for a maximum of five seconds Release the key when the engine...

Page 31: ...has no engine braking 2 Press on the brake pedal evenly and firmly Practice starting and stopping using the brakes until you re familiar with the controls Parking the Vehicle 1 Stop the vehicle on a...

Page 32: ...ilable through ROHVA 3 Review the section of this owner s manual about starting the engine stopping the engine braking and parking pages 30 31 4 Perform the pre ride inspection page 28 5 The driver an...

Page 33: ...ear of people and obstacles 17 Keeping both hands on the steering wheel slowly release the brakes and press the throttle with your right foot to begin driving 18 Drive slowly at first Practice startin...

Page 34: ...er carry more than one passenger in this vehicle 7 Never allow a passenger to ride on the back of the vehicle Allow a passenger to ride only in the passenger seat 8 Make sure the passenger is wearing...

Page 35: ...kidding and sliding Follow these precautions when driving in slippery conditions 1 Slow down before entering slippery areas 2 Be alert watch the path ahead and avoid quick turns which can cause skids...

Page 36: ...rive at a steady rate of speed Never press the throttle suddenly 5 Avoid unnecessary changes in speed or direction 6 Never go over the crest of a hill at a high speed An obstacle a sharp drop or anoth...

Page 37: ...downhill to stop the slide or stop the vehicle and maneuver slowly and carefully until the vehicle can be driven straight downhill Driving Downhill Whenever driving down a hill follow these precautio...

Page 38: ...s immersed or is operated in water that exceeds the floor level service is required before starting the engine Your HAMMERHEAD dealer can provide this service If it s impossible to bring the vehicle i...

Page 39: ...uch as logs rocks and low hanging branches 3 Drive slowly and use extra caution when driving on unfamiliar terrain Obstacles are not always clearly visible 4 Do not drive over large obstacles such as...

Page 40: ...g so may affect compliance with U S A EPA noise control requirements and local noise level requirements Crankcase Emission Control System This engine is equipped with a closed crankcase system Blow by...

Page 41: ...rt Inspect clean lubricate adjust and replace parts as necessary When inspection reveals the need for replacement parts genuine HAMMERHEAD parts are available from your HAMMERHEAD dealer Equivalent pa...

Page 42: ...result in component failure and lead to serious injury or death Have an authorized HAMMERHEAD dealer or other qualified person perform these services Symbol Description Perform these operations more o...

Page 43: ...uel Tank Daily Add Carbon Clean with each fuel fill Air filter Daily Inspect clean often replace as needed Airbox Sediment Tube Daily Drain when deposits are visible Daytime running lights taillight D...

Page 44: ...N Conventional Engine Oil General lubrication 50 3 M 500 800 Lubricate all fittings pivots cables etc Shift Linkage 50 6 M 500 800 Inspect lubricate adjust D Steering 50 6 M 500 800 Lubricate Front Su...

Page 45: ...0 1600 Inspect D Ignition timing 100 12 M 1000 1600 Inspect Wiring 100 12 M 1000 1600 Inspect for wear routing security apply dielectric grease to connectors subjected to water mud etc D Clutches driv...

Page 46: ...interval Perform these procedures more often for vehicles subjected to severe use Item Lube Method Engine Oil 10w40 Conventional Engine Oil See page 47 Brake Fluid DOT 4 Brake Fluid See page 62 Trans...

Page 47: ...level surface 2 Remove the dipstick Wipe it dry with a clean cloth 3 Reinstall the dipstick completely 4 Remove the dipstick and check the oil level Tip A rising oil level between checks in cool weat...

Page 48: ...Start the engine Allow it to idle for two to three minutes 4 Stop the engine Hot oil can cause burns to skin Do not allow hot oil to contact skin 5 Place a drain pan under the engine crankcase 6 Remov...

Page 49: ...h oil and in good condition Do not over tighten the oil filter 9 Clean the pre filter plug Install a new sealing washer on the plug The sealing surfaces on the plug and crankcase should be clean and f...

Page 50: ...gine and inspect for leaks 16 Check the oil level Add oil as needed to bring the level to the upper mark on the dipstick 17 Dispose of used oil properly NOTICE This vehicle comes with an external oil...

Page 51: ...e vehicle on a level surface 2 Remove the fill plug 3 Check the fluid level 4 Add the recommended fluid as needed 5 Reinstall the fill plug Fluid Change The drain plug is located on the right hand sid...

Page 52: ...hain failure Don t use a high pressure washer or gasoline to clean the drive chain Adjusting or operating the vehicle with improper rear drive chain slack can result in severe damage to the transmissi...

Page 53: ...vement Verify that the rear wheels rotate freely with the parking brake off lever in DOWN position and that the vehicle will not move when the parking brake is applied lever in UP position 8 Verify th...

Page 54: ...ormal Plug The normal insulator tip is gray tan or light brown There will be few combustion deposits The electrodes are not burned or eroded This indicates the proper type and heat range for the engin...

Page 55: ...proper engine performance If possibe check the spark plug gap area between electrodes using a wire feeler gauge 3 Before installing spark plug coat threads lightly with graphite grease if possible to...

Page 56: ...ut securely 5 Re check the valve clearance 6 Repeat adjustment procedure if necessary until clearance is correct with locknut secured Exhaust Valve Clearance Adjustment 1 Remove the valve cover and se...

Page 57: ...er or other qualified person for service and repair assistance This CVT system is intended for use on HAMMERHEAD products only Do not install it in any other product Always make sure the CVT housing i...

Page 58: ...1 Pull air filter box away from the machine 2 Loosen the five 5 screws on the outside of the air filter box and remove the air filter 3 Remove the air cleaning element 4 Remove and replace paper filte...

Page 59: ...Throttle Freeplay If the throttle pedal has excessive play due to cable stretch or misadjustment it will cause a delay in throttle response especially at low engine speed The throttle may also not ope...

Page 60: ...nd slide it far enough to expose the end of the in line cable adjuster 3 Loosen the adjuster lock nut 4 Move the cable adjuster until desired freeplay is achieved at the throttle pedal See page 59 Whi...

Page 61: ...pongy brake pedal can result in loss of braking which could cause an accident resulting in severe injury or death Never operate the vehicle with a spongy feeling brake pedal Brake Inspection 1 Check t...

Page 62: ...rake fade and the possibility of accident or severe injury Change the brake fluid every two years and any time the fluid becomes contaminated the fluid level is below the minimum or if the type and br...

Page 63: ...ler or other qualified service facility before operating the vehicle Shock Spring Adjustment The front and rear shock absorber springs are adjustable to increase or decrease spring tension There are f...

Page 64: ...aight ahead position and secure them in this position 3 Place a chalk mark on the center line of the front tires as close to the hub axle center line as possible Make sure both marks are the same dist...

Page 65: ...type of tires for this vehicle when replacing tires Tire Tread Depth Always replace tires when tread depth is worn to 1 8 3 mm or less Front Wheel Hub Tightening Front wheel bearing tightness and spin...

Page 66: ...to remove the 4 lug nuts to remove the wheel by itself Improperly installed wheels can adversely affect tire wear and vehicle handling which can result in serious injury or death Always ensure that a...

Page 67: ...dealer can assist Tail Light Lamp Replacement If the brakelight doesn t work the lamp may need to be replaced 1 Remove the two screws securing the lens cover 2 Remove the lens cover 3 Remove the lamp...

Page 68: ...r Thoroughly dry the air pre filter See page 58 3 Remove the air box drain plug to drain any water Reinstall the drain plug securely 4 Remove the spark plug 5 Loosen carburetor drain screw 6 Turn the...

Page 69: ...e explosive gases Keep sparks flame cigarettes etc away Ventilate when charging or using in an enclosed space Always shield eyes when working near batteries KEEP OUT OF REACH OF CHILDREN Your vehicle...

Page 70: ...mmediately wash it off with a solution of one tablespoon baking soda and one cup water to prevent damage to the vehicle Battery Installation Using a new battery that has not been fully charged can dam...

Page 71: ...The sealed battery is already filled with electrolyte and has been sealed and fully charged at the factory Never pry the sealing strip off or add any other fluid to this battery The single most import...

Page 72: ...ps specified on top of battery 100 12 8 13 0 volts None check at 3 mos from date of manufacture None required 75 100 12 5 12 8 volts May need slight charge if no charge given check in 3 months 3 6 hou...

Page 73: ...using mild soap Certain products including insect repellents and chemicals will damage plastic surfaces Do not allow these types of products to contact the vehicle The best and safest way to clean you...

Page 74: ...RHEAD dealer to purchase a replacement Replacement safety labels are provided by HAMMERHEAD at no charge Grease all zerk fittings immediately after washing Allow the engine to run for a while to evapo...

Page 75: ...t Never use abrasive cleaners on plated or painted surfaces 2 Rinse well with clear water Soap detergents salt dirt mud and other elements can cause corrosion 3 Polish the clean chrome wheels periodic...

Page 76: ...recommended amount Carbon Clean removes water from fuel systems stabilizes fuel and removes carbon deposits from pistons rings valves and exhaust systems 3 Allow the engine to run for 15 20 minutes i...

Page 77: ...h the pre measured amount of oil 3 Reinstall the spark plug Torque to specification See page 54 4 Apply dielectric grease to the inside of the spark plug cap Do not reinstall the cap onto the plug at...

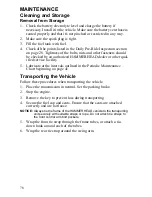
Page 78: ...e facility 5 Lubricate at the intervals outlined in the Periodic Maintenance Chart beginning on page 41 Transporting the Vehicle Follow these procedures when transporting the vehicle 1 Place the trans...

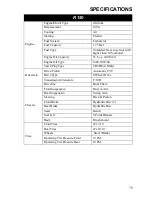
Page 79: ...40 Spark Plug Type CR7HSA NGK Drivetrain Drive Clutch Automatic CVT Drive Type 2 Wheel Drive Transmission Transaxle F N R Driveline Dual Chain Chassis Front Suspension Dual A Arm Rear Suspension Swin...

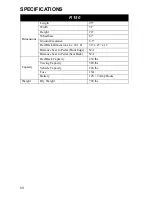
Page 80: ...ound Clearance 6 5 Bed Rack Dimensions L x W x H 38 x 23 x 11 Distance Seat to Pedal Front Edge N A Distance Seat to Pedal Seat Back N A Capacity Bed Rack Capacity 250 lbs Towing Capacity 500 lbs Vehi...

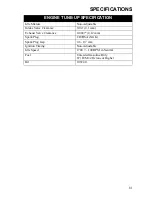
Page 81: ...Adjustable Intake Valve Clearance 0 04 0 1 mm Exhaust Valve Clearance 0 0047 0 12 mm Spark Plug CR7HSA NGK Spark Plug Gap 0 6 0 7 mm Ignition Timing Non Adjustable Idle Speed 1700 100 RPM in Neutral F...

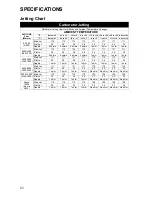
Page 82: ...38 38 35 35 35 35 Needle 2 shims 2 shims 2 shims 2 shims 1 shim 1 shim 1 shim 1 shim 4000 6000 1200 1800 Main Jet 111 111 111 111 110 110 110 110 Pilot Jet 35 35 35 35 35 35 35 35 Needle 1 shim 1 shi...

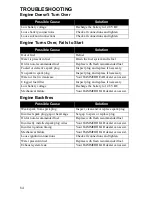
Page 83: ...e ment Use the throttle quickly and effectively Belt slippage from water or snow ingestion into the CVT system Dry out the CVT see page 57 Prevent water from entering the CVT inlet and outlet ducts se...

Page 84: ...l in crankcase Your HAMMERHEAD dealer can assist Clogged fuel filter Inspect plug and replace if necessary Low battery voltage Recharge the battery to 12 8 VDC Mechanical failure Your HAMMERHEAD deale...

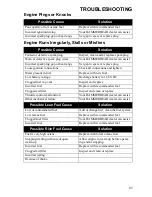
Page 85: ...oltage Recharge battery to 12 8 VDC Clogged fuel cap vent Inspect and replace Incorrect fuel Replace with recommended fuel Clogged air filter Inspect and clean or replace Throttle control malfunction...

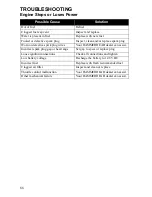
Page 86: ...tive spark plug wires Your HAMMERHEAD dealer can assist Incorrect spark plug gap or heat range Set gap to specs or replace plug Loose ignition connections Check all connections and tighten Low battery...

Page 87: ...s and labor charges for repair or replacement of defective parts The duration of these warranties may vary by international region based upon local laws and regulations These warranties begin on the d...

Page 88: ...ed oil may cause engine damage 2 Damage or failure resulting from the use of non recommended lubricants or fluids is not covered by this warranty This warranty provides no coverage for personal loss o...

Page 89: ...s vary considerably from country to country You may be required to present documentation of your move to HAMMERHEAD in order to continue your warranty coverage You may also be required to obtain docum...

Page 90: ...product was purchased will continue to be covered by the Limited Warranty Please work with your dealer to resolve any warranty issues Should your dealer require any additional assistance they will con...

Page 91: ...e parts such as the carburetor or fuel injection system fuel lines hoses connectors the ignition system catalytic converter and other emissions related assemblies see the WARRANTY COVERAGE section bel...

Page 92: ...anty covers components whose failure increases the vehicle s regulated emissions and it covers components of systems whose only purpose is to control emissions Repairing or replacing other components...

Page 93: ...card or other proof of original purchase date to any qualified repair shop or qualified person A qualified party may maintain replace or repair the emission control devices or systems on your vehicle...

Page 94: ...ED WARRANTY OR ANY OTHER CONTRACT NEGLIGENCE OR OTHER TORT OR OTHERWISE THIS EXCLUSION OF CONSEQUENTIAL INCIDENTAL AND SPECIAL DAMAGES IS INDEPENDENT FROM AND SHALL SURVIVE ANY FINDING THAT THE EXCLUS...

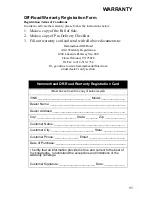
Page 95: ...ust be sent in with a copy of sales receipt VIN _______________________________ Model ______________ Dealer Name ____________________________________________ Dealer Address ___________________________...

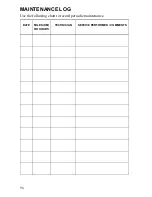
Page 96: ...96 MAINTENANCE LOG Use the following chart to record periodic maintenance DATE MILES KM OR HOURS TECHNICIAN SERVICE PERFORMED COMMENTS...

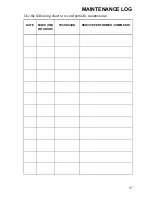
Page 97: ...97 MAINTENANCE LOG Use the following chart to record periodic maintenance DATE MILES KM OR HOURS TECHNICIAN SERVICE PERFORMED COMMENTS...

Page 98: ...ntrol System 40 CVT Break In 27 CVT Drying 57 CVT System 57 D Drive Belt Wear 83 Drive Chain Lubrication 52 Drive Chain Slack Adjustment 52 Drivetrain Break In 27 Driving Downhill 37 Driving in Revers...

Page 99: ...Maintenance Periodic 41 45 N New Operator Procedures 32 33 Noise Emission Control System 40 O Obstacles 39 Oil Engine 47 48 Main Gearcase 51 Transmission 51 Oil Change Engine Oil 48 50 Main Gearcase...

Page 100: ...Words 4 Spark Plug 54 Spark Plug Condition 54 Spark Plug Gap 54 Spark Plug Removal 55 Spark Plug Torque 54 Spark Plugs Fouled 54 Speed Control System 25 Stabilizing the Fuel 76 Steering Wheel Adjustme...

Reviews: