background image

12

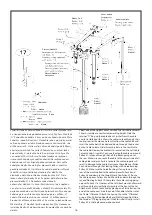
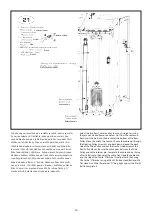
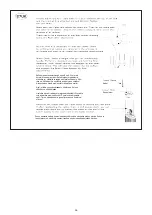
NOTE: Before beginning Step 13: If optional 200 lb. heavy stack 

is being assembled, eliminate the Weight Stack Risers. This space 

will be taken up by 5 extra Weight Plates.

After sliding in all weight plates and other parts you have 

attach the Top Weight Pulley Assemblies and Jam Nuts on the 

Selector Stems, verifying that bolts are threaded completely into 

the Selector Stems with Locknuts on the Pulleys bolts facing 

towards front of the gym using.

Top Weight Pulley Assemblies must be fully threa-
ded into the Weight Stack Selector Stems with the 
Jam Nuts tightened securely before use. Failure 
to do so may cause the Pulley Assemblies to come 
loose from weights and can cause injury.

Pozn

á

mka: Ne

ž

 za

č

nete krok 13: Pokud je nainstalov

á

n velk

ý


z

á

t

ěž

ov

ý

 blok vy

ř

a

ď

te z

á

t

ěž

ov

é

 cihli

č

ky. Toto m

í

sto zabere 5 

z

á

va

ží

 nav

í

c.

Po zasunut

í

 v

š

ech z

á

t

ěž

ov

ý

ch desek a dal

ší

ch d

í

l

ů

, kter

é

 m

á

te

p

ř

ipevn

ě

te sestavy kladek s horn

í

m z

á

va

ží

m a pojistn

é

 matice 

na d

ří

ky voli

č

e a ov

ěř

te, zda jsou 

š

rouby zcela za

š

roubov

á

ny 

do d

ří

k

ů

 voli

č

e, p

ř

i

č

em

ž

 pojistn

é

 matice na kladk

á

ch 

š

rouby 

sm

ěř

uj

í

 k p

ř

edn

í


čá

sti trena

žé

ru.

Sestavy 

ř

emenic s horn

í

m z

á

va

ží

m mus

í

 b

ý

t p

ř

ed 

pou

ž

it

í

m zcela za

š

roubov

á

ny do zd

í

ř

ek voli

č

e z

á

-

sobn

í

ku z

á

va

ží

 s pevn

ě

 uta

ž

en

ý

mi pojistn

ý

mi mati-

cemi. Pokud tak u

č

in

í

te, m

ůž

e doj

í

t k uvoln

ě

n

í

 se-

stav 

ř

emenic ze z

á

va

ží

 a m

ůž

e doj

í

t ke zran

ě

n

í

.

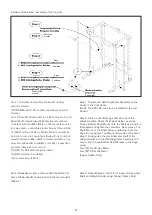
Desti

čka výběru zátěže

Nálepka

Spodní 

část má 3 nožky

Horní kladka s maticí

Gumové zarážky

Zveda

če závaží

Summary of Contents for 3643

Page 1: ...U ivatelsk n vod...

Page 2: ...stroj na pevn a rovn podklad 1 Bezpe nostn instrukce 1 Safety instructions 01 2 General 02 2 1 Packaging 02 2 2 Disposal 02 3 Assembly 03 3 1 Assembly Steps 03 4 Care and Maintenance 09 5 Trainingsanl...

Page 3: ...bliv ch sti stroje nejsou dn p edm ty 7 Do not exersice immediately before or after meals 8 Before starting any fitness training let yourself examined by a physician 9 The safety level of the machine...

Page 4: ...rech min 1 5m 3 Mont In order to make assembly of the gym as easy as possible for you we have preassembled the most important parts Before you assemble the equipment please read these instructions ca...

Page 5: ...manu ln Pozn mka modr te ka zna modrou te ku na z vitu Finger tighten only Note Blue Dot means there is a blue dot of thread locking compound on the bolt thread K ov roub modr te ka K ov roub Podlo ka...

Page 6: ...05 rouby utahujte pouze manu ln Finger tighten only Stojan hlavn ho r mu K ov roub Podlo ka Matice...

Page 7: ...06 rouby utahujte pouze manu ln Finger tighten only chyt kladky vesla K ov roub Matice Podlo ka Spodn prav chyt kabel Spodn lev chyt kabel...

Page 8: ...dva v stupky ve st edu zadn rozp ry sm uj k zadn sti stroje Finger tighten only Step 6 Assure the two tabs in the center of the Rear Cross Brace are facing towards the back of the machine Zadn rozp ra...

Page 9: ...y el vn zadn stranou Nyn kl em ut hn te kroky 1 9 Step 9 Install the M12 x 25 hex bolt in the top of the Row Pulley Mount and adjust it to it s minimum height Attach the Top Weight Stack Mount to the...

Page 10: ...olt in the top of the Row Pulley Mount step 9 up to support the load of the Lat Attachment Krok 10b Nyn nainstalujte dva dr ky podp raj c kladkovou st a k ov v ztuhy se rouby sm uj c nahoru Pou ijte M...

Page 11: ...t directly to the Pull Up Cross Brace with one M10 x 95 Button Head Bolt Krok 10c Kladkov st n zk profil nastaven Pro nastaven n zk ho profilu odstra te dva dr ky a roub Kladkovou st p ipevn te p mo n...

Page 12: ...at side of plate is on top and the single hole is to the back of the machine Pozn mka Ujist te se e je hladk ploch povrch na horn stran desti ky a jedin otvor sm uje dozadu stroje Vod c ty Mezern k Sp...

Page 13: ...lure to do so may cause the Pulley Assemblies to come loose from weights and can cause injury Pozn mka Ne za nete krok 13 Pokud je nainstalov n velk z t ov blok vy a te z t ov cihli ky Toto m sto zabe...

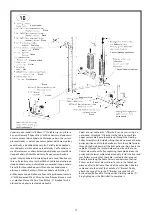
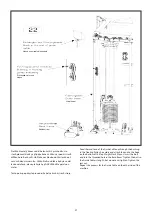
Page 14: ...13 Nyn ut hn te kl em kroky 12 a 14 Wrench Tighten Steps 12 And 14 Now roub Podlo ka Matice Horn mont n chyty...

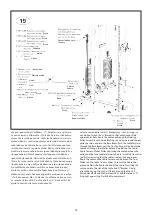
Page 15: ...14 Prav horn chyt kabel Lev horn chyt kabel roub Podlo ka Matice Lev posuvn k Vodi e kabel Prav posuvn k roub Podlo ka Matice...

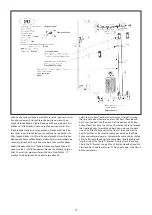
Page 16: ...Ring tight against the Plastic Ball Finally install Pulley 2 in the Top Beam per above detail Vyberte si jeden z horn ch kabel Um st te sestavu jezdce lev ho sloupku kabelu do pohodln pracovn v ky Pos...

Page 17: ...and M6 Flat Head Nut Slide the retainer O Ring tight against the Plastic Ball Finally install Pulley 2 in the Top Beam per above detail Vyberte si jeden z horn ch kabel Um st te sestavu jezdce lev ho...

Page 18: ...all to complete it Vyberte spodn kabel s dr kem U Polo te si jej a ujist te se e nen zalomen P ipevn te U dr k k horn mu st edov mu otvoru v kotevn desce kabelu Ve te lanko nahoru skrz sestavu plovouc...

Page 19: ...ght against the Plastic Ball to complete it Vyberte spodn kabel s dr kem U Polo te si jej a ujist te se e nen zalomen P ipevn te U dr k k horn mu st edov mu otvoru v kotevn desce kabelu Ve te lanko na...

Page 20: ...O Ring tight against the Plastic Ball to complete it Vyberte dva veslovac kabely a rozlo te je rovn abyste je ujistili e nejsou zalomen Odstra te jednu pojistnou matici z kon cov ho roubu kabelu Vlo...

Page 21: ...retainer O Ring tight against the Plastic Ball to complete it Vyberte dva veslovac kabely a rozlo te je rovn abyste je ujistili e nejsou zalomen Odstra te jednu pojistnou matici z kon cov ho roubu ka...

Page 22: ...jam nut Repeat this process for the Guide Cable on the other side of the machine Prot hn te mal konec vod c ho lanka skrz pr chodku v se stav plovouc kladky a p ipojte konec k h ku na spodn stran dr k...

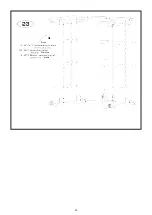
Page 23: ...22 roub Podlo ka Matice...

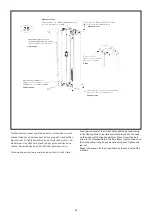
Page 24: ...23 Cvi ebn tabule roub Podlo ka Matice Krytky...

Page 25: ...n the jam nut Repeat this process for the Guide Cable on the other side of the machine Prot hn te mal konec vod c ho lanka skrz pr chodku v sestav plovouc kladky a p ipojte konec k h ku na spodn stran...

Page 26: ...at viditeln pod matic Nyn je t eba vycentrovat kabely Ujist te se e jsou v echny ve st edu kladek Uvoln te z va tak abyste jej pohodln zvl dli Prove te cvik a zadr te prvn opakov n Pomalu z va polo te...

Page 27: ...the second side Linear Shaft and Weight Holder using Finger Tighten Only Krok 1 Um st te sestavu erven z va na h ky p edn ch stojan POZN MKA SCS 102 lze tak nainstalovat na zadn stojany Krok 2 Zasu t...

Page 28: ...ything Now To attach the SCS 102 Option to the rear Racks repeat steps 1 thru 5 using the rear set of mounting holes Krok 5 Upravte vzd lenost mezi dr ky z va a konci se stavy erven z va posunut m h d...

Page 29: ...l Ka d cvi en by se m lo skl dat z tzv warm up zah vac f ze tr ninkov f ze a stre inkov f ze II Jak cvi it Trena r nab z mnoho r zn ch druh cvi en Vysv t me si s lu a v dr Vyberte z t kterou budete sc...

Page 30: ...bracket 1 7 SCS 202 Klimmzugstange Pull up bar 1 8 SCS 202 Abstandshalter f r Befestigungsplatte Shroud plate spacer 2 9 SCS 202 Ober Befestigungsplatte f r Gewichteverkleidung Shroud plate assembly 2...

Page 31: ...02 Unterlegscheibe Washer M10 56 23S SCS 202 Unterlegscheibe Washer M12 4 24S SCS 202 Mutter flach Flat nut M6 6 25S SCS 202 Mutter selbstsichernd Safety nut M6 6 26S SCS 202 Mutter selbstsichernd Saf...

Page 32: ...7 Z ruka Dovozce FITNESS STORE s r o Mare ova 643 6 198 00 Praha 9 Tel 420 581 601 521 E mail fitnestore fitnestore cz V robce Hammer Sport AG Von Liebig Str 21 89231 Neu Ulm www hammerer de 32...

Reviews: