background image


5

1

2

3

4

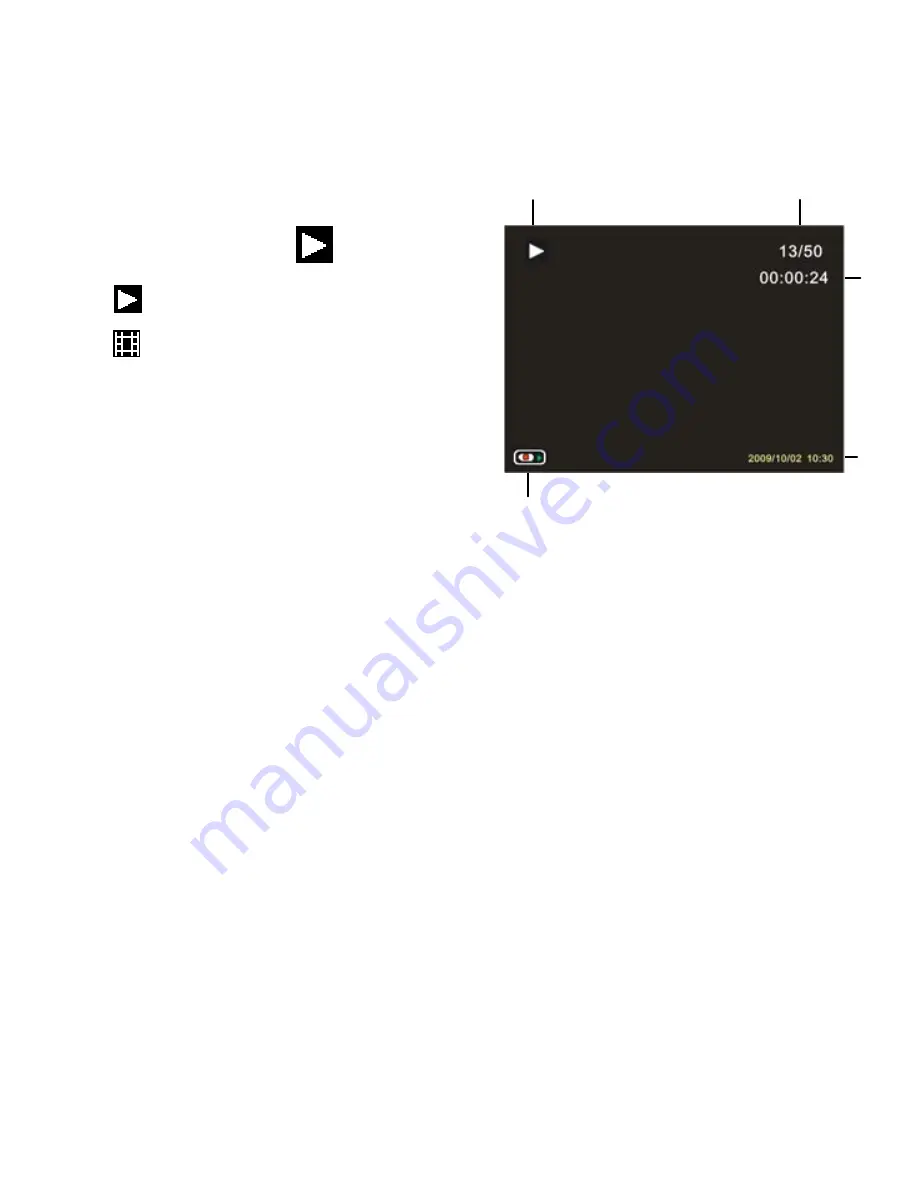
Playback mode [ 

 ] 

1. 


Playback still image icon   


Playback movie clips icon 

2.  Image# /Total Images on SD card 

Video# /Total Videos on SD Card 

3.  Video recording time 

4.  Date stamp (Only still Image mode) 

5.  Press the shutter button to playback video file 


3. Using this digital camera 

Turning the Digital camera On and Off 

1. Press the 

POWER

 button to turn on the camera and press it again to turn 

the digital camera off. 


You can change the power-off time by setting the function [Auto Power Off] 

in the Setup menu. 


16

Summary of Contents for DC2

Page 1: ...Hamilton Electronics CAMERA DC2 User s Manual 1...

Page 2: ...ORMAT THE MEMORY CARD 11 SETTING THE LANGUAGE 11 SETTING THE DATE AND TIME 12 MONITOR SCREEN DISPLAY 13 3 USING THIS DIGITAL CAMERA 16 TURNING THE DIGITAL CAMERA ON AND OFF 16 CHANGE THE RECORD MODE 1...

Page 3: ...BACK 28 PLAYBACK STILL IMAGE 28 PLAYING BACK MOVIE CLIPS 29 OTHER FUNCTION IN PLAYBACK MODE 29 6 MAKING CONNECTIONS 31 CONNECTING THE DIGITAL CAMERA TO A PC 31 7 SOFTWARE INSTALLATION 34 INSTALLING TH...

Page 4: ...pen the case of the digital camera or attempt to modify this digital camera in any way Maintenance and repairs should be carried out only by authorized service providers Keep the digital camera away f...

Page 5: ...and strap 2 Shutter button 14 Playback button 3 Power button 15 Battery SD card cover 4 Flash strobe 16 Up Display button 5 Microphone 17 Right Flash button 6 Lens 18 Ok button 7 USB jack 19 Down Mode...

Page 6: ...D 21 Menu button 10 Charging LED 22 TFT monitor screen 11 Zoom out button 23 Tripod sock 12 Zoom in button 2 Preparing for using Installing the Battery 1 Push the lock button 1 down to open the batter...

Page 7: ...After the battery is properly installed replace the battery cover until a clearly click is heard Charge the battery Please charge the battery when the indicator shows the icon 1 Power OFF connect the...

Page 8: ...ted be sure to disconnect the power supply device from the electrical outlet z Camera becomes warm during charging that is normal z Battery is exhausted after being charged when left for a long time z...

Page 9: ...he power plug Otherwise a fire and or electric shocks may be caused by short circuiting or the resulting heat generated Inserting the Memory Card 1 Turn off the digital camera 2 Push the lock button 1...

Page 10: ...card to the card slot with the label against the LCD screen Check the right direction before insert the memory card To release the memory card open the battery cover firstly and then press the edge of...

Page 11: ...e Up Display or Down Mode button to select Format then press the OK button to launch the submenu 3 Press the Up Display or Down Mode button to select the item OK and then press the OK button to erase...

Page 12: ...era to the Setup Menu See the details on page 27 2 Press the Up Display or Down Mode button to select Date Time then press the OK button to launch the dialog box 3 Press the Up Display or Down Mode bu...

Page 13: ...10 9 2 3 4 5 6 7 8 1 Camera Mode Still Image Capture Video recording Playback 2 Scene Mode Auto Night Portrait Night Scenery Portrait Scenery Sport Party Beach High Sensitivity 3 White Balance Auto D...

Page 14: ...000x3000 3264x2448 2592x1944 2048x1536 1600x1200 Always On Auto 9 SD Card inserted Off No protect status Protect status 640x480 8 Battery Power Level 10 Date Stamp 11 Smile Capture 12 Face Detect 13 A...

Page 15: ...e Quality Auto Super Fine Fine Normal 100 200 400 Video record mode 1 Video record icon 2 Video size 3 White Balance 4 Recording time available 5 Zoom value level 6 Battery level 7 SD Card inserted 1...

Page 16: ...rding time 4 Date stamp Only still Image mode 5 Press the shutter button to playback video file 3 Using this digital camera Turning the Digital camera On and Off 1 Press the POWER button to turn on th...

Page 17: ...wn Mode button is pressed the mode icon is changed Display Title Description Capture mode For taking still photos Video mode For recording movie clips Playback mode For previewing record files Note Yo...

Page 18: ...screen is increased by one For example if the screen displays 3 20 when the camera is powered on after one photo has been captured 4 19 will appear If the memory is full Memory Full will appear on sc...

Page 19: ...e the self timer mode Each time the LEFT SELF TIMER button is pressed the self timer icon changes Off Don t use self timer 2 Seconds The shutter release will delay for 2 seconds 5 Seconds The shutter...

Page 20: ...nuous shooting or movie recording 1 Set the digital camera to the Capture mode 2 Press the RIGHT FLASH button to change the flash mode Each time the flash button is pressed the flash icon changes Auto...

Page 21: ...LCD monitor 3 Press the SHUTTER button to start recording 4 Press the SHUTTER again to end the recording If the memory is full the video camera will stop recording automatically On the upper of the LC...

Page 22: ...lay the menu 3 Press the Up Display or Down Mode button to select an item 4 Press the OK button to enter the submenu 5 Use the Up Display or Down Mode button to select the desired item 6 Press the OK...

Page 23: ...re two options for choice On Off Smile Capture Sets smile capture is on Face Detect will be automatically opened Once it detects smile the digital camera will auto take pictures On Off Continue Shot U...

Page 24: ...in video mode 1 In video record mode press the MENU button to display the menu 2 Press the Up Display or Down Mode button to select an item 3 Press the OK button to enter the submenu 4 Press the Up Di...

Page 25: ...ode button to select an item 4 Press the OK button to enter the submenu 5 Push the Up Display or Down Mode button to select the desired item 6 Press the OK button to confirm the setting 7 Press the ME...

Page 26: ...ge quality to decrease the image size in order to capture more images There are three options for choice Super Fine Fine Normal Date Stamp This function can be used to add a date to your pictures as y...

Page 27: ...English Fran ais French Espa ol Spanish Portugu s Portuguese Deutsch German Nederlands Nederland Italiano Italian Pyccknn Russian Frequency Light Frequency should be set to either 60Hz or 50Hz dependi...

Page 28: ...mages stored a message No File Exist appears 2 Press the LEFT SELF TIMER or RIGHT FLASH button to preview the previous or next image 3 Zooming Press the ZOOM IN or ZOOM OUT button to zoom in or zoom o...

Page 29: ...playing Other function in playback mode Viewing Thumbnails Press the ZOOM OUT button to view the files in thumbnails mode Press the UP DISPLAY DOWN MODE LEFT Self timer RIGHT FLASH button to select a...

Page 30: ...ess the OK button to confirm the setting 6 Press the MENU button to close the menu Menu item Function Rotate Use this function to rotate the images 90 Rotate the image 90 degrees in clockwise 180 Rota...

Page 31: ...e all files Cancel OK Cancel Cancel this operation 6 Making connections Connecting the Digital camera to a PC There are two ways to download files from the digital camera s internal memory or memory c...

Page 32: ...to a directory of your choice on the computer s hard disk Connecting the Digital camera to a PC with the USB Cable 1 Connect the supplied USB cable to the computer s USB port and turn on the digital c...

Page 33: ...cable to turn the digital camera off 2 Open My Computer or Windows Explorer A Removable Disk appears in the drive list Double click the Removable Disk icon to view its contents Files stored on the cam...

Page 34: ...has the drivers and software that come with video camera Insert the CD into your CD ROM drive The autorun menu appears The following software is listed Install Driver Installs software for PC camera A...

Page 35: ...click the file named autorun exe to start the program You can also click Run in the Windows Startup menu enter D autorun exe where D is your CD ROM drive letter in the text box and click OK 1 Install...

Page 36: ...3 Click Next and then click Install to install the driver 4 Click Finish to complete the installation 36...

Page 37: ...ith the attached USB cable Long press the Shutter button and power on the camera to enter PC camera mode b Double click the icon my computer on the desktop of PC c Double click the icon then you can s...

Page 38: ...s when you copy the files to PC otherwise the files might be destroyed or lost 2 When you download the photos please always connect the USB cable to PC first then to the camera if you connect the USB...

Page 39: ...image was captured Hold the digital camera steady when shooting picture Image is not displayed on the LCD monitor 1 A memory card with non PICT images recorded with other camera is loaded This digita...

Page 40: ...GA 640x480 QVGA 320x240 Sensitivity ISO Auto 100 200 400 White balance Auto Daylight Cloudy Incandescent Fluoresce Exposure control 3EV to 3EV in 1step Continue shot YES Self timer 2 5 10 sec Storage...

Reviews: