background image

2

IMPORTANT SAFEGUARDS

1. 

Read all instructions.

2. 

This appliance is not intended for use by children or by persons with 

reduced physical, sensory, or mental capabilities, or lack of experience and 

knowledge, unless they are closely supervised and instructed concerning 

use of the appliance by a person responsible for their safety.

3. 

This appliance shall not be used by children. Keep the appliance and its 

cord out of reach of children.

4. 

Close supervision is necessary when any appliance is used near children. 

Children should be supervised to ensure that they do not play with the 

appliance.

5. 

To protect against risk of electrical shock, do not put can opener body, 

cord, or plug in water or other liquid.

6. 

Release the activation lever; then unplug from the outlet when not in use, 

before assembling or disassembling parts, and before cleaning. To unplug, 

grasp the plug and pull from the outlet. Never pull from the power cord.

7. 

Avoid contacting moving parts.

8. 

Do not operate any appliance with a damaged supply cord or plug, or 

after the appliance malfunctions or has been dropped or damaged in any 

manner. Supply cord replacement and repairs  must be conducted by the 

manufacturer, its service agent, or similarly qualified persons in order to 

avoid a hazard. Call the provided customer service number for information 

on examination, repair, or adjustment.

9. 

The use of attachments not recommended or sold by the appliance 

manufacturer may cause fire, electric shock, or injury.

10. 

Do not use outdoors.

11. 

Do not let cord hang over edge of table or counter, or touch hot surfaces 

including the stove.

12. 

Do not place on or near a hot gas or electric burner, or in a heated oven.

13. 

Do not open pressurized (aerosol-type) cans.

14. 

Do not open cans of flammable liquids such as lighter fluid.

15. 

Carefully route the power supply cord to avoid damage from the knife 

blades while sharpening.

16. 

Release the activation lever before plugging cord into wall outlet. To 

disconnect, release the activation lever; then remove plug from wall outlet. 

To unplug, grasp the plug and pull from the outlet. Never pull from the 

power cord.

17. 

Do not use appliance for other than intended purpose.

When using electrical appliances, basic safety precautions should always be followed to reduce the risk of fire, electric shock, and/or injury to persons, including 

the following:

SAVE THESE INSTRUCTIONS

Other Consumer Safety Information

This appliance is intended for household use only.

w


WARNING


Electrical Shock Hazard:

 This appliance is provided with a 

polarized plug (one wide blade) to reduce the risk of electric shock. The plug fits 

only one way into a polarized outlet. Do not defeat the safety purpose of the plug by 

modifying the plug in any way or by using an adapter. If the plug does not fit fully 

into the outlet, reverse the plug. If it still does not fit, have an electrician replace 

the outlet. The length of the cord used on this appliance was selected to reduce 

the hazards of becoming tangled in or tripping over a longer cord. If a longer cord 

is necessary, an approved extension cord may be used. The electrical rating of 

the extension cord must be equal to or greater than the rating of the appliance. 

Care must be taken to arrange the extension cord so that it will not drape over the 

countertop or tabletop where it can be pulled on by children or accidentally tripped 

over.

w


WARNING

 To reduce the risk of personal injury, keep hair and loose clothing 

away from lid opener and other moving parts of the can opener while using.

Summary of Contents for 76510

Page 1: ...www hamiltonbeach com EE UU o www hamiltonbeach com mx México para ver otros productos de Hamilton Beach o para contactarnos Questions Please call us our friendly associates are ready to help USA 1 800 851 8900 Preguntas Por favor llámenos nuestros amables representantes están listos para ayudar EE UU 1 800 851 8900 MEX 800 71 16 100 Le invitamos a leer cuidadosamente este instructivo antes de usa...

Page 2: ...n a heated oven 13 Do not open pressurized aerosol type cans 14 Do not open cans of flammable liquids such as lighter fluid 15 Carefully route the power supply cord to avoid damage from the knife blades while sharpening 16 Release the activation lever before plugging cord into wall outlet To disconnect release the activation lever then remove plug from wall outlet To unplug grasp the plug and pull...

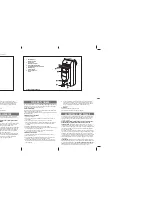
Page 3: ...ng Lever Magnetic Lid Holder Bottle Opener Cord Storage Knife Sharpener To order parts US 1 800 851 8900 www hamiltonbeach com Canada 1 800 267 2826 Mexico 800 71 16 100 Base Bottle Opener Storage Geared Wheel Can Opener Head Can Guide Pin ...

Page 4: ... is open BEFORE FIRST USE Wash removable parts according to Care and Cleaning on page 6 NOTES This can opener will easily open all standard size cans It will be necessary to position the can opener at the edge of the counter allowing for clearance to open cans taller than the can opener To ensure taller cans do not fall from the can opener place hand under can If there is a bump dent or heavy seam...

Page 5: ...d of the bottle opener to remove the bottle cap 1 Place cutting edge of the knife in the knife slot located on the back of the can opener 2 Draw the knife blade through the slot several times Clean the knife according to the package directions after sharpening NOTE This sharpener will not sharpen serrated knives How to Use the Knife Sharpener ...

Page 6: ...pull it straight out to remove 2 Wash the piercing lever in hot soapy water Rinse and dry 3 Wipe the can opener with a soft damp cloth and dry 4 To avoid damaging the can opener do not use abrasive cleaners or scouring pads 5 To reassemble hold the piercing lever at an angle and insert the piercing lever at an angle by resting the bottom on the can guide pin Move lever down 5 5 ...

Page 7: ... receipt as proof of purchase is required to make a warranty claim This warranty is void if the product is used for other than single family household use or subjected to any voltage and waveform other than as specified on the rating label e g 120 V 60 Hz We exclude all claims for special incidental and consequential damages caused by breach of express or implied warranty All liability is limited ...

Page 8: ...l 14 N ouvrir pas de boîtes ou de liquides inflammables comme de l essence à briquet 15 Bien placer le cordon d alimentation pour éviter les dommages causés par la lame de couteau pendant l affûtage 16 S assurer que l appareil est OFF arrêt avant de brancher la fiche dans la prise de courant Pour débrancher tourner la commande à et mettre à OFF arrêt puis débrancher la fiche de la prise de courant...

Page 9: ...perçage démontable Support de couvercle aimanté Ouvre bouteille Rangement de cordon Aiguisoir Pour commander des pièces Canada 1 800 267 2826 Base Rangement de l ouvre bouteille Roue dentée Tête de l ouvre boîtes Tige de guidage de la boîte ...

Page 10: ...indiqué au chapitre Entretien et nettoyage à la page 12 REMARQUES Cet ouvre boîtes ouvrira facilement toutes les boîtes de format régulier Il peut s avérer nécessaire de placer l ouvre boîtes près du bord du comptoir pour offrir suffisamment d espace et ouvrir les boîtes plus hautes que l ouvre boîtes Placer une main sous la boîte pour s assurer que les boîtes hautes ne tombent pas de l ouvre boît...

Page 11: ...é de l ouvre bouteille pour retirer le bouchon de la bouteille 1 Placer le tranchant du couteau dans la fente à couteau située à l arrière de l ouvre boîtes 2 Passer plusieurs fois la lame du couteau dans la fente Nettoyer le couteau selon les directives d emballage après l affûtage REMARQUE L affûteur n est pas conçu pour les couteaux dentelés Utilisation de l affûteur ...

Page 12: ...pouvoir le retirer 2 Laver le levier de perçage dans l eau chaude savonneuse Rincer et sécher 3 Essuyer l ouvre boîtes avec un linge doux et humide puis sécher 4 Ne pas utiliser de nettoyants abrasifs ou tampons à récurer pour éviter d endommager l ouvre boîtes 5 Pour remonter tenir le levier de perçage selon un angle puis l insérer selon un angle et en le faisant reposer au bas de la tige de guid...

Page 13: ... une réclamation au titre de cette garantie Cette garantie s annule si le produit est utilisé autrement que par une famille ou si l appareil est soumis à toute tension ou forme d onde différente des caractéristiques nominales précisées sur l étiquette par ex 120 V 60 Hz Nous excluons toutes les réclamations au titre de cette garantie pour les dommages spéciaux consécutifs et indirects causés par l...

Page 14: ...una fuente de gas caliente o de un quemador eléctrico ni dentro de un horno caliente 14 No abra latas presurizadas del tipo aerosol 15 No abra latas de líquidos inflamables como líquidos para encendedores 16 Extienda cuidadosamente el cable de alimentación eléctrica para evitar que se produzcan daños por las hojas del cuchillo mientras afila 17 Verifique que el artefacto esté OFF apagado antes de ...

Page 15: ...orte de Tapa Magnético Abrebotellas Almacenamiento de Cable Afilador de Cuchillo Para ordenar partes EE UU 1 800 851 8900 www hamiltonbeach com México 800 71 16 100 Base Almacenamiento de Abrebotellas Rueda Engranada Cabezal del Abrelatas Clavija de Guía de la Lata ...

Page 16: ...e las partes removibles de acuerdo con las instrucciones de Cuidado y Limpieza de la página 18 NOTAS Este abrelatas puede abrir fácilmente todos los tamaños estándar de latas Será necesario colocar el abrelatas en el borde del mostrador dejando espacio para abrir latas de mayor altura que el abrelatas Para garantizar que las latas más altas no se caigan del abrelatas coloque la mano debajo de la l...

Page 17: ...otellas para quitar la tapa de la botella 1 Coloque el filo de corte del cuchillo en la ranura ubicada en la parte trasera del abrelatas 2 Pase el filo del cuchillo varias veces a través de la ranura Después de afilarlo limpie el cuchillo de acuerdo con las instrucciones del paquete NOTA Este afilador no afila cuchillos dentados Cómo Usar el Afilador de Cuchillos ...

Page 18: ...a para quitarla 2 Lave la palanca de perforación en agua caliente jabonosa Enjuague y seque 3 Limpie el abrelatas con un paño suave húmedo y seque 4 Para evitar daños al abrelatas no utilice limpiadores o esponjillas abrasivos 5 Para volver a ensamblar sostenga la palanca de perforación en un ángulo e introduzca la palanca de perforación en un ángulo apoyando la base de la clavija de guía de la la...

Page 19: ...al para el consumidor Esta garantía incluye los gastos de transportación del producto que deriven de su cumplimiento dentro de su red de servicio LIMITACIONES Esta garantía no ampara el reemplazo de piezas deterioradas por uso o por desgaste normal como son cuchillas vasos jarras filtros etc Grupo HB PS S A de C V no se hace responsable por los accidentes producidos a consecuencia de una instalaci...

Page 20: ... LA GARANTÍA DÍA___ MES___ AÑO___ Si desea hacer comentarios o sugerencias con respecto a nuestro servicio o tiene alguna queja derivada de la atención recibida en alguno de nuestros Centros de Servicio Autorizados por favor dirigirse a GERENCIA INTERNACIONAL DE SERVICIO 800 71 16 100 Email mexico service hamiltonbeach com SELLO DEL VENDEDOR QUEJAS Y SUGERENCIAS FECHA DE ENTREGA CENTROS DE SERVICI...

Reviews: