25
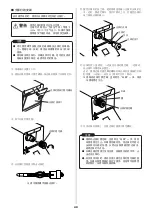
Lamp fixing cap
Pin
Groove
When using this unit for the first time, install the
lamp supplied with it first.
■
Lamp Installation
Lamp flange
Lamp
Slit
Lamp replacement
hatch fixing screw
q
Turn off the power switch.
w
Loosen the lamp replacement hatch fixing screw and
open the hatch forward.
e
Remove the lamp fixing cap by turning it.
Lamp replacement
hatch
Lamp fixing cap
* Do not touch the lamp with bare hand.
Lamp holder
WARNING
●
Keep the glass section or the end of the lamp out
of contact by hand. If dirt or grease should be at-
tached to it, wipe the glass section with a gauze
(soft cloth) soaked with alcohol.
●
Be sure to install the lamp securely. If it is not
securely installed, the output intensity may be
unstable or the lamp may fail to turn on.
r
Take out the lamp from the lamp package.
t
Holding the lamp flange, insert the lamp gradually
straight into the hole in the lamp holder.
At this time, make sure to hold the lamp flange so that
the slit faces up as shown in the figure and push in the
lamp as it is.
y
After inserting the lamp fully, align the groove in the lamp
fixing cap and the pin of the lamp holder and secure it by
turning it clockwise while pushing it.
* Be sure to turn the lamp fixing cap until it clicks
and gets locked securely.
u
Close the lamp replacement hatch and tighten its fixing
screw.
●
Be sure to turn the lamp fixing cap until it clicks
and gets locked. If the cap is loose, the lamp will
not be set at a correct position, specified light
intensity will not be obtained or the lamp will fail
to light up.
●
Note that if the lamp replacement hatch is not
closed tightly, the interlock switch will function
and the lamp will not light.
●
When using this unit for the first time, detach the
tape which secures the lamp fixing cap. If the
unit is used with this tape attached as it is, the
tape may melt by heat, causing a failure.
Caution
Caution
Be very careful when handling lamps as they con-
tain high-pressure gas approximately 1 MPa (10 at-
mos-pheres) at normal temperature and may burst
if dropped or otherwise impacted.
Summary of Contents for LIGHTINGCURE LC8
Page 2: ...2...
Page 6: ...6 1 1 1 2 JIS C 7550 3 JIS T 8141 30 kV 15 1 MPa 10 4 MPa 40...
Page 8: ...8 25 80 10 cm 10 cm L9566 L9588 10 cm 10 cm 10 cm 10 cm...
Page 11: ...11 q OFF w e 1 MPa 10 r t y u...
Page 35: ...35 1 1 1 2 IEC 2006 IEC 62471 EMI 30kV 15 1MPa 10 4MPa 40...
Page 37: ...37 L9566 L9588 10cm 10cm 10cm 10cm 25 80 10cm 10cm...
Page 40: ...40 q OFF w e r t y 1MPa 10 u...
Page 54: ...54...
Page 55: ...55...


