


4
6.1. Connection to the measuring station
• After you insert the batteries, the base station automatically
searches for a connection to the measuring station and
performs initial setup.
N
ote
• Initial setup takes approx. 2 minutes.
• During connection, the wireless symbol on the measuring
station will flash (4).
• Do not press any buttons during setup. Otherwise, values
may not be transmitted correctly and there is a risk of
value errors and inaccuracies.
• The setup process is completed when the indoor (7/8) and
outdoor (2/3) measurement data is displayed.
• The measured value is automatically updated by the base
device about every 45 seconds.
• If the temperature is outside of the measuring range,
--.-
(lower than minimum temperature) or
--.-
(higher than
maximum temperature) will appear on the temperature
display.
• If the base station still does not receive a signal from the
measuring station, press and hold the ‘CH | ’ button
(12) for approx. 3 seconds to start the manual search for
the signal.
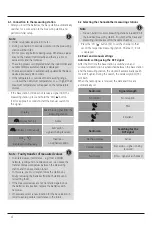
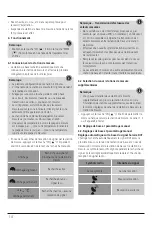
Display
Search for a signal from the
measuring station
Display flashing
Active
Displayed continuously
Successful –
signal is being received
Displayed continuously
Inactive –
no signal reception
N
ote – Faulty transfer of measured values
• In isolated cases, interference - e.g. from a WLAN
network, a computer or a television set - can cause the
transfer of measured values between the measuring
station and the base station to fail.
• In this case, you must resynchronise the stations by
briefly removing the batteries from both stations and
reinserting them.
• If the measured values are not transferred again once
the batteries are inserted, replace the batteries with
new ones.
• If necessary, select a new location for the base station in
order to avoid possible interference in the future.
6.2 Selecting the channel/other measuring stations
N
ote
• You can install two more measuring stations in addition to
the included measuring station. Ensure that the base and
measuring stations are set to the same channel.
• Press the ‘CH | ’ button (12) to set the channel to that
set on the respective measuring station. Channel 1, 2 or 3
is displayed
6.3Basic and manual settings
Automatic setting using the DCF signal
After the first time the base station is switched on and
successful transmission is established between the base station
and the measuring station, the clock will automatically search
for a DCF signal. During the search, the wireless symbol (15)
will flash.
When the radio signal is received, the date and time are
automatically set.
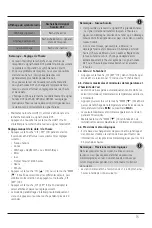
Radio icon
Signal strength
No symbol
No reception
Poor
Excellent
Radio icon
Searching for the
DCF signal
Flashing display
Active
Constant display
Successful – signal is being
received
No display
Error – signal search ended
Summary of Contents for Touch
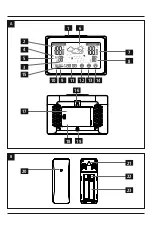
Page 2: ...A B 1 10 6 16 9 11 18 19 12 13 14 5 17 20 3 15 2 4 7 21 8 22 23...
Page 24: ...23 4 4 1 23 17 Micro 4 2 23 Micro 17 Micro 5 6 30 5 1 19 16 5 2 21 6 CH 12 MEM 14 6 1...
Page 25: ...24 2 4 7 8 2 3 45 3 CH 12 DCF WLAN 6 2 3 www hama com CH 12 1 2 3 6 3 DCF DCF 15 DCF...
Page 39: ...38 4 4 1 23 17 AAA Micro 4 2 23 AAA Micro 17 AAA Micro 5 6 30 m 1 25 m 4 5 1 19 16 5 2...
Page 40: ...39 21 6 CH 12 MEM 14 6 1 2 45 3 CH 12 WLAN 6 2 CH 12 1 2 3 6 3 DCF DCF 15 DCF...


