background image

6

7

L

Operating Instruction

-  Betätigen Sie die Taste innerhalb einer Offi ce-Anwendung, öffnet sich    
  wiederum ein kreisförmiges Menüfeld mit verschiedenen Optionen zur 
  Bearbeitung Ihrer Daten.

-  Zoom Modus: Bei Auswahl des Zoom Modus, können Sie nach Betätigung 
  dieser Taste in verschiedenen Programmen, mit den Tasten 2 und 3 zoomen.

Um zu den Grundeinstellungen zurückzukehren, klicken Sie auf 
„Wiederherstellen“.

8. Support- und Kontaktinformationen

Bei defekten Produkten:

Bitte wenden Sie sich bei Produktreklamationen an Ihren Händler oder an die 
Hama Produktberatung.

Internet/World Wide Web

Produktunterstützung, neue Treiber oder Produktinformationen bekommen 
Sie unter www.hama.com

Support Hotline – Hama Produktberatung:

Tel. +49 (0) 9091 / 502-115
Fax +49 (0) 9091 / 502-272

e-mail:

 [email protected]

Die Konformitätserklärung nach der R&TTE-Richtlinie 99/5/EG fi nden Sie unter 
www.hama.com

1. Package contents

•   7-button wireless laser mouse with 4-way scroll wheel
•   USB receiver
•   Software CD-ROM
•   Two AA batteries
•   Operating instructions

2. Installing the hardware
2.1 Inserting the Batteries

a) Remove the battery compartment cover and insert the batteries in the  


  correct direction in the battery compartment (Fig. 1). The correct polarity is 
 indicated 

there.

b) Reattach the battery cover so that it is securely closed.

2.2 Connecting the USB receiver

a) Connect the USB receiver to an available USB port on the PC.
b) Switch on your computer if you have not already done so.
c) Windows® detects the USB receiver and integrates it into the operating 
 system.
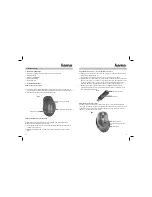
d) Set the ON-OFF switch on the base of the mouse to “ON” (Fig. 1).

e

On/Off switch

battery compartment

Fig.1

connect button

Summary of Contents for M2020

Page 1: ...M u s t e r 3 M2020 Wireless Laser Mouse 00052499 www hama com Hama GmbH Co KG Postfach 80 86651 Monheim Germany Tel 49 0 9091 502 0 Fax 49 0 9091 502 274 hama hama de www hama com 00052499 08 06 ...

Page 2: ...ngstaste am Empfänger die Status LED blinkt Abb 2 Der Empfänger ist zum Abgleich mit der Maus bereit b Betätigen Sie anschließend innerhalb von 10 Sekunden die Verbindungstaste mit einem spitzen Gegenstand z B einem Sift auf der Unterseite der Maus Abb 1 Diese Taste ist mit Connect gekennzeichnet Bitte achten Sie darauf das sich während dieser Verbindungsphase Maus und Empfänger nicht mehr als 30 ...

Page 3: ...ter b Wählen Sie die gewünschte Sprache aus und klicken Sie auf Weiter c Starten Sie nach Abschluss der Installation Ihren PC neu d Nach erfolgreicher Installation erscheint das Maussymbol in der Taskleiste Hinweis Während der Installation unter Windows XP können Meldungen bezüglich eines nicht bestandenen Logo Tests erscheinen Die Funktion der Maus oder Software wird dadurch nicht beeinträchtigt ...

Page 4: ...091 502 115 Fax 49 0 9091 502 272 e mail produktberatung hama de Die Konformitätserklärung nach der R TTE Richtlinie 99 5 EG finden Sie unter www hama com 1 Package contents 7 button wireless laser mouse with 4 way scroll wheel USB receiver Software CD ROM Two AA batteries Operating instructions 2 Installing the hardware 2 1 Inserting the Batteries a Remove the battery compartment cover and insert...

Page 5: ...ay scroll wheel is ideal for displaying large images documents or spreadsheets However you can only do this if the horizontal or vertical scroll bars are present To use all the functions of the mouse in particular the 4 way scroll wheel you must install the software see point 7 7 Installing the software The software supports Windows 98SE ME 2000 XP Uninstall any mouse software already installed a ...

Page 6: ...e application opens a circular menu field that has various options for processing your data Zoom mode Once this button is pressed in Zoom mode you can zoom in various programs using buttons 2 and 3 To return to the factory settings click Restore 8 Support and contact information If products are defective Please contact your dealer or Hama Product Consulting if you have any product claims Internet ...

Page 7: ...affichage d état commence à clignoter fig 2 Le récepteur est alors prêt pour la synchronisation avec la souris b Appuyez dans les 10 secondes sur la touche de connexion de la face inférieure de votre souris fig 1 à l aide d un objet pointu un stylo par exemple Cette touche est indiquée par Connect La souris devrait être à une distance d environ 30 cm du récepteur afin de garantir une connexion par...

Page 8: ...e lecteur de CD ROM et validez avec Enter b Sélectionnez la langue souhaitée et cliquez sur Suivant c Redémarrez ensuite votre ordinateur après l installation d Une fois l installation réussie l icône de la souris apparaît dans la barre des tâches Remarque Il est possible que des messages concernant le test de logo Windows apparaissent pendant l installation sous Windows XP Le fonctionnement de la...

Page 9: ... R TTE 99 5 EC se trouve sur www hama com d Die Konformitätserklärung nach der R TTE Richtlinie 99 5 EG finden Sie unter www hama com g See www hama com for declaration of conformity according to R TTE Directive 99 5 EC guidelines f La déclaration de conformité à la directive R TTE 99 5 CE se trouve sur www hama com e La declaración de conformidad según la directiva R TTE 99 5 CE la encontrará en ...

Reviews: