background image

16

d

Bedienungsanleitung

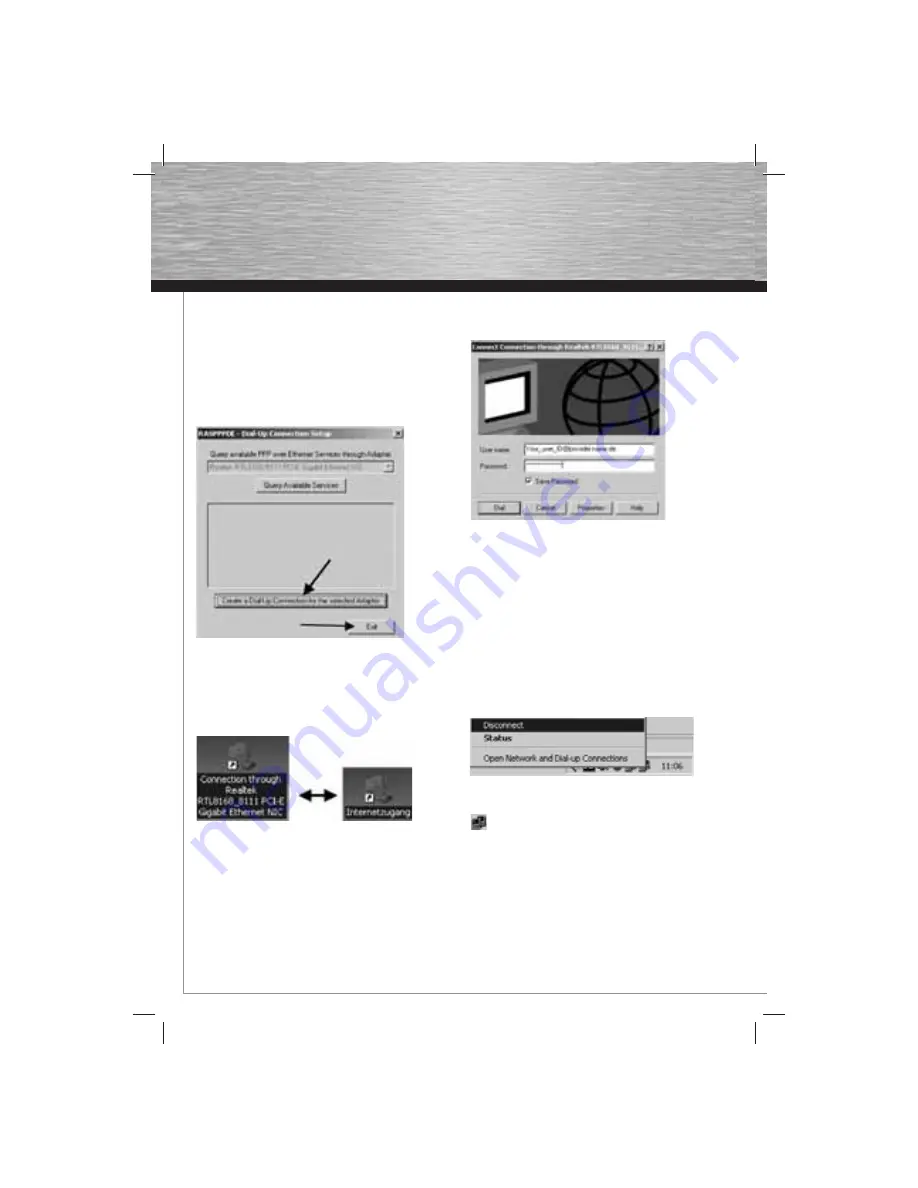
Creating a dialup connection for the network card:

The program has started. The network card for which the dialup 
connection is to be set up should be displayed under the line 
labelled 

“Query available PPP over Ethernet Services through 

Adapter:”

.

If no network card is displayed, there is a problem. Install 
the drivers for your network card again and repeat the DSL 
installation process.
Next, choose 

Create a Dial-Up Connection for the selected 

Adapter

 and click 

“Exit”

 to close the program.


Customising the shortcut on the desktop:

If the program was installed correctly, there is a DSL shortcut 
(see left part of screenshot) on the Windows desktop.

Press 

F2

 or right-click the fi le and choose 

“Rename”

 to change 

the name of the fi le to 

Internet Connection

, for example 

(see right part of the screenshot). Double-click it to open the 
connection.


Connecting to the Internet:

Enter your user name and your password. You received this 
information from your Internet provider.

Note for T-Online customers: 

The user name for this provider 

consists of your 

connection ID, T-Online number 

and the 

user 

suffi x

. You must enter these three columns of numbers 

consecutively without spaces in the 

user name

 fi eld and 

add 

@t-online.de

 at the end.

Activate the 

“Save password”

 option if you do not want to have 

to enter your password again every time you connect to the 
Internet. Click the 

“Dial”

 button to start the dialup process.


The DSL connection process begins as soon as you click 

“Dial”.


You should be connected within a few seconds.
If the window remains unchanged for an extended period, you 
may have entered the user name or password incorrectly. Wait 
until the connection attempt is terminated, correct your access 
data and try to connect again.

If unexpected problems occur, call your provider’s hotline.

Connection successful

If everything goes according to plan, 

two fl ashing computers


appear at the bottom right 

in the taskbar notifi cation area

which confi rm and indicate an 

active/existing Internet 

connection.

Disconnecting:


The easiest way to disconnect from the Internet is to use the 
status menu mentioned above: 

Right-click

 the 

connection icon


     in the 

taskbar

 and select 

Disconnect

 from the status   

           menu. The connection is now closed. The connection icon 
is no longer displayed in the taskbar. 

Summary of Contents for 49061

Page 1: ...ed brands are trademarks of the corresponding companies Errors and omissions excepted and subject to technical changes Our general terms of delivery and payment are applied Hama GmbH Co KG D 86651 Monheim Germany www hama com ...

Page 2: ...DSL Modem N E T W O R K L A N 00049061 ...

Page 3: ...stellen Die folgende Dokumentation arbeitet mit dem Programm RASPPPoE von Robert Schlabbach Sie finden es unter der Internetadresse www raspppoe com Bitte entpacken Sie die Dateien mit einem Packprogramm wie zum Beispiel WinZIP Eigenschaften der Netzwerkumgebung öffnen Klicken Sie mit der rechten Maustaste auf die Netzwerkumgebung Diese finden Sie normalerweise direkt am Desktop oder Sie erreichen...

Page 4: ...ckt haben Klicken Sie auf Öffnen Windows wird automatisch die richtige Datei RASPPPOE INF auswählen Netzwerkprotokoll wählen Markieren Sie das PPP over Ethernet Protocol und klicken Sie auf OK Digitale Signatur bestätigen Windows 2000 benutzt eine Digitale Signatur für Treiber Protokolle und diverse andere Software Da dieses Protokoll nicht digital signiert ist erscheint diese Meldung Fahren Sie d...

Page 5: ...er und den Mitbenutzer Suffix Diese 3 Zahlenkolonnen sind nacheinander ohne Leerzeichen in das Feld Benutzername einzugeben danach muss noch ein t online de angehängt werden Durch Aktivieren der Option Kennwort speichern ersparen Sie sich eine Neueingabe Ihres Passwortes vor dem Aufbau einer jeden Internetverbindung Starten Sie den Wählvorgang durch einen Klick auf die Schaltfläche Wählen Sobald S...

Page 6: ...aste auf das Symbol Netzwerkumgebung auf dem Desktop oder unter Start Systemsteuerung Netzwerk und Internetverbindungen Netzwerkverbindungen Daraufhin öffnet sich das Fenster Netzwerkverbindungen Installation des Netzwerkprotokolls Klicken Sie mit der rechten Maustaste auf das Symbol LAN Verbindung Im Kontextmenü wählen Sie anschließend die Option Eigenschaften aus Achten Sie darauf dass das Inter...

Page 7: ... Zahlenkolonnen sind nacheinander ohne Leerzeichen in das Feld Benutzername einzugeben danach muss noch ein t online de angehängt werden Das Feld Internetverbindungsfirewall für diese Verbindung aktivieren können Sie bei Bedarf aktivieren Klicken Sie anschließend auf die Schaltfläche Weiter Verknüpfung erstellen Im nächsten Schritt werden Sie gefragt ob Sie eine Verknüp fung der DSL Verbindung auf...

Page 8: ...ternet Explorer indem Sie auf Start und dann auf Internet klicken Internetoptionen im Internet Explorer aufrufen Nach dem Öffnen des Internet Explorers klicken Sie bitte auf Extras und dann auf Internetoptionen Siehe Screenshot Verbindungen in Internetoptionen Wählen Sie im Fenster Internetoptionen den Reiter Verbindungen aus und klicken anschließend auf die Schaltfläche Einrichten Verbindung konf...

Page 9: ...et Explorer Tipp Die soeben hergestellte Internetverbindung ist jetzt noch aktiv Dies erkennen Sie an dem Globus Symbol mit den beiden Computerbildschirmen rechts unten in der Taskleiste Wenn Sie auf dieses Symbol mit der rechten Maustaste klicken können Sie die aktive Verbindung trennen Zukünftige Schritte zur Einwahl ins Internet Wenn Sie die vorherigen Schritte durchgeführt haben können Sie Ihr...

Page 10: ...indung automatisch herstellen auswählen Möchten Sie die Internet Verbindung trennen schließen Sie einfach alle Internet Explorer Fenster und Sie werden automatisch gefragt ob Sie die Verbindung trennen wollen Tipp Ist die Verbindung getrennt sehen Sie ein Hinweisschild neben den beiden Computerbildschirmen rechts unten in der Taskleiste ...

Page 11: ...en die Sie in dem Unterlagen Ihres Internet Providers erhalten haben Stellen Sie sicher dass Sie sich in Mac OS X als Administra tor angemeldet haben also über alle notwendigen Rechte verfügen Klicken Sie im Apfel Menü oder im Dock auf Systemeinstellungen und klicken Sie auf Netzwerk Netzwerkeinstellung Klicken Sie auf die Schaltfläche Assistent um fortzufahren Klicken Sie auf die Schaltfläche Ass...

Page 12: ...Sie im Reiter PPPoE dass folgende Eigenschaften aktiviert wurden PPPoE verwenden PPPoE Status in der Menuleiste anzeigen Klicken Sie auf PPPoE Optionen und aktivieren Sie bei Bedarf unter Verbindungsoptionen folgende Optionen o Bei Bedarf automatisch verbinden o Alle Minuten nachfragen um die Verbindung aufrecht zu erhalten Die Minutenzahl können sie individuell einstellen o Verbindung trennen fal...

Page 13: ...hres Internet Providers erhalten haben Stellen Sie sicher dass Sie sich in Mac OS X als Administrator angemeldet haben also über alle notwendigen Rechte verfügen Klicken Sie im Apfel Menü oder im Dock auf Systemeinstellungen und klicken Sie auf Netzwerk Klicken Sie auf die Schaltfläche Assistent um den Mac OS X Netzwerkassistenten zu starten Im nächsten Fenster werden Sie gefragt Benötigen Sie Hil...

Page 14: ...er Suffix Diese 3 Zahlenkolonnen sind nacheinander ohne Leerzeichen in das Feld Benutzername einzugeben danach muss noch ein t online de angehängt werden Nach Eingabe aller notwendigen Daten klicken Sie auf Fortfahren Wurden die Eingaben im vorherigen Menu korrekt eingegeben dann erhalten Sie nach kurzer Zeit den oben abgebildeten Hinweis Sie wurde erfolgreich mit dem Internet verbunden Klicken Si...

Page 15: ... network cards There are external programs that provide this service PPPoE This document is based on the program RASPPPoE by Robert Schlabbach It is available on the Internet at www raspppoe com Please extract the files using archiving software such as WinZIP Opening the properties for My Network Places Right click My Network Places This is generally displayed on the Desktop or can be accessed via...

Page 16: ...the zip file that you downloaded at the beginning Click Open Windows automatically selects the correct file RASPPPOE INF Selecting the network protocol Select the PPP over Ethernet Protocol and click OK Confirming the digital signature Windows 2000 uses a digital signature for drivers protocols and various other software As this protocol does not have a digital signature the following message is d...

Page 17: ...onsists of your connection ID T Online number and the user suffix You must enter these three columns of numbers consecutively without spaces in the user name field and add t online de at the end Activate the Save password option if you do not want to have to enter your password again every time you connect to the Internet Click the Dial button to start the dialup process The DSL connection process...

Page 18: ...ation from your Internet provider Changing the network connection Right click the My Network Places icon on the desktop or under Start Control Panel Network and Internet Connection Network Connections The Network Connections window is then opened Installing the network protocol Click the LAN connection symbol with the right mouse button Select the properties option in the context menu afterwards E...

Page 19: ...Online number and the user suffix You must enter these three columns of numbers consecutively without spaces in the user name field and add t online de at the end If required you can check Turn on Internet Connection Firewall for this connection Then click Next Creating a shortcut In the next step you are asked whether you want a shortcut to the DSL connection on the desktop After this click the F...

Page 20: ...arting Internet Explorer Click Start and then Internet to start Internet Explorer Opening Internet Options in Internet Explorer After opening Internet Explorer click Tools and then Internet Options see screenshot Connections in Internet Options In the Internet Options window select the Connections tab and then click the Setup button Configuring the connection Click Broadband PPPOE to configure a D...

Page 21: ...Internet connection you just created is still active This is indicated by the globe icon with the two computer screens at the bottom right in the task bar notification area When you right click this icon you can close active connection by clicking on Disconnect from Broadband Conncection button Steps for connecting to the Internet in the future When you have completed the previous steps you can co...

Page 22: ...ve to click Connect To close the Internet connection simply close all Internet Explorer windows and you are automatically asked whether you want to close the connection Tip When the connection has been closed a message is shown at the bottom right in the taskbar notification area beside the two computer screens ...

Page 23: ...e the connection you need a login and password access data which are stated in the documents you received from your Internet provider Ensure that you are logged in as the administrator in Mac OS X and have all rights required Click System Preferences in the Apple menu or the Dock and click Network Network configuration Click the Assist me button to continue Click the Assistant button to continue I...

Page 24: ... and select the Network option Check that the following properties are activated on the PPPoE tab Use PPPoE Show PPPoE status in the menu bar Click PPPoE Options and activate the following options under Session Options o Connection automatically when stating TCP IP applications o Prompt every minutes to maintain connection You can set the number of minutes individually o Disconnect if idle for min...

Page 25: ...nection you need a login and password access data which are stated in the documents you received from your Internet provider Ensure that you are logged in as the administrator in Mac OS X and have all rights required Click System Preferences in the Apple menu or the Dock and click Network Click the Assist me button to start the Mac OS X Network Assistant In the next window you are asked Do you nee...

Page 26: ...ction ID T Online number and the user suffix You must enter these three columns of numbers consecutively without spaces in the user name field and add t online de at the end When you have entered all required data click Continue If the entries on the previous screen were correct the message shown above is displayed You have successfully connected to the Internet Then click Done You can then close ...

Page 27: ...oals batterijen op het einde van gebruik in te dienen bij openbare verzamelplaatsen speciaal opgezet voor dit doeleinde of bij een verkooppunt Verdere specificaties aangaande dit onderwerp zijn omschreven door de nationale wet van het betreffende land Dit symbool op het product de gebruiksaanwijzing of de verpakking duidt erop dat het product onderworpen is aan deze richtlijnen Door te recycleren ...

Page 28: ...овать электрические и электронные приборы а также батареи и аккумуляторы после их использования в специально предназначенных для этого пунктах сбора либо в пунктах продажи Детальная регламентация этих требований осуществляется соответствующим местным законодательством Необходимость соблюдения данных предписаний обозначается особым значком на изделии инструкции по эксплуатации или упаковке При пере...

Reviews: