background image

14

NAVIGATION AND cONTROlS

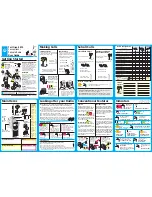
8. Navigation and controls

Once the radio has been initialised for the first time, switch it on using the button (Power button)

if required to start the product setup process. Below, the relevant steps are explained in brief. Further

information can be found in the relevant detailed sections.

8.1 control options

Please see the operating concept for information on the radio's general operation.

The radio can be used with the following control options:

1. Control elements on the device

2. The free UNDOK app for Android and iOS devices

8.2 language selection

Once the initial start-up procedure is complete, you can choose

your preferred system language.

Please note that some parts of the interface are synchronised over

the Internet and it may be that some sections are not available in

your chosen language.

8.3 Setup wizard

We recommend using the setup wizard for quick and easy first-

time setup (setting of the time, date, Internet connection, etc.).

If you skip the setup wizard's help with first-time setup, you can

of course still make these settings via the System settings or re-

initiate the setup wizard.

Note on operation

To select between the various settings options, use the control elements explained in the operating

concept. These allow you to navigate between the menu items and subsequently confirm your

selection. If you have accidentally made an incorrect selection, you can return to the previous menu

item.

8.4 Time settings

The radio allows the time to be displayed in 12-hour (am/pm) or 24-hour format. The time can be

calibrated using the various reception methods (VHF/DAB/DAB+/Internet), enabling the current time to be

synchronised automatically in the event of

a power cut. If you disable synchronisation, there is the risk that the time information will need to be

repopulated manually after a power cut.

NAVIGATe

eNTeR

German

Italian

Norwegian

Polish

LANGUAGE

YES

NO

SYSTEM SETTINGS

Summary of Contents for 00054873

Page 1: ...ruzioni per l uso Gebruiksaanwijzing Instrukcja obs ugi Haszn lati tmutat N vod k pou it N vod na pou itie Manual de instru es Kullanma k lavuzu Manual de utilizare Bruksanvisning K ytt ohje Betjening...

Page 2: ...e network connection Internet connection 13 7 3 WLAN Wi Fi connection wireless network 13 8 Navigation and controls 14 8 1 Control options 14 8 2 Language selection 14 8 3 Setup wizard 14 8 4 Time set...

Page 3: ...ngs 23 13 Bluetooth playback RX 24 13 1 Connect a source device 24 13 2 Music playback via Bluetooth 24 13 3 More settings 24 14 Routines 25 14 1 Sleep 25 14 2 Alarm clock 25 14 3 Timer 26 15 System s...

Page 4: ...18 2 Time settings 36 18 2 1 Time date setting 36 18 2 2 Time synchronisation 36 18 2 3 Time display 37 18 2 4 Setting the time zone 37 18 2 5 Summer winter time 37 18 3 Language 37 18 4 Auto standby...

Page 5: ...tion of warning symbols and notes Risk of electric shock This symbol indicates a risk of electric shock from touching product parts carrying hazardous voltage Warning This symbol is used to indicate s...

Page 6: ...ot permitted Only use the article under moderate climatic conditions The product is intended only for use inside buildings Do not use the product in a damp environment and avoid splashing water Route...

Page 7: ...smartphone or tablet To do this download the free UNDOK app for iOS Android Note on the UNDOK app A detailed description of the UNDOK app and all of its functions can be found in our UNDOK Guide at w...

Page 8: ...signation Function 1 Mains connection Connection of the enclosed mains adapter to the power supply 2 Headphones connection 3 5 mm Analogue connection with wired headphones with 3 5 mm jack connection...

Page 9: ...2 4 6 8 10 Setting up the radio and accessories No Button Designation 1 1 2 3 4 Button 1 4 2 Power button 3 List of favourites 4 Settings 5 Mute 6 Information 7 Back 8 Mode 9 Navigation OK Volume 5 2...

Page 10: ...Rotary knob OK button Confirmation button for opening the menu or function currently highlighted Toggling between the presentation forms available full screen split screen POWER button Switch off and...

Page 11: ...playback mode Long key press Save the current station to favourite storage space 2 4 PRESET 4 button Short key press Access favourite storage space 4 for current playback mode Long key press Save the...

Page 12: ...total power consumption of all connected devices does not exceed the power strip s maximum throughput rating If you will not be using the product for a prolonged period disconnect it from mains power...

Page 13: ...nternet 7 3 WLAN Wi Fi connection wireless network Ensure the router is switched on is functioning correctly and that there is a connection to the internet network Activate the WLAN function of your r...

Page 14: ...nd using the setup wizard for quick and easy first time setup setting of the time date Internet connection etc If you skip the setup wizard s help with first time setup you can of course still make th...

Page 15: ...llow the directions in section 16 1 1 Network wizard Once the network wizard has finished the setup wizard is finished as well 8 7 Managing favourites Please see the operating concept for information...

Page 16: ...wing section and each operation is illustrated graphically DAB Station list Scan Prune invalid DRC Dynamic Range Control Station order MAIN MENU External Sources Bluetooth Streaming FM Scan setting Au...

Page 17: ...ct Delete inactive stations to remove stations from the station list that are currently no longer available 10 4 DRC Dynamic Range Control Some DAB network radio stations support a volume control feat...

Page 18: ...dcaster for the region 11 2 History not yet available or empty during initial setup The radio stores the stations called up in this History list so you can quickly find previously called up stations a...

Page 19: ...n which the search results should be based Here too you can filter for a specific language or for all languages After the preset filters have been selected select Show channels to display the list of...

Page 20: ...atively the IP address can also be determined from the device overview of most routers Now open the Internet browser on your smartphone tablet or PC and enter the IP address in the address line of the...

Page 21: ...rage spaces of the web administration correspond to those of the radio Changes on the radio or in the web interface are adopted accordingly To edit or add a new station complete the Name and URL field...

Page 22: ...list and on the overview page of the web portal To access the station from the overview page press Play 11 10 Delete stations To delete a saved station press the Change button and then Remove Note Pl...

Page 23: ...l tuning is active the currently set frequency is highlighted on the screen NAVIGATE FM 88 05 MHZ 88 00 MHZ 88 10 MHZ FM 88 00 MHZ 12 3 Settings Additional functions are available to optimise the qual...

Page 24: ...ing via the menu item Pair new device NAVIGATE ON OFF PAIR NEW DEVICE BLUETOOTH RECEIVER PAIR NEW DEVICE ENTER 13 2 Music playback via Bluetooth As soon as your source device for example a smartphone...

Page 25: ...always triggered on Saturdays and Sundays Monday Friday The alarm is only triggered on Monday to Friday Time Define the date if Once is selected on which and at what time the alarm is to be active So...

Page 26: ...a value of 1 99 minutes Select the desired runtime for the timer and then confirm the selection to start the timer When the timer expires a signal tone sounds NAVIGATE ENTER TIMER 30 min TIMER 30 min...

Page 27: ...ttings Manual settings NetRemote PIN Setup Network profile Clear network settings Keep network connected Bluetooth RX TX Bluetooth Receiver Pair New Device Active Device Saved Devices Equaliser DISPLA...

Page 28: ...frequency bands After the scanning process is complete the search results are shown on the display and you can choose from the WLAN networks found Alternatively restart the search using the New searc...

Page 29: ...If the connection fails this may be because the wrong password was entered Check the configuration of your access point for example the router configuration When entering the key pay attention to upp...

Page 30: ...connection option and then DHCP active Now enter the exact name of the network SSID using the on screen keyboard Then select whether the network is secured WEP WPA WPA2 or unsecured open If it is a s...

Page 31: ...put has been confirmed the radio will attempt to connect to the network NetRemote PIN setup To prevent other users from accessing your radio s configuration you can assign a network PIN via the input...

Page 32: ...Note A profile that is currently active cannot be deleted Delete Internet settings All previously saved configurations are deleted after confirmation Keep internet connection This setting is a radio e...

Page 33: ...display shows you the name under which you can find the radio After a successful connection you can start playback via the source device Active connection Connected device Shows you information about...

Page 34: ...configured profiles adjusted to suit a variety of music genres or create your own custom profile My EQ settings To make your own adjustment of the sound open this menu item and then select whether you...

Page 35: ...ching off the radio and adjusting the lighting intensity If the timeout function is deactivated the intensity of the display illumination is adjusted immediately when the radio is put into standby mod...

Page 36: ...via the screen mask and confirm the entries one after the other for the day month year hours and minutes NAVIGATE ENTER TIME DATE 12 30 TIME DATE 12 30 12 35 12 25 Note If the setup wizard is used fo...

Page 37: ...there may be problems with playback via a jack connection because the transmitted signal is too weak and the radio mistakenly assumes there is no active playback To remedy this you can deactivate auto...

Page 38: ...the radio s software and hardware You can find the current software version of your device in this information should you require support from Hama s product advice team 19 2 Privacy Policy The data p...

Page 39: ...innish French Italian Norwegian Polish Portuguese Slovak Spanish Swedish Turkish Packaging contents Hama DIR3020BT Power Supply Quick Start Manual Connectivity WiFi 2 4 GHz b g n 5 GHz a n Bluetooth r...

Page 40: ...to technical changes Our general terms of delivery and payment are applied The Bluetooth word mark and logos are registered trademarks owned by Bluetooth SIG Inc and any use of such marks by Hama GmbH...

Reviews: