4-6
3. Function Switches
User-defined Function Switches [F1] to [F7]
•
When the V7 series is in the STOP mode, the function switches do not work.
•
When the V7 series is in the RUN mode and the switch menu by the [SYSTEM] switch is not
displayed, the function switches can be defined by the user.
•
User-defined function switches should be set in the following dialogs of the V-SFT editor.
- Settings for each screen
[Edit]
→
[Local Function Switch Setting]
→
[Function Switch Setting] dialog
- Setting for all screens
[System Setting]
→
[Function Switch Setting]
→
[Function Switch Setting] dialog
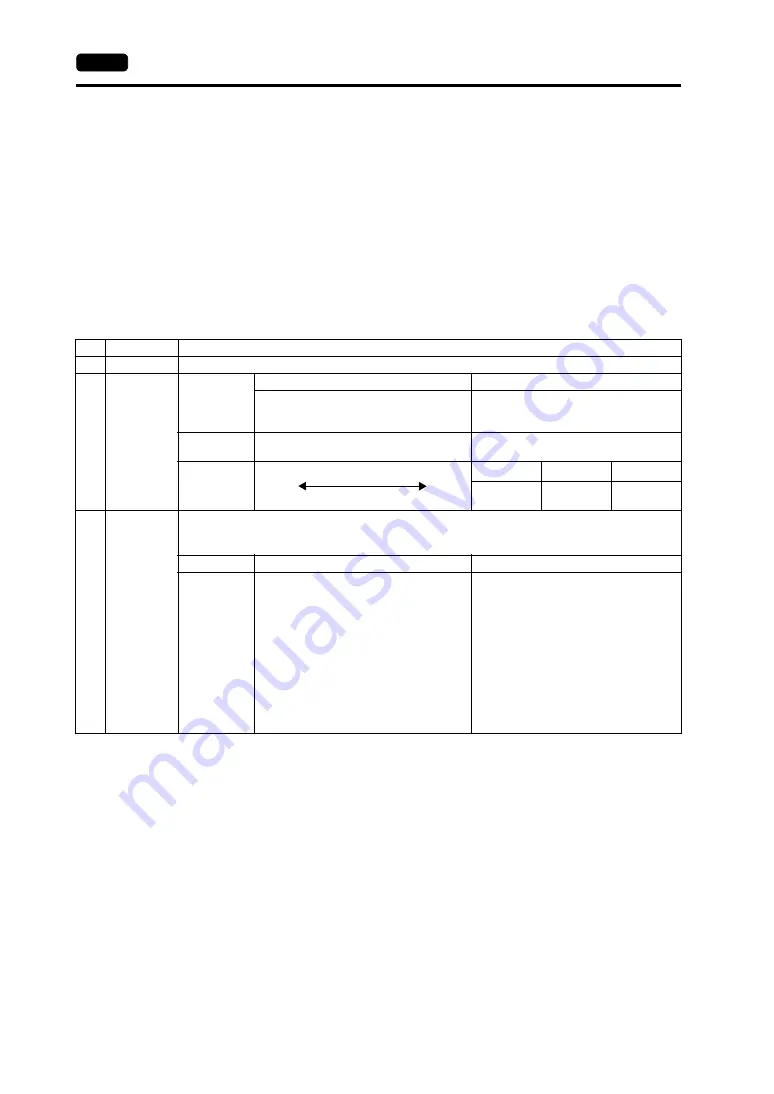
[F1] to [F5] Switch Functions with Switch Menu
*1
When a medium or dark brightness is set, the backlight service life may become shorter.
Functions
Contents
F1
Mode
Selects the operation mode between STOP
↔
RUN.
F2
F3
F4
Contrast
Brightness
Item
Contrast Adjustment
Brightness Adjustment
Adjust the contrast. Holding down the
switch for one second or more changes the
contrast rapidly.
Adjusts the screen brightness in three
levels.
Applicable
Models
V708C, V710C
V710T, V710iT, V710S, V710iS, V712S,
V712T
Adjustment
F2
F3
F4
Dark
Medium
Pale
F2
F3
*1
F4
*1
1
Bright
2
Medium
3
Dark
F5
Backlight
Turn the backlight on and off.
Backlight control should be set on the V-SFT editor.
([System Setting]
→
[Unit Setting]
→
[Unit Setting] dialog, [Backlight] tab window]
Always ON
Auto 1/Auto 2/Auto 3
Manual/Manual 2
Ignored
• The [F5] switch turns the backlight off.
• This is valid when the backlight control
bit (bit 11) in the read area “n + 1” in the
system memory is reset (OFF: 0).
• Manual
The [F5] switch turns the backlight off.
To turn it on, press somewhere on the
screen or a function switch.
• Manual 2
The [F5] switch turns the backlight on
and off.
• [Backlight Power ON Time Control] that
determines the backlight status at
power-up becomes valid.
When the power is turned on:
ON
→
Backlight ON
OFF
→
Backlight OFF
Summary of Contents for Monitouch V7
Page 1: ...V7 Series...
Page 3: ......
Page 5: ......
Page 9: ......
Page 13: ......
Page 14: ...11 Features 2 Models and Peripheral Equipment 3 System Composition Overview...
Page 15: ......
Page 25: ......
Page 47: ...2 22 8 Printer Connection PRINTER Please use this page freely...
Page 48: ...31 Mounting Procedure 2 Power Supply Cable Connection Installation...
Page 49: ......
Page 53: ...3 4 2 Power Supply Cable Connection Please use this page freely...
Page 54: ...41 Coin type Lithium Battery 2 DIP Switch Setting 3 Function Switches Instructions...
Page 55: ......
Page 63: ......
Page 81: ...5 18 10 Other Networks Please use this page freely...
Page 82: ...61 Operational Procedures 2 Main Menu Screen MONITOUCH Operations...
Page 83: ......
Page 112: ...71 Error Messages 2 Troubleshooting Error Correction...
Page 113: ......
Page 122: ...81 Inspection and Maintenance 2 Warranty Policy Inspection and Maintenance...
Page 123: ......
Page 127: ...8 4 2 Warranty Policy Please use this page freely...


