2020.11
MA03201Jb201116
© 2020 HAKKO Corporation. All Rights Reserved.
Please access the web address below for other distributors.
https://www.hakko.com
HEAD OFFICE
4-5, Shiokusa 2-chome, Naniwa-ku, Osaka 556-0024 JAPAN
TEL: +81-6-6561-3225 FAX: +81-6-6561-8466
https://www.hakko.com E-mail: [email protected]
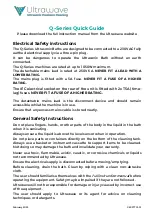
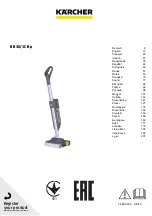
4. Operation
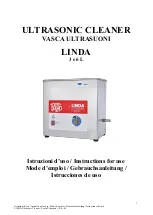
(1) Insert the AC adapter plug in the DC jack.
(2) The sensor reacts when the tip is inserted and cleaning will begin.
Note
Do not intentionally rotate the brush continuously.
Note
Remove the adjuster when using a large tip. The adjuster
can be stored in the base.
Note
This product cleans the tip in a short time. If the tip is left
in for a long time, it may accelerate deterioration of the tip
or the cleaning brush.
Note
Place this product on grounded surface with electrostatic
measurement, or connect a wire to the ground screw
upon use.
Ground Attachment Part
Adjuster
5. Maintenance
CAUTION
Regularly remove solder waste and flux residue that adhere to the
solder waste collector, cleaner interior, and cleaning brush.
Note
To remove the cover you must first remove the AC
adapter plug from the DC jack.
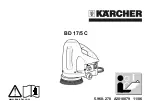
●
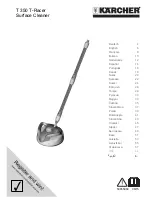
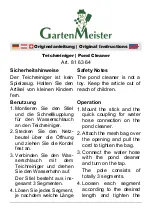
Removal of Solder Waste
Remove the cover and
remove solder waste.
Solder Waste
●
Replacing the Brushes
Replace the cleaning brushes by pulling them straight out of
their brush fixing shafts.
* Tools are not required.
Brush fixing shaft
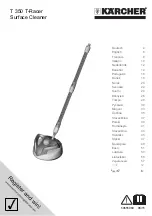
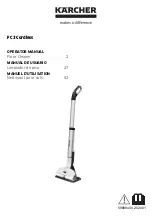
●
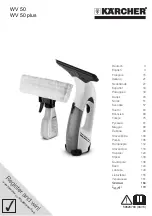
Cleaning the Sensor Cover
Remove stains on the upper and lower recess areas of the
P.W.B. cover using a soft brush.
Recess
Note
If the sensor cover is considerably stained, remove the
sensor cover and clean it with alcohol damp cloth. In this
case, be careful not to let solder waste or other debris fall
into the device.
Note
Replace the sensor cover if it has cracked or there is a
considerable amount of scratches.
6. Troubleshooting
The cleaning brush
continues to rotate.
Is the P.W.B. cover
or adjuster bent or
out of alignment?
Attach it in the
correct position.
Is the sensor cover
stained?
Please clean it.
The motor does not
move.
Are the AC adapter
and plug connected?
Connect.
The motor moves but the
cleaning brush does not rotate.
Has the pulley belt
come off?
Reattach it.
When other problems occur or the above remedies do not resolve
a problem, contact your nearest agent.
7. Parts List
●
Replacement Parts
Part No.
Part Name
Specifications
A5063
Cleaning brush C
Fluoroplastic brush, qty 2
A5060
P.W.B. cover
With sensor cover
A5061
Adjuster
A5062
Sensor cover
qty 10
B5284
Pulley belt
B3528
AC adapter
Flat pin plug
B5118
AC adapter
Chinese plug
B5119
AC adapter
BS plug CE
B5120
AC adapter
European plug CE
B5121
AC adapter
Australian plug
●
Options
Part No.
Part Name
Specifications
A1566
Cleaning brush A
Plastic brush, qty 2
A1567
Cleaning brush B
Metal brush, qty 2