background image

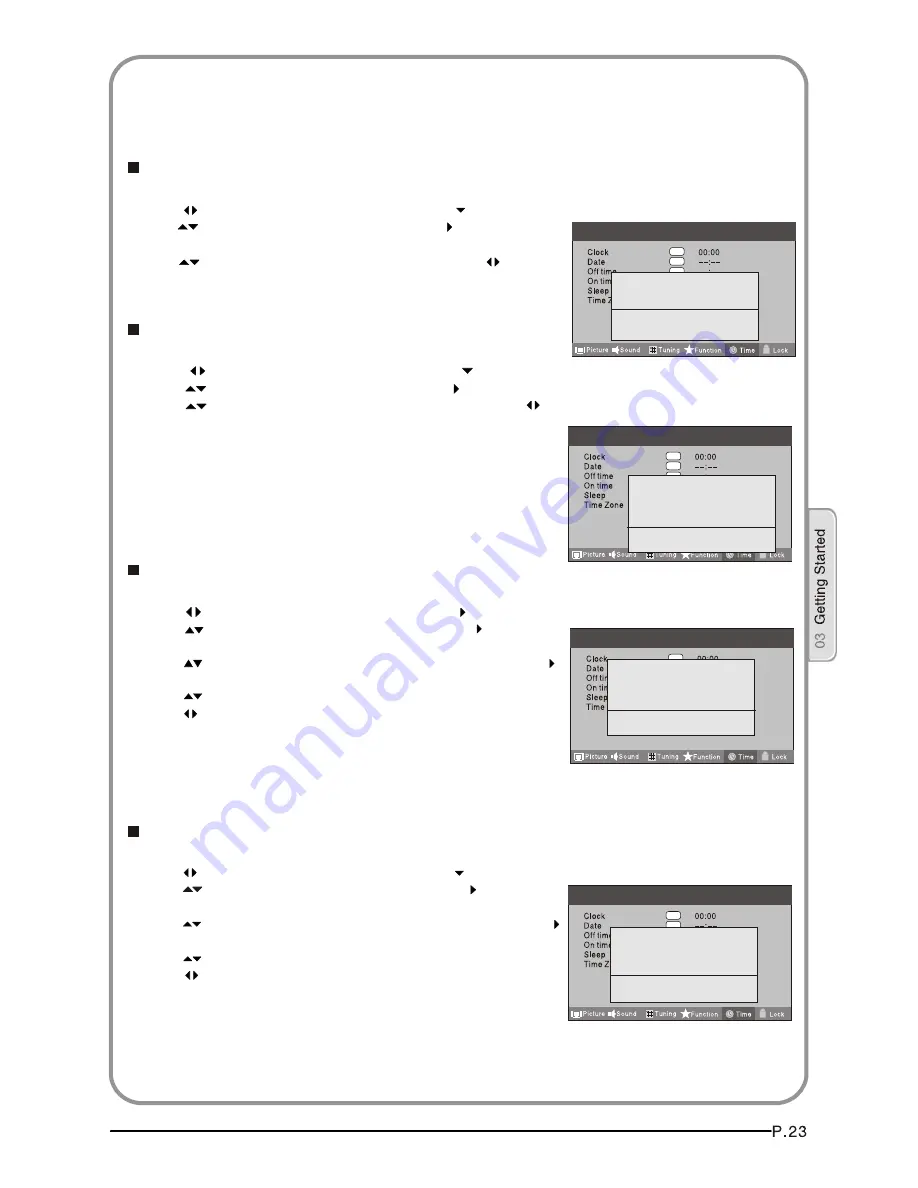
1 Press MENU button.


2 Press      button to select 

Time 

menu, press   button to enter.

3 Press     button to select Clock item, press   button to enter 
   setting. 
   Press      button to select  hour or minute, press     button
   to adjust  the value. 

1 Press MENU button.


2 Press      button to select 

Time 

menu, press   button to enter.

3 Press      button to select Off Time item, press   button to
   enter setting. 
   Press      button to select Repeat option, and then press   
   button to set it on.
   Press      button to select hour or minute,
   Press     button to adjust the value.

    When the off time has arrived, the TV set will enter into standby mode.

 Clock

 Off Time

1 Press MENU button.


2 Press     button to select 

Time 

menu, press   button to enter.

3 Press     button to select On Time item, press   button to 
   enter setting. 
   Press      button to select activate option, and then press     
   button to set it On.
   Press      button to select hour or minute,
   Press     button to adjust the value.

   
   When the on time has arrived, the TV set will switch on automatically.

 On Time

 Date

1 Press MENU button.
2 Press      button to select 

Time 

menu, press    button to enter.

3 Press      button to select Date item, press    button to enter setting. 
   Press      button to select the  option, and then press     button to 
   adjust value.

OK

OK

OK

OK

OK

OK

OK

Hour         <      02    >
Minute      <      03    >

                Close

Menu

OK

OK

OK

OK

OK

OK

OK

Date         <     02    >
Month      <      3      >
Year         <   2009  >      

                Close

Menu

OK

OK

OK

OK

Repeat     <     Off    >
Hour         <      00     >
Minute      <      00     >

                Close

Menu

OK

OK

OK

OK

OK

OK

OK

Activate   <     Off    >
Hour         <     00     >
Minute      <     00     >

                Close

Menu

TIME SETTINGS

NOTE: In DTV  mode, because the time information is
from the signal,the Clock and Date are not able to be
changed.
If you want to change the time, turn off the TV in ATV
mode,then turn on the TV. 

Summary of Contents for LT26K3A

Page 1: ...ual carefully before operating the unit and keep it for future reference DIGITAL LCD TELEVISION INSTRUCTION MANUAL MODEL LT26R3A LT26K3A LY26R3A LY26K3A LTF32R3A LTF32K3A LY32R3A LY32K3A LTF42R3A LTF42K3A LTF42R3B LTF42K3B ...

Page 2: ......

Page 3: ...formation Get to know your TV Get to know your remote control Connecting your TV Preparation of your remote control Setting up Tuning your TV Common interface Using your TV Adjusting picture settings Adjusting sound settings Function settings Time settings Lock menu settings Shortcut menu display Teletext function USB mode Using External USB Disk For Recording Using your DVD player certain models ...

Page 4: ... 42 HD Ready Digital LCD TV This guide will help you set up and begin using your TV First check the contents of your box with the parts checklist below 26 32 42 HD Ready Digital LCD TV Remote control AAA battery x2 Instruction Manual Now you can get started ...

Page 5: ...lace your television receiver in an area with heavy moisture Attention should be paid to avoid accidental scratches or impacts onto the screen WARNING RISK OF ELECTRIC SHOCK DO NOT OPEN Caution Please read this manual carefully before using your television and keep this manual in a good place for future reference To achieve the best performance of your television read this User s Manual carefully ...

Page 6: ... from heat sources to avoid electric shocks or fire hazards Do not connect excessive sockets in parallel or share the same socket by multiple plugs to avoid fire hazards The product must be placed on a solid and stable surface to avoid collapse Unauthorized disassembly of the television is prohibited to avoid electric shocks or fire hazards Contact authorized after sales service if technical servi...

Page 7: ... cause fire When antenna is used measures should be taken to prevent water from flowing down along the cable into the television Unplug the television use soft fabric never chemicals if you are going to make cleaning of the product Make sure that no water drops in the product The plug and electric cable must be kept clean to avoid electric shocks or fire hazards Disconnect the television from powe...

Page 8: ...put 2 YPbPr AUDIO input 3 DVI AUDIO input 4 ANTENNA input 5 HDMI3 input 6 S VIDEO input 7 EARPHONE output 8 HDMI1 input 9 HDMI2 input 10 input 11 Common Interface 12 SCART1 input 13 VGA AUDIO input 14 SCART2 input 15 VGA input 16 USB AV COMPONENT IN HDMI3 VGA IN ANT IN Rear Terminals Control ...

Page 9: ...O input 3 DVI AUDIO input 4 ANTENNA input 5 HDMI3 input 6 S VIDEO input 7 EARPHONE output 8 HDMI1 input 9 HDMI2 input 10 input 11 Common Interface 12 SCART1 input 13 VGA AUDIO input 14 SCART2 input 15 VGA input 16 USB AV USB 2 1REC COMPONENT IN HDMI3 VGA IN ANT IN Rear Terminals Control ...

Page 10: ...VD USB REC Timeshift CANCEL button Zoom only for DVD USB Teletext index only for TV REC index Play Pause button only for DVD USB Timeshift Stop only for DVD USB REC Timeshift Fast Reverse only for DVD USB REC Timeshift Fast Forward only for DVD USB REC Timeshift Previous only for DVD USB REC Timeshift Next only for DVD USB REC Timeshift DVD Set up Text DVD Title TeletextMix DVD Search Teletext Sub...

Page 11: ...e cable to the PC interface connector on the TV Tighten the screws on the VGA connectors and connect the audio cable not supplied to the audio input socket on the back of the TV 4 Turn on the power of the TV firstly and then the PC 5 Press the button on the TV or TV remote control to set the video input mode to VGA 6 Once the image shows if there is noise present change the VGA mode to another res...

Page 12: ...on 2 1 Connect the AV DVD VCR outputs to the AV IN socket on your TV 2 Press the SOURCE button on the TV to set the video input mode to AV SCART INPUT 1 Connect the scart lead from the external device DVD player Set top box or games console to the TV scart socket 2 Press the SOURCE button to select SCART mode 3 Press the PLAY button on the external device HDMI INPUT 1 Connect the cable from the HD...

Page 13: ...nsor of the TV set Sunshine or other strong light will interfere with the signal sent by the remote control In this situation turn the TV set to avoid the direct light source Do not put the remote control in direct heat or in a damp place as you may damage the remote Please use two AAA 1 5V batteries Do not mix battery types Install the batteries at the correct polarities Do not use rechargeable b...

Page 14: ... are inserted the right way around matching the polarity as indicated inside the battery compartment SWITCHING YOUR TV ON 1 Press the STANDBY button on the right side of the TV once Ared flashing light will appear in the corner of the screen 2 Press STANDBY on the remote control The TV will turn on and the red light will turn blue This may take a few moments 3 Select your chosen language when prom...

Page 15: ... Press EXIT button to exit DIGITAL MANUAL SEARCH If you have attached a DVD player or similar external device to the TV you will need to tell the TV to display the content from it Simply press SOURCE which will bring up the source menu in the left corner of the screen Use the and button to highlight the required source and press OK select For details of how to plug in other equipment see GET TO KN...

Page 16: ... try using the FINE TUNE feature Do not use this feature unless reception is poor Analog Manual Search Follow the below steps when you need to have a manual search 1 Press MENU button 2 Press button to select Tuning menu press button to enter 3 Press button to select Analog Manual Search item Press button to enter 4 Press button to select Search item press button is used to select the higher frequ...

Page 17: ...m 3 You can press the EXIT button to cancel the changes at anytime Setting favourite channel 1 Press button to select the channel press Red button to set your favourite channel 2 You can press the Red button to cancel the changes at anytime 3 Press FAV button on the remote control and Favourite List will be displayed 4 Press button to select the channel and press OK button to enter SKIP 1 Press bu...

Page 18: ...he CI slot that is located at the side of the TV 2 Turn on the TV and it will display the below message if the CA module is detected Wait for few moments until the card is activated 3 Press the MENUbutton to display the Main Menu and use the and button to highlight the line and press the OK button 4 Detailed information on the CI card in use is displayed 5 Press OK button to access the card menu R...

Page 19: ...ing code stream of the channel is suitable for your set Do System Update option can be selected Otherwise the Do System Update option is grey and cannot be selected 6 Press button to select the System Update option and use OK button to enter Then the TV will restart and search the upgrade information NOTES If the upgrade information is received the TV will begin to upgrade Or else the TV will be b...

Page 20: ... button Press the P P button to select a channel number HOW to adjust volume Press V V button on the remote control or the side of the TV to adjust the volume level CH LIST function Press CH LIST button on the remote control will display Channel List menu and then press button to enter Press button to select the channel and then press OK button to enter ...

Page 21: ...ol blue colours to suit personal preferences Select Cool to give the white colour a blue tint Normal to give the white colour a neutral tint Warm to give the white colour a red tint Noise Reduction Automatically filters out and reduces the image noise and improves picture quality when receiving weak video signals Select Off Low Standard High according to the image noise Reset To recover to the def...

Page 22: ...o Languages Press button to select Primary Secondary item and then press button to select the languages you needed Press button to select Close item Press OK button to close it Note The Audio Language function is only available in DTV mode Reset To recover to the default menu setting 1 Press MENU button 2 Press button to select Sound menu 3 Press button to select the item requires adjusting 4 Pres...

Page 23: ...9 mode Choose 16 9 when you want to adjust the picture horizontally in a linear proportion to fill the entire screen Zoom1 Choose Zoom1 when you want to view the picture without any alteration However the top and bottom portions of the picture will be cropped Zoom2 Choose Zoom2 when you want the picture to be altered both vertically extended and cropped The picture taking a halfway trade off betwe...

Page 24: ...ll be set in sequence off 10sec 15sec 30sec 45sec 60sec will be set in sequence Reset OSD et how long you want the menus to appear on screen OSD T To set the transparency background of OSD thetransparency To recover to the default value ransparency Off 25 50 75 100 OK OK OK Menu FUNCTION SETTINGS ...

Page 25: ...em press button to enter setting Press button to select activate option and then press button to set it On Press button to select hour or minute Press button to adjust the value When the on time has arrived the TV setwill switch on automatically On Time Date 1 Press MENU button 2 Press button to select Time menu press button to enter 3 Press button to select Date item press button to enter setting...

Page 26: ... the button and then use button to select the Sleep 3 Press the button and then use button to select the number of minutes Select Off 5Min 10Min 15Min 30Min 45Min 60Min 90Min 120Min 180Min 240Min 4 When you are satisfied with your choice press MENU button to return to the previous menu or press the EXIT button to return to TV viewing And the time begins to count down from the number of minutes sel...

Page 27: ... on the remote control press button to select Lock menu press button to enter the sub menu and you will be required to enter the password The initial password of the television is 0000 If you forget your password you can always input 9443 to regain control Tuning Lock Press to select Tuner Lock and to set On Off To set On some operation such as search will be not available When enter the Tuning me...

Page 28: ... mode Press button to unlock all set modes setting all lock options to off and the maximum volume returns to 100 The TV will remember it after your setting that will be the volume when turn on the TV next time Source Lock Source Lock will control the On or Off of hinder external input modes Press button to set as on or off When the source lock is set as on TV source will display at this time when ...

Page 29: ...press the EXIT button to cancel the changes at anytime Notes Available only in the DTV mode GUIDE Function FAV Function Press FAV button on the remote control will display Favourite List menu Press button to select program and press OK button to enter You can press the EXIT button to cancel the changes at anytime Press AUDIO button on the remote control will display Audio Languages menu Press butt...

Page 30: ...unction enables quick swap to the last watched program Press Q view button and the TV willbe back to the TV source expect in the USB and DVD source When you need to pay attention to surrounded sounds or there is a telephone calling you or there are some guests visiting you the sound elimination mute function is very convenient Eliminate Sound 1 Press the MUTE button on the remote control and Mute ...

Page 31: ...elect teletext press the button on the handset To switch off teletext press the button again Note all menu functions are not available in teletext mode Only a few direct button control functions are available in teletext mode they are Volume adjustment Mute function Teletext Page number entering Mix mode To select a Teletext page enter the page number using the numeric key pad on the remote contro...

Page 32: ...the button will reveal hidden text This feature is used to reveal information such as answers to Teletext on line interactive puzzles Time While in normal TV mode only pressing the button will display the teletext time in the top right hand corner for a few seconds Fast text coloured buttons Fast text automatically displays the four most commonly used pages that the broadcaster thinks that you may...

Page 33: ...sks mobile harddisks and MP3 player If USB equipment could not be identified due to unsupported file system please format the equipment to the above mentioned file system 3 To achieve smooth playing ensure the following 1 The file code rate should be lower than 300KB S 2 Due to the limitation of USB signal transmission distance it is recommended not to use USB patch cord in case of using the cord ...

Page 34: ...u at first to protect equipment and then press SOURCE to select TV to return to the TV mode Notes 1 B 2 While playing the USB press BACK button repeatly the screen picture will return to USB main interface and only at this time you can switch corresponding signal sources by pressing SOURCE again 3 Under source of US when press button MENU screen goes black except when images or movies are being pl...

Page 35: ...fast back of option being played the 4 Press PLAY PAUSE to play and press it again to pause playing 5 Press ZOOM to magnify pictures when the picture is enlarged press and to move the picture 6 Press STOP to stop playing or return to the previous menu and press BACK repeatedly to return to the main menu NOTE You can choose the photos or music in different files to play together USB MODE ...

Page 36: ...ay the pictures 4 If you want to pause the picture which is being palyed press the PALY PAUSE button again Press ZOOM to magnify the picture When the picture is enlarged press and to move the picture Press PREV NEXT to select the last or next picture Press to rotate the picture Press STOP to stop the picture being played 5 To exit playing just press BACK repeatedly NOTE The menu display varies wit...

Page 37: ...hen press to play the music PLAY PAUSE button 4 To return to the main menu just press BACK repeatedly Press PREV NEXT to select the last or next music Press STOP to stop the music being played when the current interface is the music being played Press to achieve the REV fast back and FWD fast forward of musicbeing played the NOTE You can enjoy the music and the picture at the same time USB MODE OK...

Page 38: ...he movie you want to play and then press PLAY PAUSE button to play the movie 4 To exit playing just press BACK repeatedly 1 After entering USB main interface press to select Movie Press ZOOM to magnify the picture Press PREV NEXT to select the last or next movie Press STOP to stop the movie being played USB MODE OK ...

Page 39: ... enter the text file list 4 To exit the Text mode just press BACK repeatedly 3 Press and OK buttonto select the text you want to play and then press PLAY PAUSE button to play the text Press PREV NEXT to select the last or next text USB MODE NOTE You can enjoy the music and the text at the same time OK ...

Page 40: ...m will format the whole device and if your device size is bigger than 1GB you can set the size which is used for time shift 6 Format may take several minutes and the time is depending on the memory size Press button to select the Time Shift Disk Size Themax device size for Time Shift is 8GB Then press OK button to save NOTES If you select all the size format for time shift you can not do any recor...

Page 41: ...mation Press button to cancel Press OK or PLAY PAUSE button to play the program recorded and press STOP button to stop it Recording REC 5 five The streets of SAN francisco 15 06 384MB 00 00 00 TIME SHIFT 00 00 12 00 10 00 Time Shift 14 51 00 00 12 00 10 00 Time Shift 14 51 A B Recorded List Gold workshop wit Record Play Gold workshop wit INDEX DATE 2004 03 01 TIME 14 56 09 DURATION 0000 00 00 CHAN...

Page 42: ...2 Some discs will remember the moment at which the DVD was stopped so press PLAY PAUSE to recall the moment and continue playback 3 Press the button twice to stop completely and clear the memory USING FAST FORWARD OR REWIND 1 To move forward through a disc more quickly press the button To rewind through the disc press the button 2 Press the or button repeatedly to cycle through the available speed...

Page 43: ...the top left corner of the screen Press repeatedly until your desired subtitle language is shown 3 Press SUBTITLE repeatedly until SUBTITLE OFF is shown to switch the subtitles off USING REPEAT MODE Press REPEAT once to repeat the chapter on a DVD twice to repeat the currently playing title or three times to repeat the whole contents of the disc CHANGING THE CAMERA ANGLE Some DVD have multiple cam...

Page 44: ...hen finished move the cursor to select START The DVD will jump directly to that section and begin to play Ifyou want to cancel this function press PROGRAM and move to STOP then press PLAY PAUSE A B Use A B to set a section of a DVD to repeat Press A B to mark the start point and again to mark the end The section will begin to be repeated immediately Press A B to cancel the repetition ANGLE D CALL ...

Page 45: ...return to the previous one PLAYING AN AUDIO CD 1 Insert a CD in the same way as you would a DVD with the label facing away from you 2 The CD will load and a menu of the disc s contents will appear on screen 3 Use the and buttons to highlight the track you wish to play and press PLAY PAUSE or just press PLAY PAUSE to listen to the whole CD from the beginning You can stop pause fast forward or fast ...

Page 46: ...nd Press MUTE button and verify if Mute mode is set Switch to other channel and verify if the same problem happens Press VOL button to see if the problem can be solved Poor sound Verify if sound system is correct Refer to user s manual for adjustment No picture in some channel Verify if correct channel is selected Adjust the antenna No color for some channel program black and white Verify if the s...

Page 47: ...Base cover Battery x2 The part specifications of this TV set provided here are for reference only Differences may occur as product technology is updated Design and specifications are subject to change without notice 26 digital LCD TV 32 42 digital LCD TV 66 2 x 20 0 x 50 0 including base LT26R3A 66 2 x 20 0 x 50 0 including base LY26R3A 79 6 x 23 0 x 59 0 including base LTF32R3A 79 6 x 23 0 x 59 0...

Page 48: ......

Reviews: