background image

wall

wall

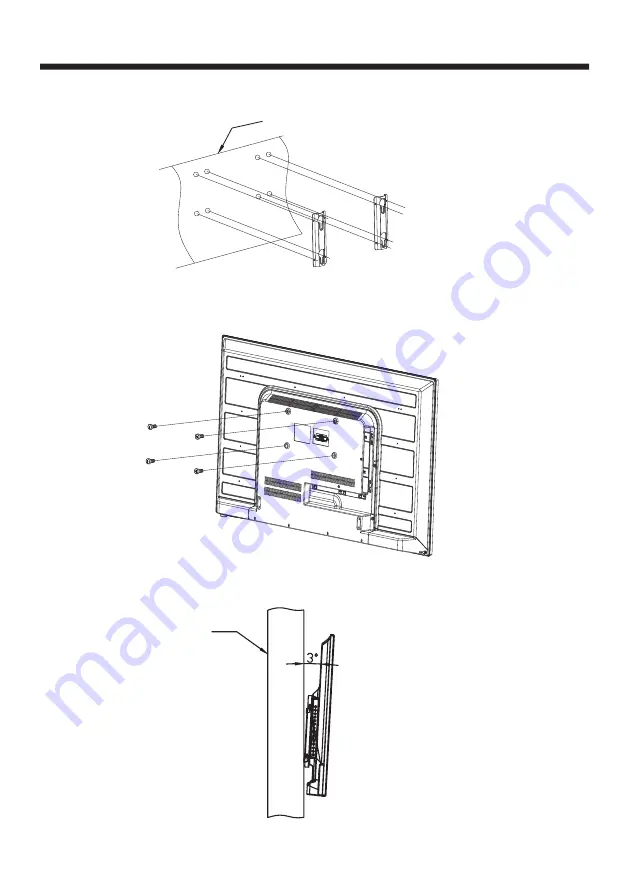
WALL  MOUNT  INSTALLATION

-5-

Step  One:  Use  the  expansion  bolts  (4*36PWA)  to  fix  the  wall  mount  brackets  into  the  wall.

Step Two:  Fix  the  wall  mount  screws  (M6x8mm/4pcs)  into  the  rear  side  of  the  LCD TV,  using  the 
tongue  of  8kgf.cm.

The TV  appearance  subject  to  material  object. 

Step Three:  Put  the  LCD TV  with  wall  mount  screws  onto  the  wall  mount  brackets.

Warning:  the  angle  between  the TV  and  wall  must  not  be  bigger  than  3º.

Summary of Contents for LE55B8000

Page 1: ...LED LCD TV OWNER S MANUAL MODEL LE55B8000 Please READ this manual carefully before operating your TV and retain it for future reference ...

Page 2: ...Contents 1 1 Safety and warnings 2 3 2 Introduction 4 3 Wall Mount Installation 5 4 Installation 6 9 5 Remote Controller 10 6 TV Operation 11 14 7 Trouble shooting 15 ...

Page 3: ...sonnel Servicing is required when the apparatus has been damaged in any way such as power supply cord or plug is damaged liquid has been spilled or objects have fallen into the apparatus the apparatus has been exposed to rain or moisture does not operate normally or has been dropped 14 Mains plug is used as the disconnect device the disconnect device shall remain readily operable 15 The ventilatio...

Page 4: ... should pay special attention to children Serious injury may result if it falls Do not place your television on an unstable cart stand shelf or table Serious injury to an individual and damage to the television may result if it falls When the television receiver is not used for an extended period of time it is advisable to disconnect the AC power cord from the AC outlet Avoid exposing the televisi...

Page 5: ...el Power consumption Signal Input Output Horizon Video Signal System Input Power Voltage Audio Output Power THD 7 tal definition TV line Composite Video input 350 Y Cb Pb Cr Pr 400 1920x1080 16 9 PAL BG PAL NTSC SECAM 1 200 2 x 10W 128W AC 100 240V 50 60Hz 140cm 4 Analog RGB VGA x 1 High Definition Multimedia Interface HDMI x 2 Composite Video Input x 1 Audio Input x 1 YCb Pb Cr Pr x 1 USB x 1 RF ...

Page 6: ...to the wall Step Two Fix the wall mount screws M6x8mm 4pcs into the rear side of the LCD TV using the tongue of 8kgf cm The TV appearance subject to material object Step Three Put the LCD TV with wall mount screws onto the wall mount brackets Warning the angle between the TV and wall must not be bigger than 3º ...

Page 7: ...o select items 5 STANDBY Press this button to turn the unit ON from STANDBY mode Press it again to turn the set back to STANDBY SOURCE MENU V V CH CH Standby 1 2 3 4 5 3 2 30 30 1 All the terminals are from left to right AC POWER SOCKET AV INPUT YPbPr INPUT Note VIDEO and YPbPr share one audio channel All the terminals are from left to right HDMI2 HDMI1 USB AV OUTPUT VGA RF Note When HDMI port get...

Page 8: ...are Power off 1 Connect VGA and audio cable 2 Connect power cord 3 Power on the TV switch to PC mode 4 Power on the PC This sequence is very important PC Note Aerial connections IEC female Input impendance 75 unbalanced HDMI2 HDMI1 USB RF VGA VIDEO L R AV OUTPUT 8 ...

Page 9: ...n 60Hz 1 2 3 800 600 1024 768 60 60 37 88 48 36 RESOLUTION V Freq Hz H Freq KHz 4 1280 768 60 47 3 PRESET MODE HDMI 1 2 3 800 600 1024 768 60 60 37 88 48 36 RESOLUTION V Freq Hz H Freq KHz 1360 768 60 47 7 4 1280 768 60 47 3 1920 1080 60 67 5 5 1920 1080 60 67 5 ...

Page 10: ...rt these video fomats 480i 576i 480p 576p 720p 1080i 1080p Note 1 Video and YPbPr share one audio channel 2 When HDMI port get DVI signal the channel is changed to receive the audio for HDMI port AV Audio 3 Sometimes it will not support in different device because the device supplys nonstandard signal 4 When current source is TV AV OUT signal is TV when current source is AV AV OUT signal is AV oth...

Page 11: ... 10 REMOTE CONTROLLER Note The relevant button doesn t work if TV without teletext NICAM MHL function ...

Page 12: ...ete Press to choose the program Press red button the program will delete Rename Move the cursor to the program press green button to rename the program Press to choose the character Press to move the cursor Press MENU button to exit edit Press EXIT to exit the menu Note The TV programs name only can be 5 characters Move Move the cursor to the program press yellow button it will show yellow cursor ...

Page 13: ...lance Auto Volume Surround Sound MENU Back Move OK OK Movie Sports Music Standard CHANNEL PICTURE SOUND TIME OPTION User Clock OK Off Time On Time Sleep Timer Auto Sleep CHANNEL PICTURE SOUND TIME OPTION MENU Back Move OK OK OSD Language Restore Factory Default Blue Screen HDMI CEC MENU Back Move OK OK CHANNEL PICTURE SOUND TIME OPTION NOTE Restore factory default will clear all the programs and r...

Page 14: ...to display media files and folder list or choose Return to back to the media type selection menu Select the media file by pressing or then the preview frame will pop up Press the button to play the media file in full screen When the media file photo music movie or text type is playing press the OK or DISPLAY button can display the control bar Haier Innovation Life Return C Back EXIT Move Select OK...

Page 15: ...u will not display when set to No SourceKeyLock Sourcelock youcan tchangethesource whensetto Yes Volume Default Power on default volume press the or button to select the desired volume HotelModeOperation OFF OFF 100 TV 1 Yes No 30 Save To USB Backup all TV setting data to USB disk backup file named DATABASE bin Load Restore this data to TV from USB disk When restore is executed the TV will reboot ...

Page 16: ...t or not No picture Mute Power cord is not inserted Power switch is not opened Contrast and brightness volume setup Press standby key on the remote control for inspecting No color Normal audio color control Scramble Normal audio or weak retune channel No color Noise Audio system Special Explanation The accessories such as remote control is not belongs to the guarantee Normal audio antenna position...

Page 17: ......

Reviews: