background image

Antenna


Type

DVBC

DVBT

DVB


Tuning


Type

ATV

DTV

-11-

 TV OPERATION

Power supply to switch on/off this Unit. Before switch on, 
ensure that all connections will be proper and correct.
Press Power on/off (at the botton of the rear panel of this 
Unit) to turn on/off this Unit. When the power indicator turns 
red, this Unit accesses the power on and standby state.

Basic Operation

Press 


key to start this Unit.The power indicator turns off.  

Press


 key once again to switch off this Unit

.

If there is no signal for the current signal source, this unit will 
automatically set to the standby state 10 minutes later.
If not to use the main Unit for a long time, unplug the AC 
power cord from the AC outlet.

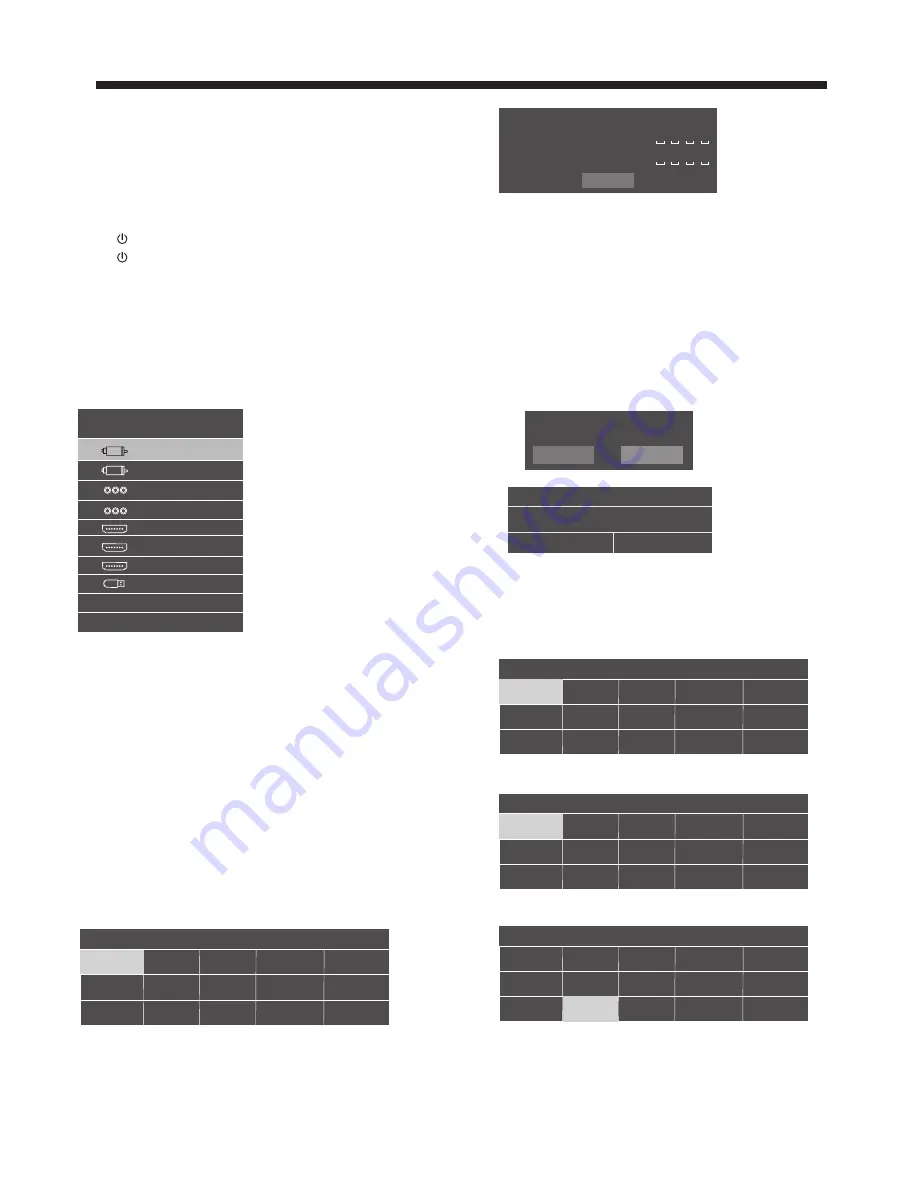
Select input signal sources

After turn on the main unit, press source to select proper 
input source. Press

▼▲

 buttons to select the main signal 

source. Press OK button to confirm.

Setting the OSD Menu

Press MENU button, and the main menu appears. the main 
menu display in turn as below:
Picture

Audio

Wide Mode

Channel

Time

Setup

When display of some menu option is gray, it indicates that 
such options are not available under the current mode.
General Step for Menu Setup:

For each main menu, first press

▼ 

to enter the submenu.

Press 

▶ 

to select the desired adjustable option.

Press 

▶ 

to adjust to suitable value.(There is 

▶ 

option 

only following such menu, then press 

▶ 

key only)

After the selection of option is completed, press Menu to be 

able to quit the menu.

Installation Guide

The installation guide only appear when the TV first time


turn 

on or reset to factory set.

1). Press the 

▲▼ 

buttons to navigate the menu and change 

the settings. Press the OK button to confirm.         
Select your desired language to be displayed on the menu. 
Input your password and press confirm to complete.

Note

: The default password is 0000.

Home And Shop modes

2). When the unit is turn on for the very first time, it will show 
Initialization set-up menu. After the OSD language is set, the     
user can choose between "shop mode” and "home mode".
When the screen shows the following setting menu and the 
cursor stays on the "home mode" choice, press 

◀▶ 

to adjust, 

and "OK" to enter the menu.

If "Home mode" is choosen, the following menu will displayed.

Press "OK" to enter the next prompt menu.

Choose “Cancel” to go back to the Initialization set-up menu, and 
the cursor will stay at the “home mode” choose it to go the next 
menu to choose the country.
 3)

.

Press the 

◀ ▶ 

buttons to select DTV/ATV


and then press the 

OK button to confirm. 

Press the 

◀ ▶ 

buttons to select DVB-T/DVB-C


and then press 

the OK button to confirm.

a. If you select DVB-T, the next step is to select the country then 
press the OK button into the country select menu.

b.If you select DVB-C, the next step is to select the country then 
press the OK button into the country select menu.


Source

DTV

ATV
AV

Component
HDMI1

HDMI2
HDMI3
Media

Please


select


an


OSD


language

Dutch

Russian

Greek

French

Italian

Spanish

German

Romanian

Czech

Polish

Portuguese

Hungarian

English


Arabic

Thai

Password

Please


enter


new


password

Confirm


new


password

Confirm


Shop


Mode

Home


Mode

Select


the


usage


mode

?

Shop


mode


is


for


shop


usage


only

.

Confirm

Are


you


sure


to


change


to


Home


mode

?

Cancel

OK

Country

Nigeria

India

Iran

Malaysia

Thailand

Saudi Arabia

Israel

Iraq

Pakistan

Benin

Philippines

Egypt

Kuwait

Indonesia

Morocco

Summary of Contents for LE42U6500A

Page 1: ...LED LCD TV OWNER S MANUAL MODEL LE42U6500A Please READ this manual carefully before operating your TV and retain it for future reference ...

Page 2: ...Contents 1 1 Safety and warnings 2 3 2 Introduction 4 3 Wall Mount Installation 5 4 Installation 6 8 5 Remote Controller 9 10 6 TV Operation 11 17 7 Trouble shooting 18 ...

Page 3: ...vicing is required when the apparatus has been damaged in any way such as power supply cord or plug is damaged liquid has been spilled or objects have fallen into the apparatus the apparatus has been exposed to rain or moisture does not operate normally or has been dropped 14 Mains plug is used as the disconnect device the disconnect device shall remain readily 15 The ventilation should not be imp...

Page 4: ... should pay special attention to children Serious injury may result if it falls Do not place your television on an unstable cart stand shelf or table Serious injury to an individual and damage to the television may result if it falls When the television receiver is not used for an extended period of time it is advisable to disconnect the AC power cord from the AC outlet Avoid exposing the televisi...

Page 5: ... Signal System Input Power Voltage Audio Output Power 1920x1080 16 9 PAL BG PAL I PAL DK PAL NTSC SECAM THD 7 High Definition Multimedia Interface HDMI x 3 Composite Video Input x 1 Audio Input x 1 YCb Pb Cr Pr x 1 tal definition TV line Composite Video input 350 Y Cb Pb Cr Pr 400 USB x 3 RF x 1 TF x 1 LAN x 1 Headphone Output x 1 Optical Output x 1 80W AC 100 240V 50 60Hz 2x8W 107cm Receiving ATV...

Page 6: ...to the wall Step Two Fix the wall mount screws M6x12mm 4pcs into the rear side of the LCD TV using the tongue of 8kgf cm The TV appearance subject to material object Step Three Put the LCD TV with wall mount screws onto the wall mount brackets Warning the angle between the TV and wall must not be bigger than 3º ...

Page 7: ...the corresponding button the corresponding icon highlighted to remind the user has been operating successfully and to achieve the corresponding functions Press to enter the menu input source Press the corresponding button the corresponding icon highlighted to remind the user has been operating successfully and to achieve the corresponding functions Menu Home or Application status in TV confirmatio...

Page 8: ...ote Aerial connections IEC female Input impendance 75 unbalanced ANTENNA PRESET MODE HDMI 1 2 3 800 600 1024 768 60 60 37 88 48 36 RESOLUTION V Freq Hz H Freq KHz 1360 768 60 47 7 4 1280 768 60 47 3 5 1920 1080 60 67 5 ...

Page 9: ...ed to the following appliances VCR multi disc player DVD camcorder video game or stereo system etc YPbPr can support these video fomats 480i 576i 480p 576p 720p 1080i 1080p Note 1 share one audio channel 2 Sometimes it will not support in different device because the device supplys nonstandard signal VIDEO YPbPr Red audio R White audio L Red Pr or Cr R W R Blue Pb or Cb Green Y B G Yellow video Y ...

Page 10: ...isplay the channel information In teletext mode press to revealthe hidden information Press to open the channel list In teletext mode press to switch the image to top bottom or full 3D WORLD These models do not support 3D feature Press to close the on screen menu In teletext mode press to exit the teletext mode 16 17 18 19 20 21 22 23 24 25 26 Press to select previous or next file previous next Pr...

Page 11: ... 10 REMOTE CONTROLLER ...

Page 12: ...set 1 Press the buttons to navigate the menu and change the settings Press the OK button to confirm Select your desired language to be displayed on the menu Input your password and press confirm to complete Note The default password is 0000 Home And Shop modes 2 When the unit is turn on for the very first time it will show Initialization set up menu After the OSD language is set the user can choos...

Page 13: ...d then press the button 2 Press the buttons to select submenu Standard Music Theatre User User Mode Picture You can adjust picture effect here such as brightness color sharpness etc 3 Wide Mode MENU 1 Press the MENU button and then press the buttons to select the Wide Mode MENU and then press the button 2 Press the buttons to select submenu Auto 16 9 4 3 Zoom1 Zoom2 Just Scan 4 Channel MENU 1 Pres...

Page 14: ... can Delete Rename Move Skip favorite Delete Press teletext red button the program is cursor will delete Edit Only can rename ATV programs Move the cursor to the program press teletext green button to rename the program Press to choose the character press to move the cursor Press MENU button to exit edit Press EXIT to exit the menu Move Use the Arrow Buttons to select the channel you wish to move ...

Page 15: ...NU button and then press the buttons to select the Setup MENU and then press the button 2 Press the buttons to select Advance and press OK to confirm Here are some of the TV set 5 Time MENU 1 Press the MENU button and then press the buttons to select the Time MENU and then press the button 2 Press the buttons to select submenu Picture Audio Channel Time Wide Mode Setup On Time Off Time Advance On ...

Page 16: ...m Tip Sure you want to exitTV system OK Cancel 1 1 Net You can choose the Wi Fi to connect Wi Fi Ethernet If you connected Wi Fi the Ethernet will closed 1 2 Sound You can press the Sound button to change the sound volumes or close the press sounds 1 3 Display You can press the Display button to replace your Wallpaper or change your Font size type and video settings 1 4 Storage You can press the S...

Page 17: ...now please backup your personal data 1 10 System Update Here you can upgrade your system by Local update or Net update 1 11 Add account You can add an account at this point 1 12 Date time Here is some of time Settings you can go to your habits 1 13 About TV Here is some version info such as Model number Android verdion Kernel version Build number 2 Application Menu There are some Apps you can choo...

Page 18: ...TV OPERATION 17 TV OPERATION ...

Page 19: ...t or not No picture Mute Power cord is not inserted Power switch is not opened Contrast and brightness volume setup Press standby key on the remote control for inspecting No color Normal audio color control Scramble Normal audio or weak retune channel No color Noise Audio system Special Explanation The accessories such as remote control is not belongs to the guarantee Normal audio antenna position...

Page 20: ......

Reviews: