background image

Basic Receiving and Playing Operations

22  LED -LCD  television  Owner’s Manual 
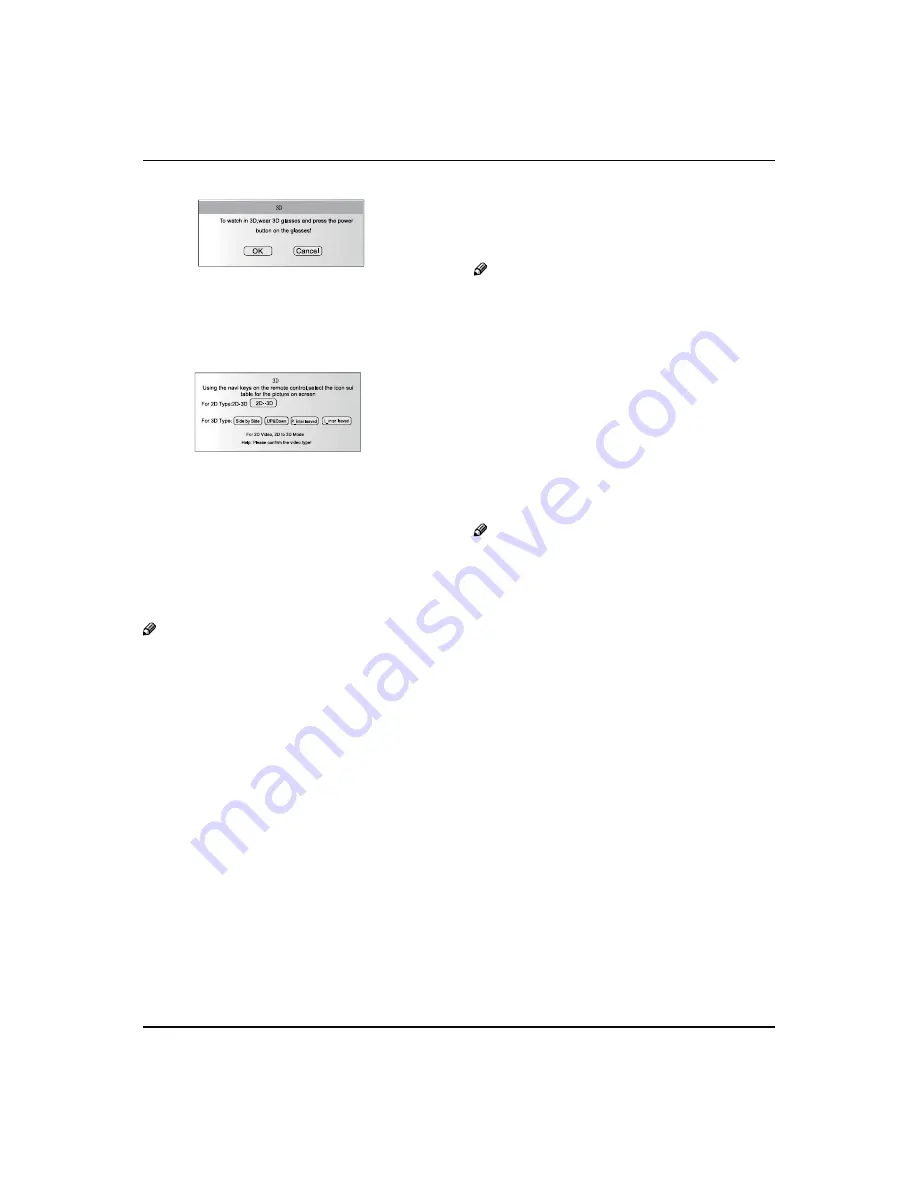
Press 

B

/

 to select the “Confirm” option, you will 

enter the interface for selecting a corresponding 3D 

mode. (See Fig. 2 below)

If the TV is currently in the 3D 

mode:

Press the 3D switch key on the remote control to call 

A

out the prompt menu. (See Fig. 3 below) 

Press 

B

/

keys to exit the 3D mode or cancel the 

exit.

 Note

When you watch a 3D TV program, please wear 


and turn on 3D glasses.

If the signal currently detected in the HDMI 


channel is one of 3D signals specified in the 
Specification HDMI1.4a, selecting the “Confirm” 
option will make the TV directly switch to a 
corresponding 3D mode, so the above Fig. 2 will 
not appear and you needn’t choose a 3D mode.

In the 3D mode, the TV screen display menu can 


still be called out and displayed normally.

The TV doesn’t memorize the setting of 3D mode, 


so it will be in the 2D mode when you turn it on 
again after turning it off.

In the USB mode, there are various modes of 3D 


video sources. With USB signals, the 3D switch key 
functions only when playing a video (film). The TV 
will exit the 3D mode when playing ends or when 

you manually exit the 3D mode.

Advanced function

Streaming Media Playing 

System

 Note

The diagrams in the following section are 


schematic and only for your reference. Please see 
the actual product if necessary.

Supported file formats:

A

Picture: 


*. JPEG; PNG; BMP;

Music: 


*. Mp3(8-320kbps; WMA(32-192kbps); 

AAC(16-576kbps)
Movie:


MPEG4: *. avi files in accordance with Div*4. x/5. x 

Protocol; 

MPEG2: some *. mpeg files; 
MPEG1: *. dat and some *. mpeg files;
RealVideo
Text: 


*. Txt.

 Note

Due to the particularity of file coding, some files 


may be unable to be read.

Supported equipment:    


B

Support the equipment that supports Mass Storage 

Protocol and whose file system is FAT/NTFS/FAT16/

FAT32, such as some USB disks, mobile hard disks, 

card readers, MP3 players and digital cameras. 

If USB equipment could not be identified due 

to unsupported file system, please format the 

equipment to the above-mentioned file system;

The external card reader supports most of the digital 

C

cards in the current market; the types of digital cards 
that can be read are relevant to the performance 
of selected card reader; you may attach standard 
mobile hard disks (working voltage 5.0V, working 
current not higher than 500mA); during media 
playing, do not pull out storage media, otherwise it 
may cause system halt, damage the files in storage 
media or damage USB equipment; sometimes, the 
TV may halt due to overhigh information error rate, 
in which case you should restart the system; there 
are a lot of nonstandard USB mobile equipment 
in the market, they may not be identified when 
connected to the streaming media playing system; 
the above phenomena may also occur on computers 
and are not the TV’s fault.

To achieve smooth playing, ensure the following:

D

Summary of Contents for LE42H330

Page 1: ...Please READ this manual carefully before operating your TV and retain it for future reference OWNER S MANUAL LED LCD TELEVISION LE42H330 LE46H330 LE55H330 LD42K3 ...

Page 2: ... ON OFF the TV set 14 Choose the Menu Language 14 Choose the Input source 14 Picture Menu 14 How to select the picture mode 14 How to customize your own picture status 14 Sound Menu 15 How to select the sound mode 15 How to customize your own sound status 15 Channel Menu 16 Programme Edit 16 Auto Tuning 17 Exchange 17 DTV Manu 18 Function Menu 18 Function Menu Set 18 Adjust Menu 19 Time Menu 19 Lo...

Page 3: ...gle Major part or accessory of which technical specifications must be followed if it is to be replaced RISK ELECTRIC SHOCK DO NOT OPEN WARNING To avoid fire or electric hazards never place your television receiver in an area with heavy moisture Attention should be paid to avoid accidental scratches or impacts onto the screen CAUTION Please read this manual carefully before using your television an...

Page 4: ...Important Safety Instructions 4 LED LCD television Owner s Manual Important Safety Instructions ...

Page 5: ...Important Safety Instructions LED LCD television Owner s Manual 5 ...

Page 6: ... Press this key to open close signal source options menu 2 VOL Presstoadjustthevolume IntheMENUscreen thesebuttonsserveasright leftbuttons 3 POWER Press to turn on and off theTV 4 CH Press to scan through channels To scan quickly through channels press and hold down either In the MENU screen these buttons serve as up down buttons 5 MENU Menu display Press to access the on screen menu display Intro...

Page 7: ...s strong light may interfere the signals change your position to operate the remote controller if the television cannot be turned on or off as you expect Keep the remote controller away from heat source or humid area to ensure effective performance of the remote controller Make sure that two AAA alkaline batteries are loaded The batteries must be of the same type The batteries must be located prop...

Page 8: ...hese jacks 5 HDMI1 3 In Connect a HDMI device to receive digital audio and uncompressed digital video 6 AV OUT Connect the audio L R and video cables to your other video equipment 7 AV1 In Connect the video signal from a video device 8 ANT In Connect cable pr antenna signal to theTV either directly or through your cable box 9 SPDIF Digital Audio Optical output 0 W A For the smart comtroller A USB ...

Page 9: ... B CH Used to select aTV channel when the screen options menu is closed specifically press P to decrease the channel and press P to increase the channel C Sound Mode Press this key continuously to select the sound mode D Picture Mode Press this key continuously to select the picture mode E TV MENU Press this key to display or exit the main menu F D MENU Press this key to display the Special Functi...

Page 10: ... coaxial cable to remove the disturbance caused by airwave Don t bind antenna cable and electric wire together To improve picture quality in a poor signal area purchase and install a signal amplifier If the antenna needs to be split for two Tv s install a 2 WaySignal Splitter in the connections If the antenna is not installed properly contact your dealer for assistance Note All cables shown are no...

Page 11: ...w Audio Left white and Audio Right red How to use Select the input source with using the A SOURCE button on the remote control Press B button to select the desired source Press C OK button to confirm Operate the corresponding external equipment D Connecting a DVD player How to connect Connect the DVD video outputs Y P A b Cb Pr Cr to the COMPONENT Y Pb Cb Pr Cr input jacks on the TV and connect th...

Page 12: ... owner s manual for the digital set top box Use SOURCE on the remote contralto select PC or B HDMI Y Pb Cb Pr Cr mode Press C Play button on external equipment for program play PC Setup How to connect Use the TV s PC IN port for video connections A Then make the corresponding audio connection If B using a sound card adjust the PC sound as required How to use Turn on the PC and the TV A Turn on the...

Page 13: ...put settings Note Component PC HDMI input sources cannot be used for Monitor out When connecting with external audio equipments such as amplifiers or speakers please turn the TV speakers off Power source TO USE AC POWER SOURCE Use the AC polarized line cord provided for operation on AC Insert the AC cord plug into a standard polarized AC outlet Note Never connect the AC line cord plug to other tha...

Page 14: ...repeatedly When you satisfied with your choice press D MENU to return to normal viewing Back light LED Four Prog DTV Manu Intelligent Mode Net Upgrade Chinese Surround Choose the Input source Change the picture source so you can watch your TV VCR Cable or any other devices that are connected to your TV Press A SOURCE button to enter the Input Source menu and then use button to select the desired i...

Page 15: ...hown in the below figure and then press to select a benchmark in the range of 2500K 15000K from warm color to cold color afterwards press to adjust if a different benchmark is selected for adjustment the original adjustment data will be automatically cleared Picture Sound Channel Function Adjust Timer Language Menu Time out Programe Auto Tun Exchange Volume Balance Digital SRS AVL MAXX Bass Reset ...

Page 16: ... Limit This will reduces the differences in volume level among broadcasters MAXX Bass To adjust the super bass Press to select super bass off low high or Medium Reset Return to factory default settings Channel menu Display channel menu by pressing SOURCE button then use button to select the source of ATV or DTV item Press A MENU button and then use button to select Channel menu Press B button to s...

Page 17: ... Press B button to select Auto Tuning then press OK to enter its submenu Press C button to select OK press OK button to start to scan Press MENU button to return to the previous menu press EXIT button to EXIT the menu screen All channels now available will be automatically preset in order After the search has finished the first program number will display on the screen This search automatically ad...

Page 18: ...t of the TV the TV set automatically turn This function is not available for LD42K3 OPC Press to select the OPC then press to select Uesr Dynamic Daylight Normnal Night Press to select the Adjust then press to set 0 10 Press to select theDynamic Contral to be adjusted and then press to select ON or OFF Eye guard Mode Press to select the Eye guard Mode option Press OK to enter the submenu Press to ...

Page 19: ...e menu Press B to select the desired option press OK to enter its submenu Current Time The current time is calculated from the moment upon turning the TV on At first check whether the time indicated on the TV s clock is consistent with the standard time of your time zone if not adjust the clock as follows Press MENU on the remote control unit or MENU on the TV s front panel to display the main men...

Page 20: ...the display will automatically disappear The Lock Set menu is as follows Change Password OK Tuning Lock Preset Source Preset Prog Source Lock OK Child Lock Max Volume 100 Power On Volume off Unlock OK off off off off Lock Set Change Password After entering the Lock Set menu press to select the Change Password option and then press OK to display the Change Password menu afterwards enter a new 4 dig...

Page 21: ...isappear later To resume Child Lock function just enter the Lock Set menu to set Child Lock OFF or execute the Unlock option Max Volume Setting Press to select the Max Volume option and then press to freely adjust the max volume within the range of 0 100 After finishing the setting the max volume in the Volume menu will not exceed the preset max volume for example if the preset max volume is 30 th...

Page 22: ...e the actual product if necessary Supported file formats A Picture JPEG PNG BMP Music Mp3 8 320kbps WMA 32 192kbps AAC 16 576kbps Movie MPEG4 avi files in accordance with Div 4 x 5 x Protocol MPEG2 some mpeg files MPEG1 dat and some mpeg files RealVideo Text Txt Note Due to the particularity of file coding some files may be unable to be read Supported equipment B Support the equipment that support...

Page 23: ...em menu press C on the remote control unit to select the required USB equipment and then press on the remote control unit to select the required file Press D OK to enter the selected file To exit the streaming media playing system and E watch a TV program you must return to the streaming media main menu at first to protect equipment and then press SOURCE to select TV or directly press USB to retur...

Page 24: ...ast or next movie To exit playing just press D BACK repeatedly Note The menu display varies with the number and names of files in your equipment Playing Music After entering USB main interface press A to select a harddisk partition and then press to select the Music option Press B OK to confirm the selection and press PLAY PAUSE to play the music of your choice Press C PLAY PAUSE FWD REV to contro...

Page 25: ...g the power cord before you begin any cleaning Cleaning the Screen Here s a great way to keep the dust off your screen A for a while Wet a soft cloth in a mixture of lukewarm water and a little fabric softener or dish washing detergent Wring the cloth until it s almost dry and then use it to wipe the screen Make sure the excess water is off the screen and B then let it air dry before you turn on y...

Page 26: ...on technologies However there might be some dank or bright red blue or green spots or some anomalistic stripes or spots This is not defect If the TV set is used in an area 2 400 meters above the sea level where the air pressure is below 750hpa the picture on the screen maybe affected and a muffled sound might be produced These phenomena might happen in the area 1 500 meters above the sea level Thi...

Page 27: ...p 50 60 4 1080i 1080p 50 60 Recommendation PC connection input format sequence number Format H Frequency KHz V Frequency Hz 1 640 480 60Hz 31 5 60 2 800 600 60Hz 37 88 60 3 1024 768 60Hz Recommendatory 48 36 60 Recommendation DVI connection input format Sequence Number Resolution Refresh Frequency Hz 1 640 480 60 2 800 600 60 3 1024 768 60 Recommendation HDMI connection input format Sequence Numbe...

Page 28: ...28 LED LCD television Owner s Manual Specification ...

Page 29: ...LED LCD television Owner s Manual 29 Format ...

Page 30: ...30 LED LCD television Owner s Manual Specification ...

Page 31: ...LED LCD television Owner s Manual 31 Format ...

Page 32: ...32 LED LCD television Owner s Manual Specification Specification Format ...

Page 33: ...LED LCD television Owner s Manual 33 Format ...

Page 34: ...34 LED LCD television Owner s Manual Specification ...

Page 35: ...LED LCD television Owner s Manual 35 Format ...

Reviews: