background image

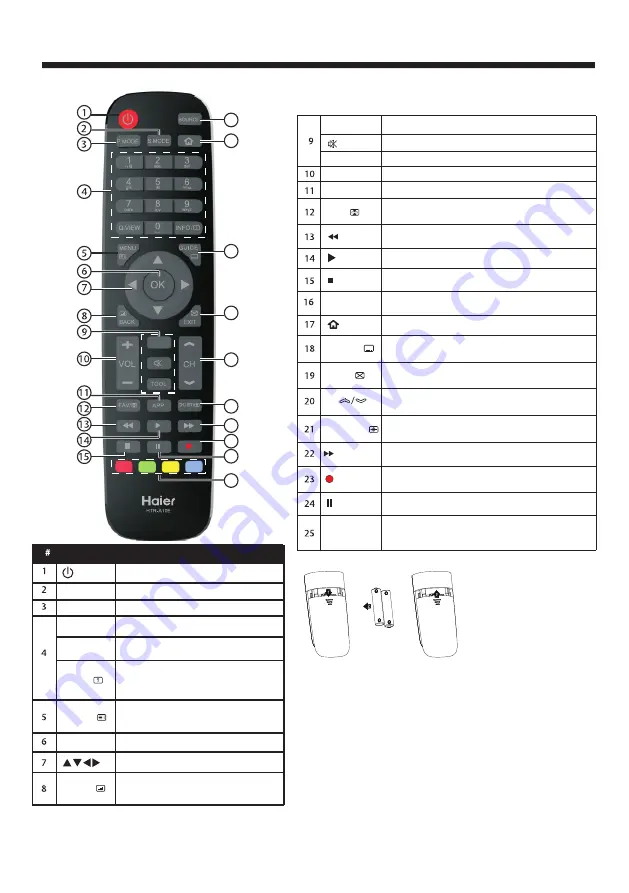
REMOTE CONTROLLER

-10-

Programme Edit: Delete, Rename, Move, Skip.
EPG: Record, Info, Schedule, Reminder.

No function.

No function.

No function.

Press to turn the TV on or off.

(Power)

S.MODE

Press to select the sound mode.

P.MODE

Press to select the picture mode.

0-9

Press to enter a channel number
or password.

Q.VIEW

Press to switch to the last viewed
channel.

Press to open the on-screen menu. In 

teletext mode, press to open the INDEX 

page.

Press to navigate the on-screen menu.

Press to confirm a selection.

OK

Press to return to the previous screen.

In teletext mode,press to enter mix 

mode.

SOURCE

Press to open the input source list.

CH

Press to change the channel.

Press to  display the channel information.
In teletext mode,press to revealthe 
hidden information. 

Press to  open the channel list.In teletext mode,
press to switch the image to top,bottom or full.

Press to  close the on-screen menu.In teletext 
mode,press to hide the text.

Press to stop multimedia playback, REC& Timeshift 

mode.

GUIDE/

Press to  display electronic programme guide 
in TV mode. Press to enter  the  teletext subpage.

(REC)

Press to record the TV program you are watching 
in DTV mode.

(Mute)

Press to turn the sound on or off.

TOOL

Press to open the shortcut menu of tool.

VOL  +/-

Press to adjust the volume level.

APP

Press to open a favorite channel list. In teletext 
mode, press to hold a page.

(reverse) Press to reverse playback in multimedia.

Press to play in multimedia mode  & Timeshift mode.

(Play)

(forward) Press to fast forward in multimedia.

Press to pause in multimedia mode & Timeshift 

mode.

(Pause)

Insert Batteries into the Remote Control

1. Remove the battery cover.
2. Inserting the 2 AAA 1.5V batteries making sure the polarity
(+ or -) of the batteries matches the polarity marks inside the unit.
3. Mount the battery cover. Replace with new batteries when the 
TV set begins to show the following symptoms:Operation is 
unsteady or erratic. Sometimes the TV set does not function
with Remote Control Unit.

Remark:

1) Alkaline Battery Recommeded.
2) Remove batteries when they are exhausted or if the remote 
control is not to be used for long time.

Coloured 
buttons

16

17

18

19

21

22

24

25

20

23

APP

STORE

APP STORE

INFO/

MENU/

BACK/

Button

Descriptions

FAV/

(Stop)

EXIT/

CH.LIST/

Summary of Contents for LE32K6000T

Page 1: ...LED LCD TV OWNER S MANUAL MODEL LE32K6000T Please READ this manual carefully before operating your TV and retain it for future reference LE40K6000TF LE43K6000TF ...

Page 2: ...Contents 1 1 Safety and warnings 2 3 2 Introduction 4 3 Wall Mount Installation 5 4 Installation 6 9 5 Remote Controller 10 11 6 TV Operation 12 22 7 Trouble shooting 23 ...

Page 3: ... way such as power supply cord or plug is damaged liquid has been spilled or objects have fallen into the apparatus the apparatus has been exposed to rain or moisture does not operate normally or has been dropped 14 Mains plug is used as the disconnect device the disconnect device shall remain readily operable 15 The ventilation should not be impeded by covering the ventilation openings with items...

Page 4: ... should pay special attention to children Serious injury may result if it falls Do not place your television on an unstable cart stand shelf or table Serious injury to an individual and damage to the television may result if it falls When the television receiver is not used for an extended period of time it is advisable to disconnect the AC power cord from the AC outlet Avoid exposing the televisi...

Page 5: ...hannel Power consumption Signal Input Output Horizon Video Signal System Input Power Voltage Audio Output Power 1366 x 768 16 9 600 DTV 100 ATV THD 7 Analog RGB VGA x 1 High Definition Multimedia Interface HDMI x 2 Composite Video Input x 1 Audio Input x 1 YCb Pb Cr Pr x 1 tal definition TV line Composite Video input 350 Y Cb Pb Cr Pr 400 USB x 1 RF x 1 Headphone x 1 CI x 1 SCART x 1 COAXIAL x 1 4...

Page 6: ...Step Two Fix the wall mount screws into the rear side of the LCD TV using the tongue of 32 M4x5mm 40 M6x8mm 4pcs 43 M6x12mm 8kgf cm The TV appearance subject to material object Step Three Put the LCD TV with wall mount screws onto the wall mount brackets Warning the angle between the TV and wall must not be bigger than 3º ...

Page 7: ...6 1 Middle Button press longtime for power function 2 Up Down CH 3 Left Righ VOL press once for source function The keyboard is located at the bottom left near the right side of signal indicator KEYBOARD Rocker COMMON INTERFACE CI HEADPHONE VIDEO YPbPr AUDIO RF 1 Remote control sensor 2 Indicator LED RED STANDBY 3 Key board 3 2 1 8m Bottom Bottom 32 40 43 3 2 1 8m 32 40 43 APP STORE APP STORE ...

Page 8: ... get DVI signal the audio signal receives from the Audio channel HDMI1 ARC AV REAR AV Connections SIDE 32 USB HDMI1 ARC VGA HDMI2 COAXIAL SCART All the terminals are from left to right SCART HDMI2 VGA USB COAXIAL Output Note When HDMI port get DVI signal the audio signal receives from the Audio channel HDMI1 ARC AV REAR AV Connections SIDE 40 43 USB HDMI1 ARC VGA HDMI2 COAXIAL SCART ...

Page 9: ...tant 8 PC SUPPORTED MODE HDMI 1 2 3 800 600 x 1024 768 x 60 60 37 88 48 36 RESOLUTION V Freq Hz H Freq KHz 1366 768 x 60 47 7 4 640x480 60 31 47 1920 80 x10 60 67 5 5 VGA HDMI2 SCART COMMON INTERFACE CI HEADPHONE VIDEO YPbPr AUDIO RF PRESET MODE PC NOTE PC V Freq Hz not more than 60Hz 1 2 3 800 600 1024 768 60 60 37 88 48 36 RESOLUTION V Freq Hz H Freq KHz 4 1280 768 60 47 3 1920 1080 40 43 60 67 ...

Page 10: ...080i 1080p Note 1 VIDEO and YPbPr share one audio channel 2 When HDMI port get DVI signal the Audio channel is changed to receive the audio for HDMI port 3 Sometimes it will not support in different device because the device supplys nonstandard signal AV HDMI G B R G B R VIDEO EQUIPMENT with YPbPr G B R Red audio R White audio L Red Pr or Cr R W R Blue Pb or Cb Green Y VIDEO B G USB HDMI1 ARC VGA ...

Page 11: ...tronic programme guide in TV mode Press to enter the teletext subpage REC Press to record the TV program you are watching in DTV mode Mute Press to turn the sound on or off TOOL Press to open the shortcut menu of tool VOL Press to adjust the volume level APP Press to open a favorite channel list In teletext mode press to hold a page reverse Press to reverse playback in multimedia Press to play in ...

Page 12: ...es which are automatically displayed successively This key is used to stop or resume sub page acquisition The indication appears top left To freeze the page To display or hide the concealed information games solutions This is used to call or exit teletext modes The summary appears with a list of items that can be accessed Each item has a corresponding 3 digit page number If the channel selected do...

Page 13: ...e If Shop mode is choosen the following menu will displayed Are you sure to change to Shop mode OK Cancel Press OK to enter the next prompt menu Shop mode is the most energy mode OK Cancel Continue Choose Cancel to go back to the Initialization set up menu and the cursor will stay at the home mode choice Password Please enter new password Confirm new password Programme s Programme s Programme s Pr...

Page 14: ... in a preset order If you wish to skip channels modify the preset order or rename channels select Programme Edit under the channel menu some Programme s Programme s Programme s Programme s 1 ATV 3 Press buttons to select Scan type Symbol Ks S press the OK button to confirm 4 In the Tune Type menu press the buttons to select ATV DTV DTV ATV Press the button and then press the buttons to select the ...

Page 15: ...al Tuning Programme Edit Signal Information DTV Manual Tuning Software Update USB CI Information OK OK BACK MOVE OK MENU 2 Press the buttons to select DTV Manual Tuning and then press the OK button 4 Press the MENU button to return back to the main menu 5 Press the EXIT button to exit the menu 2 2 DTV Manual Tuning DVB C 1 Press the MENU button and then press the buttons to select the CHANNEL menu...

Page 16: ...aracter Press to move the cursor Press MENU button to exit edit Press EXIT to exit the menu Note ATV programs name only can be 5 character Press teletext red button to storage to channels after manual tuning 4 Program edit You can Delete Rename Move Skip FAV any programs Press teletext red button the program in cursor will delete Delete 3 ATV Manual tuning You can change the sound system to search...

Page 17: ...lear all the programs and password In PVR File system menu you can set up USB disk for PVR USB Disk Time Shift Size Speed Select Disk C Check PVR File System Start Format Free Record Limit 6 Hr OK MENU CHANNEL PICTURE SOUND TIME OPTION LOCK Lock System Block Program Parental Guidance Set Password OK OK BACK MOVE OK MENU The default pass word is 0000 If you forget the password you can use the super...

Page 18: ...ile system will limit the size of the storage size File system NTFS up to 2TB FAT32 with up to 192GB FAT16 with up to 2GB From OPTION MENU enter into PVR File System as below CHANNEL PICTURE SOUND TIME OPTION LOCK OSD Language Subtitle Language PVR File System Restore Factory Default Automatic power down 4h Home Shop Mode HDMI CEC DCR Audio Languages OK OK BACK MOVE OK MENU 7 EPG Menu Electronic P...

Page 19: ...ins HD 4 Mins OK Format disk Do not unplug USB device Formatting please wait Format disk Start Exit Format disk Warning All data will be lost OK Suggest to format the device by High Speed Fs which can speed up the record PVR File System Type Hi Speed FS PVR File System Size All SD 208 Mins HD 59 Mins File System Size PVR File System Type FAT32 SD 208 Mins HD 59 Mins File System Size OK OK Select D...

Page 20: ...tivated Approximately 4GB of memory buffers about offer 140 minutes Prepare to record the program This TV allows you to pause and record the currently watched digital program to a USB storage device and to resume to the point where it was paused Formatting a USB 2 0 storage device will be needed Save your original data before formatting All the data stored in the USB device will be erased after fo...

Page 21: ...ideo bit rate is too low 7 Not all USB devices are compatible The USB hard disk drive electricty should be 500MA Below is a list of recommended USB drvies Models that are not listed may be compatible but it is not guaranteed to work VOL VOL 8 This feature is not available for all digital TV such as scrambled or audio only channels San Disk Extreme Contour USB Flash Drive 8GB SDCZ8 8192 E75 San Dis...

Page 22: ...edia file in full screen When the media file photo Movie or text type is playing press the OK or Info button can display the control bar Press to select the function icon press OK button to confirm the function Press or EXIT button to exit the control bar except for music You can adjust the audio track or program in the Info menu while Playing the video file Choose the Info icon and press OK can d...

Page 23: ...will not display when set to Off Input Source Change Source lock you can t change the source when set to Off Save To USB Backup all TV setting data to USB disk backup file named DATABASE bin Load Restore this data to TV from USB disk When restore is executed the TV will reboot Volume Default Power on default volume press the or button to select the desired volume HotelModeOperation Hotel Mode Oper...

Page 24: ...tions are not correct No picture Mute Power cord is not inserted Power switch is not opened Contrast and brightness volume setup Press standby key on the remote control for inspecting No colour Normal audio Colour control Picture breaking up Normal audio or weak retune channel No colour Noise TVsystem Normal audio antenna position direction or connection Trouble phenomenon Symptom Ghost Normal aud...

Page 25: ...4031Q325099 ...

Reviews: