background image

1

2

abc

3

def

4

ghi

5

jkl

6

mno

7

pqrs

8

tuv

9

wxyz

Operation

EN-18

5). Common Interface

This menu can display the CI card' s information.

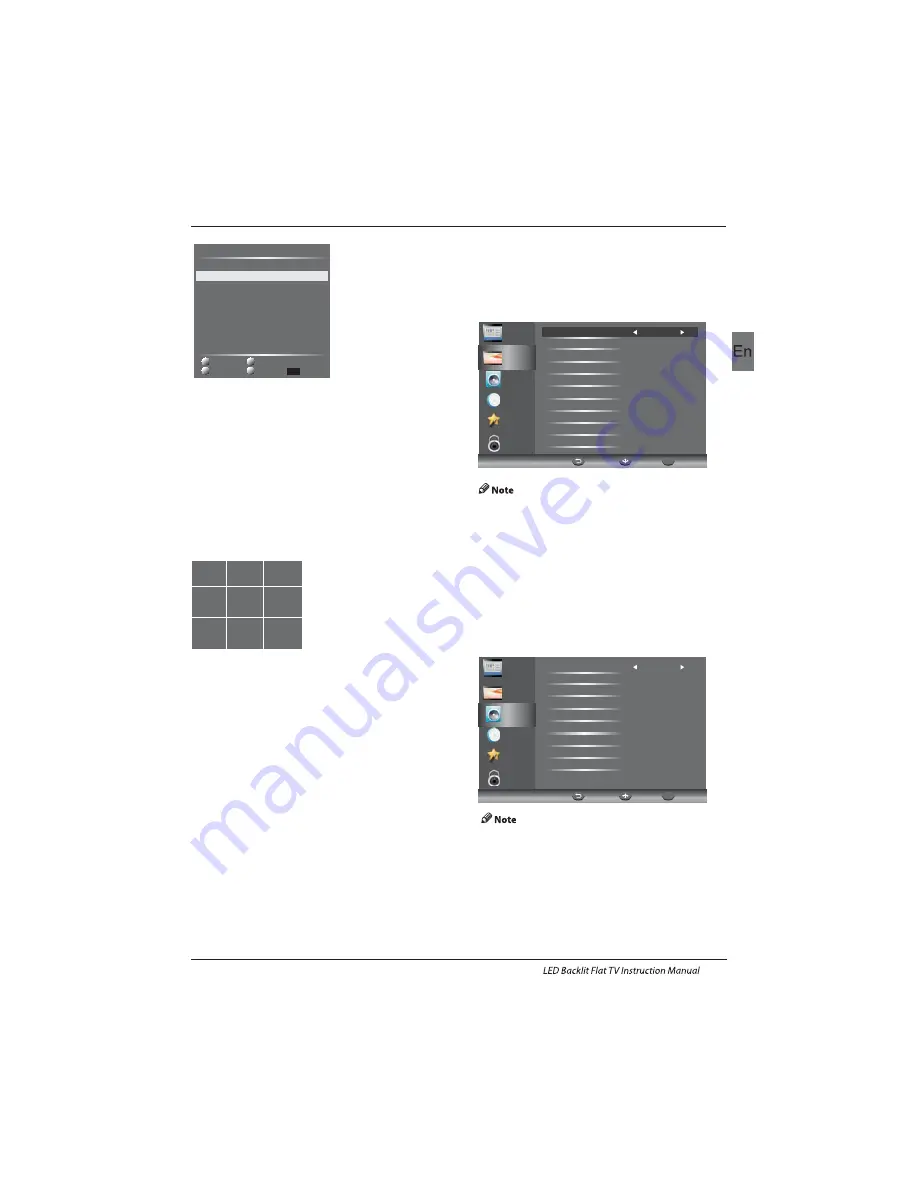
The second item of the MENU is PICTURE MENU.
You can adjust picture effect here, such as 
contrast, brightness, etc.
Press 

▼▲

 to move, press OK to adjust.


2. PICTURE MENU


Channel

Picture

Audio

Clock

Setup

Lock

Picture Mode                           Standard

Medium

Aspect Ratio                                 16:9

Color Temp                                Standard     

Brightness                                     50

Contrast                                         45

Sharpness                                     60

Color                                               45

Tint                                                   0

NR                                               Medium

Dynamic Contrast                     

MENU

Move

OK

OK

1).There are four colors temperature modes 
can be selected standard, warm, cool,user
2).Screen  is available in PC mode only which
can adjust Horizontal position, vertical 
position, size and phase.

3.AUDIO MENU

The third item of the MENU is the AUDIO 
MENU.
You can adjust the sound effect here  such as 
treble, bass, balance etc.
Press 

▼▲

 to move, press OK to adjust.

Channel

Picture

Audio

Clock

Setup

Lock

Sound


Mode                   


Standard

Treble                                     


0

Bass                                        


0

Balance


0


Auto


Volume                                 On

Surround


Sound


Off           

SPDIF


Auto

Audio


Description

Audio Only                                On / Off

MENU

Move

OK

OK

001 The HITS                        


003 UKTV Br’tldeas              
004 f th                                    
005 Ideal World                      
006 Colourbars100                
001 Kiss                                   
002 Smash Hits!                      
003 Kerrang!                           

002 TMF         

Delete

Programme Edit

DTV

DTV

DTV
DTV
DTV
DTV
Radio
Radio
Radio

Move

Skip

Rename

Favorite

Delete: Press the Red Button to delete the channel you 
highlighted. 
SKIP: Press the Yellow Button to select the Skip function 
and a SKIP icon will be displayed next to the program and 
it will be skipped when changing the channel. 
MOVE: Press the Green Button to highlight the select the 
channel you want to move. An icon will display ahead the 
channel number. Then press the 

▼ / ▲

 Buttons to a new 

position and press the Green Button to confirm. 
Rename: (For ATV only) Press the Blue Button for renaming 
the channel. Press the number key circularly to enter a new 
name and press the OK Button to confirm (the number key 
as the following table). 

FAV: Press the FAV Button (instead of color Buttons) to set 
the favourite channel. (If you want to view the Favorite 
Channel List you need to exit Program Edit Menu and then 
press the FAV Button.)

6). Signal Information (Only for DTV)

Press the 

 / 

 Buttons to select the Signal Information 

in the Channel Menu. Then press the OK Button to show the 
related information of the current channel. 

7). Software Updated (USB) 

Press the 

 or 

 Buttons to select Software Update (USB) 

in the Channel Menu. Then press the OK Button to update 
software by using a USB. Follow the software upgrade 
instructions provided with the software.
Note: We recommend you perform a factory reset (refer to 
Restore Factory Default in Setup menu) to ensure the unit 
is successfully upgraded.

1.Auto volume: only available when the input 
signal volume is too large or distortion.
2. Audio Only: set on to turn off the TV screen,
and then you can listen TV.

4.CLOCK MENU

FAV

Summary of Contents for LE32C800C

Page 1: ...LE32C800C ...

Page 2: ...nstallation Guide 04 Operation 15 CHANNEL MENU 15 Auto Tuning DVB T 15 Auto Tuning DVB C 16 DTV Manual Tuning DVB T DTV Manual Tuning DVB C ATV Manual Tuning 17 17 17 PICTURE MENU 18 19 Audio MENU 18 Clock MENU 18 SETUP MENU LOCK MENU EPG Menu Electronic Program Guide 20 PVR function 20 Prepare to record the program 20 19 Record the program 21 DTV Recording 21 Timeshift function 22 USB Player 23 T...

Page 3: ...IS PRODUCT THERE IS A EXCLAMATION MARK IN THE TRIANGLE THIS SYMBOL ALERTS YOU THAT IMPORTANT LITERATURE CONCERNING OPERATION AND MAINTENANCE HAS BEEN INCLUDED WITH THIS PRODUCT CAUTION TO REDUCE THE RISK OF ELECTRIC SHOCK AND FIRE DO NOT PUT THE TV SET NEAR SOURCES OF HUMIDITY DO NOT USE ANY ABRASIVE CLEANERS WHICH MAY SCRATCH OR DAMAGE THE LCD SCREEN AVOID CONTACT WITH OBJECTS THAT MAY SCRATCH TH...

Page 4: ...Safety notice EN 3 ...

Page 5: ...ion Do not trap the power supply cord under the television receiver Caution Never stand on lean on or suddenly push the television or its stand You should pay special attention to children Serious injury may result if it should fall Caution Do not place your television on an unstable cart stand shelf or table Serious injury to an individual and damage to the television may result if it should fall...

Page 6: ...id excessively warm locations to prevent possible damage to the cabinet or premature component failure Do not cover the ventilation openings when using theTV Main parameter Main features 4 NICAM 5 T ime shift 3 HDMI interface and SCART Interface High luminance wide viewingangle 2 Used as Television display terminal PC display 1 Never tamper with any components inside the TV or any other adjustment...

Page 7: ...PRESET MODE PC 3 5 1024x768 1280x1024 60 60 1 640x480 60 31 47 2 800x600 60 37 88 48 36 63 98 RESOLUTION V Freq KHz H Freq KHz 4 1360x768 60 47 7 Introduction EN 6 ...

Page 8: ... between the TV and the wall to permit ventilation Please do not attempt to rotate the TV on the stand Avoid excessively warm locations to prevent possible damage to the cabinet or premature component failure Introduction EN 7 1 Place the TV with the display side down on a flat surface Use a cloth to protect the display Position the stand base plate onto the bottom of the stand pole 2 Attach the s...

Page 9: ...e 1 Place the LED LCD Television onto a solid surface Please place some soft material over the front of the screen to protect it from any damage 3 Use the four screws provided to fix the TV onto a wall mounting bracket not included via the four VESA standard holes on the back of the television Introduction EN 8 This television can be wall mounted as follows M4X10 M4X10 M4X10 M4X10 200mm 100mm ...

Page 10: ... input 3 4 input 5 digital audio output input AC Power Source 6 input output S PDIF SCART L R AUDIO VIDEO 7 input USB input 8 9 HDMI2 with ARC input 10 11 12 13 input HDMI1 COMMON INTERFACE CI PC AUDIO input analogue audio output input HEADPHONE input VGA 14 input RF Introduction Front control panel EN 9 AC INPUT 100 240V 50 60Hz YPbPr VIDEO L R SPDIF OUTPUT SCART 2 3 1 4 6 5 7 8 9 11 12 13 14 10 ...

Page 11: ...nnecting to your Haier TV G Green Y B Blue Pb Cb W White AUDIO L R Red AUDIO R Pr Cr Y Yellow VIDEO EN 10 Amplifier AC INPUT 100 240V 50 60Hz YPbPr VIDEO L R SPDIF OUTPUT SCART G R B CVBS DVD Player or other machine with YPbPr YCbCr COMMON INTERFACE CI VGA RF USB HDMI2 HDMI1 HEADPHONE PC AUDIO COMMON INTERFACE CI ...

Page 12: ...o R white red on the TV to the DVD player or games console etc To select the device connected with the cable press the SOURCE button on the remote and use the keys to select COMPONENT and press the OK button Option 5 VGA 15pin Sub D Connect a VGA cable not supplied from the VGA socket on the TV to the PC Laptop To select the PC Laptop connected with the VGA cable press the SOURCE button on the rem...

Page 13: ...e provider to get more information about the modules and subscription Please noted that CA modules and smart cards are neither supplied nor optional accessories from us COMMON INTERFACE Introduction EN 12 Channel Picture Audio Clock Setup Lock Auto Scan Signal Information Software Update USB Manual Scan Program Edit Common Interface MENU Move OK OK Common Interface option CAM Removed CAM Inserted ...

Page 14: ...ie Next File 27 Teletext Yellow Button USB Movie Previous File 28 USB STOP 29 USB PAUSE 30 START RECORD 31 UP DOWN LEFT RIGHT Cursor Press to navigate your selection 32 Fav To access your favourite channels list in TV or DTV mode 33 Select Programme Press Button to select the next or previous TV channel 34 GUIDE Press to display electronic programme guide in TV mode 35 Q View To access the previou...

Page 15: ...ication appears top left To freeze the page To display or hide the concealed information games solutions The user can set four favorite pages to be directly linked to the four color keys While list mode is activated it is not possibility to use TOP or FLOF navigation with the colorkeys The favorite page numbers should be stored and restored to from nonvolatile memory for each channel by the system...

Page 16: ...TV ATV Antenna Type Air First Time Setup OSD Language English Mode Setting Home Mode Country Germany Start Auto Scan DTV ATV Antenna Type Cable Cable Quick 3 Channel tuning will commence This operation may take up to 6 minutes The display will show the progress of the tuning and the number of channels found 4 If you want to skip the DTV tuning press the MENU button to interrupt the tuning half way...

Page 17: ...g DVB C 1 Press the MENU button and then press the buttons to select the CHANNEL menu and then press the OK button 2 Press the buttons to select Auto Tuning and then press the OK button select Antenna Type to cable mean DVBC 3 Press the button and then press the buttons to select the country you will operate the TV Channel Picture Audio Clock Setup Lock Antenna Type Cable Country Germany Mode DTV ...

Page 18: ... and then press the buttons to select the CHANNEL menu and then press the OK button If you select Cable in Auto scan you will enter DVBC manual scan menu Channel Picture Audio Clock Setup Lock Frequency 474000K Symbol Rate 6875K Modulaton Auto Start MENU Move OK OK 2 The CADTV Manual Tuning screen will pop up Press the buttons to select Frequency Symbol ks s QAM Type QAM press Start to commence th...

Page 19: ...nnel you highlighted SKIP Press the Yellow Button to select the Skip function and a SKIP icon will be displayed next to the program and it will be skipped when changing the channel MOVE Press the Green Button to highlight the select the channel you want to move An icon will display ahead the channel number Then press the Buttons to a new position and press the Green Button to confirm Rename For AT...

Page 20: ...u forget the password you can use the super password 9443 Block program Press to choose the program press teletext green button to block the program If you want unblock the program pls enter the main menu input the password then press green button again Parental guidance Press to choose rating Timeshift Record Time To set the max Timeshift Record Time Auto Standby 4hr To set the unit to standby af...

Page 21: ...nd volume will be mute there will be no display however the unit will be on You can press the STANDBY Button to turn the picture and volume back on Reminder Blue Button In the EPG Menu press the BLUE Button to set a program reminder The below Reminder Menu will then be displayed and you can use the or Buttons to set the program reminder details You will be able to set reminder to occur once Daily ...

Page 22: ... be saved in the folder USB record on the device You can play it in PVR Setting Menu and in File manager sub menu Recording Recorded Time 00 00 40 Available Time 25 Minute To conceal or reveal the menu press the REC Button again To stop recording press the Stop Button or move the cursor to select the Stop option when the above menu is displayed and then follow the pop up guide You may also enter t...

Page 23: ...can play ts files on a computer or laptop with the correct software Refer to the Internet or or an IT supplier more information about the most appropriate software Caution Haier does not take any responsibility for any software downloaded by any customer or retailer and may contain viruses or for any malfunction resulting of installing the software The customer uses it at their own risk Provide li...

Page 24: ...OK Enter Exit Quick Menu Media Pad PHOTO MUSIC TEXT MOVIE Haier Innovation Life Basic Function screen When photos are playing press Press Play Pause key on the remote control to play or pause Music 1 1 Select OK Enter Exit Quick Menu Media Pad Title Album Artist Track Year 2010 09 30 1 2 10547672 PLAY 00 00 53 00 00 00 10547672 mp3 14953359 mp3 USB1 Music key on the remote control a help bar will ...

Page 25: ...ss PLAY key to play normally Press Back ground music Left Right key on the remote control to select this function press ok key to turn on off Press Set A Left Right key on the remote control to select this function press ok key to set A and B the film will circulating play in the time of A to B Press Zoom in Left Right key on the remote control to select this function press ok key to enlarge pictu...

Page 26: ... Mute Power cord is not inserted Power switch is not opened Contrast and brightness volume setup Press standby key on the remote control for inspecting No colour Normal audio Colour control Picture breaking up Normal audio or weak retune channel No colour Noise TVsystem Normal audio antenna position direction or connection Trouble phenomenon Symptom Ghost Normal audio Change aspect to zoom There i...

Page 27: ...the sequence below for all input sources ATV DTV SCART HDMI 1 and 2 as each input source is controlled separately Press TV Menu button Press Right Arrow to access Picture sub menu Press Down Arrow to select Aspect Ratio Select Auto Press Exit Repeat for all input sources I have just plugged in a DVD player or another item into my TV and it doesn t work This is applicable to any item of equipment p...

Page 28: ...I plug should be very close or touching the body of the TV or component When plugging in any HDMI cables you may experience problems if the HDMI cables are plugged in when the TV or the other component is switched on Always switch off both the TV and the component you are plugging in If you have checked the plugs and sockets switch off the TV and whatever you have plugged in to the TV and then swi...

Page 29: ... When current source is ATV AV SCART scart output signal is ATV 2 When current source is DTV there will be no SCART output signal 3 Other source have no SCART output signal Connectivity 2 HDMI sockets 1 SCART socket PC input socket Component video socket Composite 1 USB port 1 Headphone port 1 port SPDIF Supported Systems PAL SECAM Storage channel number 1000 DTV 100 ATV TV RF 75Ω Imbalance AV Vid...

Page 30: ......

Page 31: ...Bitte lesen Sie diese Bedienungsanleitung vor der Inbetriebnahme des Geräts sorgfältig durch und bewahren Sie diese für späteres Nachschlagen auf LCD Fernseher mit LED Hintergrundbeleuchtung LE32C800C ...

Page 32: ...DTV Aufnahme 21 TimeShift Funktion 22 USB Media Player 23 Störungserkennung 05 Störungserkennung 26 Spezifikationen 29 Willkommen Wichtige Informationen 2 2 Sicherheitshinweise Warnhinweise 3 4 Parameter Standfuß montieren 02 Einleitung 5 7 Wandmontage Vorderes Bedienfeld 8 9 TV Anschlussfeld 9 Fernseher anschließen Common Interface 10 12 Fernbedienung 03 Fernbedienung 13 Installation 04 Bedienung...

Page 33: ... MIT PROBLEMEN UND FRAGEN ZUR WARTUNG AN DEN KUNDENDIENST DER BLITZ IM GLEICHSEITIGEN DREIECK BEDEUTET DASS IM GERÄT HOCHSPANNUNGSGEFAHR BESTEHT DAS AUSRUFUNGSZEICHEN IM GLEICHSEITIGEN DREIECK BEDEUTET DASS WICHTIGE WARTUNGS UND BEDIENUNGSHINWEISE IN DER BEDIENUNGSANLEITUNG GEFUNDEN WERDEN VORSICHT ZUR VERMEIDUNG VON STROMSCHLAG UND FEUER SETZEN SIE DEN FERNSEHER KEINER FEUCHTIGKEIT AUS REINIGEN S...

Page 34: ...nicht auf einem Kissen Sofa oder ähnlichen Flächen ab Stellen Sie das Gerät nicht auf einem unstabilen Wagen Aufsteller Stativ Tisch oder einer Halterung ab Es kann herunterfallen und Verletzungen und Schäden verursachen Stellen Sie keine schweren oder scharfkantigen Gegenstände auf dem Gerät ab Ziehen Sie nach der Benutzung den Netzstecker Entsorgen Sie Batterien umweltgerecht WARNUNG Batterien o...

Page 35: ...ter dem Fernseher ein Stehen Sie nicht auf dem Fernseher lehnen Sie sich nicht gegen den Fernseher stoßen Sie ihn nicht an Achten Sie auch besonders auf Kinder Der Fernseher kann schwere Verletzungen und Schäden verursachen wenn er umfällt Vorsicht Stellen Sie das Gerät nicht auf einem unstabilen Wagen Aufsteller Stativ Tisch oder einer Halterung ab Es kann herunterfallen und Verletzungen und Schä...

Page 36: ...CI x 1 USB Port x 1 RF Co Ax x 1 Komposit Videoeingang 350 YPbPr 400 Kopfhörerausgang x 1 S PDIF x 1 Machen Sie sich nicht an Bauteilen im Fernsehgerät oder an irgendwelchen anderen Einstellungssteuerungen zu schaffen die nicht in diesem Handbuch beschrieben sind Alle LED Fernsehgeräte sind elektrische Hochspannungsgeräte Wenn Sie Staub oder Wassertropfen von dem Bildschirm oder dem Gehäuse oder u...

Page 37: ...mingtabelle PC 3 5 1024x768 1280x1024 60 60 1 640x480 60 31 47 2 800x600 60 37 88 48 36 63 98 Auflösung V Freq kHz H Freq kHz 4 1360x768 60 47 7 Einleitung De LCD Fernseher mit LED Hintergrundbeleuchtung DE 6 ...

Page 38: ... Sie auf der Rückseite des Fernsehers ausreichend Platz zur Ventilation Hinweis Der TV Standfuß ist nicht schwenkbar Vermeiden Sie besonders warme Standorte um einen Hitzestau im Gerät und vorzeitige Schäden zu vermeiden Einleitung DE 7 LCD Fernseher mit LED Hintergrundbeleuchtung 1 Legen Sie den Fernseher mit dem Bildschirm auf eine flache Arbeitsfläche Legen Sie ein Tuch unter um den Bildschirm ...

Page 39: ...ildschirm auf eine flache Arbeitsfläche Legen Sie ein Tuch unter um den Bildschirm zu schützen 3 Schrauben Sie den Fernseher mit vier vorgesehenen Schrauben an eine VESA Wandhalterung beides nicht mitgeliefert Einleitung Dieser Fernseher kann wie folgt an der Wand montiert werden De LCD Fernseher mit LED Hintergrundbeleuchtung DE 8 M4X10 M4X10 M4X10 M4X10 200mm 100mm ...

Page 40: ... Netzteil 6 S PDIF SCART L R AUDIO VIDEO 7 USB AC INPUT 100 240V 50 60Hz YPbPr VIDEO L R SPDIF OUTPUT SCART 2 3 1 4 6 5 7 8 9 11 12 13 14 10 8 9 HDMI2 mit ARC 10 11 12 13 HDMI1 COMMON INTERFACE CI PC AUDIO AnalogAudioAusgang Kopfhörerausgang HEADPHONE VGA 14 ANTENNE Kabel Seitliches Bedienfeld Einleitung SchaltetdenFernseherindenStandby Betrieb Eingang Eingang Eingang Eingang Ausgang Eingang Einga...

Page 41: ...PUT 100 240V 50 60Hz YPbPr VIDEO L R SPDIF OUTPUT SCART G R B CVBS DVD Player oder anderes Gerät mit YPbPr YCbCr CVBS DVD Playeroderanderes GerätmitCVBS S Video Anschließen des Haier Fernsehers LCD Fernseher mit LED Hintergrundbeleuchtung DE 10 Einleitung De VGA RF USB HDMI2 HDMI1 HEADPHONE PC AUDIO COMMON INTERFACE CI ...

Page 42: ...abel angeschlossene Gerät auszuwählen drücken Sie die SOURCE Taste auf der Fernbedienung und verwenden Sie die Tasten um auszuwählen Drücken Sie sodann die Taste OK Option 5 VGA 15pin Sub D Schließen Sie ein VGA Kabel nicht mitgeliefert über die VGA Buchse des Fernsehers an den PC Laptop an Um den mit dem VGA Kabel angeschlossenen PC Laptop auszuwählen drücken Sie die SOURCE Taste auf der Fernbedi...

Page 43: ...e Meldung wird angezeigt wenn das CI Modul erkannt wird Warten Sie einen Moment ab bis die Karte aktiviert ist Wählen Sie im MENU den Unterpunkt Kanäle aus und navigieren mit zur Auswahl option Common Interface Detaillierte Informationen zur benutzten CI Karte werden angezeigt Drücken Sie OK um das Kartenmenü aufzurufen Finden Sie detaillierte Anleitungen in der Bedienungsanleitung des Moduls Nach...

Page 44: ...e Funktion 24 Teletext Halten 25 Teletext Untercode Teletext Unterseite 26 Teletext Taste Blaue Taste USB Funktion Nächste Datei 27 Teletext Taste Gelbe Taste USB Funktion Vorherige Datei 28 USB Funktion STOPP 29 USB Funktion ABSPIELEN PAUSE 30 AUFNAHME STARTEN 31 Navigationstasten NACH OBEN NACH UNTEN NACH LINKS NACH RECHTS Drücken Sie die Tasten um zu Ihrer Auswahl zu gelangen 32 Favoriten Zugri...

Page 45: ... Mit dieser Taste blättern Sie um oder halten Sie die Unterseite Die Seitenzahl wird oben links im Bild angezeigt Mit dieser Taste halten Sie eine Seite sie wird nicht umgeblättert Versteckte Informationen anzeigen oder verbergen Spielauflösungen Mit den vier Farbtasten können vier Favoritenseiten markiert werden In diesem Modus ist eine weitere Navigation mit den Farbtasten nicht möglich Mit dies...

Page 46: ...pringen der DTV Kanalsuche drücken Sie MENU Damit gelangen Sie direkt zur ATV Kanalsuche 5 Nachdem die Suche abgeschlossen ist werden die Kanäle in einer vorgegebenen Reihenfolge angeordnet Wenn Sie Kanäle überspringen möchten ändern Sie die voreingestellte Reihenfolge oder nennen Sie die Kanäle um wählen Sie Programme bearbeiten im Kanalmenü aus 1 1 Automatische Kanalsuche DVB T 1 KANALMENÜ 1 Drü...

Page 47: ...und die Anzahl der gefundenen Kanäle 6 Zum Überspringen der DTV Kanalsuche drücken Sie MENU Damit gelangen Sie direkt zur ATV Kanalsuche Wiederholen Sie den obigen Schritt wenn Sie auch die ATV Kanalsuche überspringen möchten Sie werden beim nächsten Einschalten an die Installation erinnert falls noch kein Kanal eingestellt ist 7 Nachdem die Suche abgeschlossen ist werden die Kanäle in einer vorge...

Page 48: ...dschirm ATV Manuelle Kanalsuche ATV Manual Tuning wird angezeigt Drücken Sie zur Auswahl von Frequenz Symbol ks s QAM Type QAM und dann Start um mit der Kanalsuche zu beginnen Wenn das Signal gefunden wurde wird das Bild und die Signalstärke auf dem Bildschirm angezeigt 3 Drücken Sie die Taste MENU um zum Hauptmenü zurückzukehren Drücken Sie die Taste EXIT um das Menü zu verlassen 3 ATV Manuelle K...

Page 49: ...n dann FAV 6 Signalinformationen nur DTV Drücken Sie zur Auswahl der Signalinformationen im Menü Kanal Dann drücken Sie OK zur Anzeige der entsprechenden Informationen zum aktuellen Kanal 7 Softwareaktualisierung USB Drücken Sie oder zur Auswahl von Softwareaktualisierung USB im Menü Kanal Dann drücken Sie OK zur Aktualisierung der Software über USB Folgen Sie den Anleitungen zur Aktualisierung de...

Page 50: ...hirmmenüs Rücksetzen auf Werkseinstellungen Drücken Sie oder zur Auswahl von Rücksetzen auf Werkseinstellungen Restore Factory Default und drücken Sie OK um die Erstinstallation durchzuführen Nach der Bestätigung werden alle Einstellungen gelöscht Benutzen Sie diese Funktion nur bei Problemen mit dem Fernseher 2 Zur Deaktivierung der automatischen Abschaltung wählen Sie im Menü Einstellungen Auto ...

Page 51: ...nformationen zum aktuellen Programm anzuzeigen 8 PVR Dateisystem nur DTV Drücken Sie oder zur Auswahl von PVR Dateisystem dann drücken Sie OK zum Aufrufen des Untermenüs und mit oder scrollen Sie durch die Optionen Das EPG Menü Elektronische Fernsehzeitschrift gibt Ihnen eine detaillierte Übersicht über die Sendungen Drücken Sie EPG zur Anzeige eines Pop up Menüs mit Programminformationen des aktu...

Page 52: ...ei Manager Hot key Nach oben Nach unten Auswählen Zurück Beenden EXIT EXIT OK EXIT MENU Geplante Aufnahme Gep p p p p p p pla Standby Wiedergabe Ansicht EXIT Eins löschen Alle löschen EXIT Funktion Informationen zu der aktuellen Abspieldatei Kanalname Programmname Aufnahmezeit Gesamtzeit Beschreibung BBC ONE Olympics 2012 2012 08 09 11 44 00 08 06 Matt Baker and Clare Balding present coverage of t...

Page 53: ...gen Software können Sie ts Dateien auf einem Computer oder Laptop wiedergeben Im Internet oder bei einem IT Anbieter finden Sie weitere Informationen zu geeigneter Software Achtung Haier übernimmt keine Verantwortung für heruntergeladene Software diese kann Viren und Schadprogramme enthalten Die Benutzung erfolgt auf eigene Gefahr und kann die Kopierschutzrechte verletzen Nachstehende Dateitypen k...

Page 54: ...e zu unterbrechen oder fortzusetzen Drücken Sie die linke Pfeiltaste um das vorherige Foto anzuzeigen Drücken Sie die rechte Pfeiltaste um das nächste Foto anzuzeigen Drücken Sie die linke rechte Pfeiltaste zur Auswahl der Funktion dann drücken Sie OK um die Wiedergabe zu beenden und in das vorherige Menü zurückzukehren Drücken Sie OK um die Diashow zu wiederholen Drücken Sie die blaue Taste um im...

Page 55: ...pulen Drücken Sie die Wiedergabetaste um zur Normalwiedergabe zurückzukehren Hintergrundmusik Drücken Sie die linke rechte Pfeiltaste zur Auswahl der Funktion dann drücken Sie OK um die Musik ein oder auszuschalten A B Wiederholung Drücken Sie die linke rechte Pfeiltaste zur Auswahl der Funktion dann drücken Sie OK um die Punkte A und B der Wiederholungsschleife einzustellen Vergrößern Drücken Sie...

Page 56: ...g Deaktivierung des OSD Menüs On Das Einstellungsmenü wird auf dem Bildschirm angezeigt Off Das Einstellungsmenü wird nicht auf dem Bildschirm angezeigt Der Standardwert ist On Bitte beachten Sie Ist das OSD Menü deaktiviert Off so drücken Sie Source 1001 um das Hotel Modusmenü aufzurufen Drücken Sie zum Einstellen der Sperre für den Ein Ausschalter Wählen Sie Off Die Funktion ist deaktiviert Keyp...

Page 57: ...ltet Kontrast und Helligkeit Lautstärke einstellen Drücken Sie STANDBY auf der Fernbedienung keine Farbe normaler Ton Farbe im Bildmodus überprüfen Bildverschwindet normaler Ton oder leise Kanal neu konfigurieren keine Farbe gestört Schlechtes TV Signal normaler Ton Antennenposition ausrichtung oder anschluss Problem Schatten normaler Ton Zoom Ansicht ändern Sie sehen einen schwarzen Balken oben u...

Page 58: ...ENU auf Ihrer Fernbedienung und drücken den Pfeil nach rechts um zum Bild Untermenü zu gelangen Drücken Sie den Pfeil nach unten um den Menüpunkt Bildformat auszuwählen Wählen Sie Auto aus Drücken Sie Ende Wiederholen Sie diese Schritte für alle Signalquellen Ich habe gerade einen DVD Player bzw ein anderes Gerät an meinen Fernseher angeschlossen und es funktioniert nicht Dies gilt für jedes Gerät...

Page 59: ...falls die HDMI Kabel eingesteckt werden wenn der Fernseher oder andere Komponente eingeschaltet ist Schalten Sie immer sowohl den Fernseher als auch die Komponente aus die Sie einstecken möchten Wenn Sie die Stecker und Steckdosen überprüft haben schalten Sie den Fernseher und alles was Sie an den Fernseher angeschlossen haben aus und dann schalten Sie sie wieder ein Ich habe meinen PC an den Fern...

Page 60: ...4 H 264 2 x HDMI 1 x SCART PC Eingang Video Komposit 1 x USB Port 1 x Kopfhörerbuchse 1 x SPDIF Unterstützte Systeme PAL SECAM Kanalspeicher 1000 DTV 100 ATV TV RF 75 Ω asymmetrisch AV Videoeingang 75 Ω 1 V P RCA AV Audioeingang 20 kΩ 500 mB RMS YPbPr HDMI Videoeingang 480i 480p 576i 576p 720p 1080i 1080p Komponenten Zusätzliche Funktionen Klangqualität Digitale Funktionen Leistungsaufnahme Stand ...

Page 61: ...Lisez attentivement ces instructions avant d utiliser l appareil et conservez les pour toute référence ultérieure Téléviseur à écran plat LED GUIDE D UTILISATION LE32C800C ...

Page 62: ...pannage 25 Spécification 28 Bienvenue Information Importante 01 Avertissment de sécurité 2 2 Instruction de sécurité Avertissements et mise en garde 3 4 Principales Caractéristiques Installation du socle TV 02 Introduction 5 7 Installation Murale Panneau de commande avant et latéral 8 9 Prises arrières 9 Connexion du Téléviseur Interface commune CI 10 12 Présentation de la Télécommande 03 Télécomm...

Page 63: ...es de votre modèle Tout démontage sans approbation préalable du présent produit est strictement interdit elle entrainerait l annulation de la garantie Haier AVERTISSEMENT pour éviter tout risque d incendie tenez bougies et autres sources de flammes ouvertes à distance du produit en toutes circonstances AVERTISSEMENT afin d éviter tout risque d incendie ou de décharge électrique n installez jamais ...

Page 64: ...mber causant des dommages ou des blessures Ne placez jamais d objets lourds ou tranchants sur le panneau ou le cadre Débranchez la prise de courant lorsque l appareil n est pas utilisé Il faut tenir compte de la protection de l environnement lors de l élimination des piles AVERTISSEMENT Les piles pile ou batterie ou bloc batterie ne doivent pas être exposées à une chaleur excessive telle que rayon...

Page 65: ...mentation sous le récepteur de télévision Attention Ne montez jamais sur le téléviseur ne vous appuyez pas dessus et ne le poussez pas brusquement sur son socle Prêtez une attention particulière aux enfants Risque de blessures graves en cas de chute Attention Ne placez pas le téléviseur sur un chariot une étagère ou une table instable Le téléviseur risque de tomber et peut provoquer des blessures ...

Page 66: ... bouton de commande du téléviseur non décrit dans ce manuel Tous les téléviseurs à LED sont des équipements de haute tension électrique Il faut débrancher le téléviseur avant de nettoyer de la poussière ou des gouttes d eau sur l écran du boîtier ou autour de l un des boutons ou des connecteurs Utilisez un chiffon doux et sec et non pelucheux pour essuyer le téléviseur Pendant les orages débranche...

Page 67: ...MODE PRÉDÉFINI PC 3 5 1024x768 1280x1024 60 60 1 640x480 60 31 47 2 800x600 60 37 88 48 36 63 98 RESOLUTION V Fréq KHz H Fréq KHz 4 1360x768 60 47 7 Introduction FR Téléviseur à écran plat LED FR 6 ...

Page 68: ...révoyez suffisamment d espace entre le téléviseur et le mur pour permettre la ventilation Évitez les endroits trop chauds pour éviter tout dommage possible à l enceinte ou une défaillance prématurée des composants S il vous plaît ne pas tourner ce téléviseur Son socle n est pas pivotant Introduction FR 7 Téléviseur à écran plat LED 1 Placez le téléviseur sur une surface plane avec l écran orienté ...

Page 69: ...léviseur LCD LED sur une surface solide Mettez souple à l avant de l écran pour le protéger contre tout dommage une protection 3 Utilisez les quatre vis fournies pour fixer le téléviseur sur un support mural non inclus par les quatre trous VESA standard à l arrière du téléviseur Introduction Ce téléviseur peut être accroché au mur en suivant la procédure suivante FR Téléviseur à écran plat LED FR ...

Page 70: ...L VOL Pourréglerleniveausonore DansMENU permetderéglerl élémentsélectionné 5 1 YPbYr 2 3 4 5 Sortie audio numérique Entrée Sourcesd alimentationCC 6 S PDIF Peritel AudioGauche Droite Vidéo 7 USB 8 9 HDMI2 avec ARC 10 11 12 13 HDMI1 COMMON INTERFACE CI Audio PC SortieCasqueaudioAnalogique HEADPHONE EntréeVGA 14 ANT Panneau frontal Introduction Entrée Entrée Entrée Entrée Sortie Entrée Entrée Entrée...

Page 71: ...PUT 100 240V 50 60Hz YPbPr VIDEO L R SPDIF OUTPUT SCART G R B Introduction Téléviseur à écran plat LED FR 10 CVBS lecteur DVD ou autre appareil équipé d YPbPr YCbCr CVBS lecteur DVD ou autre appareil équipé de CVBS S Vidéo Connexion à votre TV Haier FR COMMON INTERFACE CI VGA RF USB HDMI2 HDMI1 HEADPHONE PC AUDIO COMMON INTERFACE CI ...

Page 72: ...ez un câble VGA non fourni du connecteur VGA du téléviseur au PC ordinateur portable Remarque VGA transmet uniquement de la vidéo Pour l audio de votre PC ordinateur portable vous devez connecter un câble audio séparé du PC connecteur 3 5 mm à la prise casque de votre PC ordinateur portable connecteur 3 5 mm Option 6 USB La plupart des clés USB peuvent être connectés à votre téléviseur et certains...

Page 73: ... téléviseur Allumez le téléviseur le message ci dessous s affiche si un module est détecté Attendez quelques instants jusqu à ce que la carte soit activée CAM Appuyez sur la touche MENU puis sur la touche pour sélectionner l option Interface Commune Des informations détaillées sur la carte CI en cours d utilisation seront affichées Appuyez sur OK pour accéder au menu de la carte Reportez vous au m...

Page 74: ...ne fichier précédent USB 28 Arrêt USB 29 PLAY PAUSE Lecture Pause 30 DEMARRER L ENREGISTREMENT 31 TOUCHES DE DEPLACEMENT HAUT BAS DROITE GAUCHE Appuyez pour atteindre votre sélection 32 Fav Pour accéder à votre liste de chaînes favorites en mode TV ou DTV 33 Sélection de programme Utilisez pour sélectionner la chaîne suivante ou précédente 34 GUIDE Appuyez pour afficher le guide électronique des p...

Page 75: ...t à gauche Pour figer la page Pour afficher ou masquer les informations cachées solutions de jeux L utilisateur peut définir quatre pages préférées à être directement liées aux quatre touches de couleur Lorsque que le mode liste est activé il n est pas possible d utiliser la navigation Haut et Bas avec les touches de couleur Les numéros des pages préférées sont conservés et restaurés dans de la mé...

Page 76: ...echerche terminée les chaînes seront disposées dans un ordre préétabli Si vous souhaitez ignorer des chaînes modifier l ordre des chaînes préréglées ou les renommer sélectionnez Programme Edit Modifier les programmes dans le menu Channel 1 1 Recherche automatique DVB T 1 MENU Chaîne 1 Appuyez sur la touche MENU puis utilisez les touches pour sélectionner le menu puis appuyez sur la touche OK ou la...

Page 77: ...înes seront disposées dans un ordre préétabli Si vous souhaitez ignorer des chaînes modifier l ordre des chaînes préréglées ou les renommer sélectionnez Programme Edit Modifier les programmes dans le menu fois que vous Chaîne Téléviseur à écran plat LED FR 16 Remarque UTILISATION 6 7 8 La recherche des chaînes démarre Cette opération peut prendre jusqu à 6 minutes L écran affiche l état d avanceme...

Page 78: ...sitionne sur 1 Appuyez sur la touche MENU puis utilisez les touches pour sélectionner le menu puis appuyez sur la touche OK 2 Utilisez les touches pour sélectionner DTV puis appuyez sur la touche OK si vous sélectionnez Air dans vous entrez dans le menu recherche manuelle DVB T chaîne Recherche manuelle recherche automatique 3 L écran DTV recherche manuelle DTV s affiche Utilisez les touches pour ...

Page 79: ...électionnée mise en surbrillance Ignorer Appuyez sur la touche Jaune pour sélectionner la fonction Ignorer un symbole Ignorer sera affiché à côté du programme qui sera ignoré lors du changement de chaîne Déplacer Appuyez sur la touche Verte pour mettre en surbrillance la chaîne sélectionnée que vous souhaitez déplacer Un symbole apparaît devant le numéro de la chaîne Utilisez les touches pour atte...

Page 80: ...élément du Menu est le menu Vous pouvez régler l heure l heure de mise en marche arrêt l heure de veille automatique etc Utilisez les touches pour se déplacer appuyez sur OK pour régler Horloge Pour retourner à l arrêt automatique après 4 heures répéter ce qui précède en utilisant la touche Gauche pour sélectionner YES OUI Dans le système de fichiers PVR vous pouvez configurer le disque USB pour P...

Page 81: ...NT Le formatage de l appareil USB supprime tous les fichiers stockés sur l appareil Si vous avez configuré un enregistrement programmé votre téléviseur s allume automatiquement pour enregistrer le programme et s éteint automatiquement une fois l enregistrement terminé Pendant un enregistrement programmé il n y aura pas d image et le son sera coupé pas d affichage mais l appareil sera allumé Vous p...

Page 82: ...Cela peut être dû à la connexion d un câble de rallonge USB au lieu d une connexion directe téléviseur via un câble USB 3 Les dispositifs USB ne sont pas tous compatibles Voici une liste des lecteurs USB recommandés Les modèles qui ne sont pas listés peuvent être compatibles mais ce n est pas garanti La liste de dispositifs USB supportés est la même que celle de la fonction Timeshift lecture décal...

Page 83: ...ui s affichent droite Veillez ce que l appareil de stockage utiliser pour enregistrer soit connecté entre l USB située l arrière du téléviseur et qu il est compatible pour l enregistrement Si votre appareil de stockage n est pas compatible il vous sera demandé de le formater Appuyez sur la touche Index pour accéder au menu PVR Setting Configuration PVR et sectionnez Device List Liste d appareils p...

Page 84: ...a touche Droite de la télécommande pour afficher la photo suivante Utilisez les touches Gauche Droite de la télécommande pour sélectionner cette fonction appuyez sur OK pour arrêter la lecture et retourner au menu précédent Appuyez sur la touche OK pour répéter une fois ou afficher toutes les images en diaporama Appuyez sur la touche Bleue pour accéder au menu rapide et régler les intervalles de t...

Page 85: ...r avancer rapidement Appuyez sur la touche PLAY pour lire normalement Musique de fond Utilisez les touches Gauche Droite de la télécommande pour sélectionner cette fonction appuyez sur OK pour activer désactiver Répéter A Utilisez les touches Gauche Droite de la télécommande pour sélectionner cette fonction appuyez sur OK pour fixer A et B Zoom avant Utilisez les touches Gauche Droite de la téléco...

Page 86: ...L interrupteur d alimentation n est pas ouvert Configuration du contraste luminosité volume Appuyez sur la touche standby veille de la télécommande pour inspection Pas de couleur Audio norma Contrôle des couleurs Rupturedel image Audio normal ou faible Recherchez le canal Pas de couleur Bruit Système TV Audio normal position de l antenne direction ou connexion Symptôme du problème fantôme Audio no...

Page 87: ...e ci dessous pour toutes les sources d entrée ATV DTV Péritel HDMI 1 et 2 car chaque source d entrée est contrôlée séparément Appuyez sur la touche TV Menu Appuyez sur la flèche droite pour accéder au sous menu Image Appuyez sur la flèche vers le bas pour sélectionner Format d image Sélectionnez Auto Automatique Appuyez sur Quitter Répétez l opération pour toutes les sources d entrée Format d imag...

Page 88: ...s problèmes lors du branchement des câbles HDMI s ils sont branchés lorsque le téléviseur ou composant est allumé Eteignez toujours le téléviseur et le composant que vous branchez Si vous branchez des fiches et des prises éteignez le téléviseur et tout ce que vous avez branché à ce dernier puis rallumez les J ai connecté mon PC au téléviseur Pas de son Si en connectant votre PC ou ordinateur porta...

Page 89: ...I Compatible Audio Description 0 30W Décodeur Tuner DTV DVB T DVB C Modulation QAM 16 32 64 128 256 MPEG2 MPEG4 H 264 HD Ready Taille d écran 81cm Résolution 1366x768 pixels 50Hz 2 prises HDMI 1 prise péritel Prise d entrée PC Prise vidéo composante Composite 1 port USB 1 Prise casque 1 Prise SPDIF Systèmes supportés PAL SECAM Mémorisation des numéros des chaînes 1000 DTV 100 ATV TV RF 75Ω asymétr...

Page 90: ......

Page 91: ...Lees deze handleiding zorgvuldig door alvorens het toestel te gebruiken en bewaar het voor latere naslag LED TV Gebruiksaanwijzing backlight LE32C800C ...

Page 92: ...ler 23 Oplossen van problemen 05 Oplossen van problemen 25 Specificatie 28 PICTURE MENU 18 Welkom Belangrijke informatie 01 Veiligheid en waarschuwingen 2 2 Mededeling over de veiligheid Waarschuwingen en voorzichtigheid 3 4 Belangrijkste kenmerken Montagewijze van het voetstuk 02 Introductie 5 7 Richtlijnen voor monteren aan een muur Het voorpaneel 8 9 AV verbindingen 9 Het aansluiten van uw tv C...

Page 93: ...KLANTENDIENST VOOR EVENTUELE PROBLEMEN ER BEVINDT ZICH EEN BLIKSEMSCHICHT PIJLSYMBOOL IN DE DRIEHOEK DIT SYMBOOL GEEFT AAN DAT ER ZICH EEN HOOG VOLTAGE BINNENIN BEVINDT HET KAN GEVAARLIJK ZIJN OM ELKE VORM VAN CONTACT TE MAKEN MET DE ONDERDELEN BINNENIN DIT PRODUCT ER BEVINDT ZICH EEN UITROEPTEKEN IN DE DRIEHOEK DIT SYMBOOL ATTENDEERT U EROP DAT ER BELANGRIJKE LITERATUUR MEEGELEVERD IS BIJ DIT PRO...

Page 94: ...len wat resulteert in mogelijke schade of mogelijk letsel Plaats nooit zware of scherpe voorwerpen op het paneel of frame Haal de stekker uit het stopcontact wanneer het apparaat niet in gebruik is Er moet speciale aandacht besteed worden aan milieu aspecten bij inzameling van batterijen WAARSCHUWING de batterijen of accu s mogen niet blootgesteld worden aan extreme hitte zoals zonlicht vuur en de...

Page 95: ...smaatregelen Leun of sta nooit op de televisie of standaard of druk er niet plotseling tegenaan Besteed speciale aandacht aan kinderen Een ernstig letsel kan veroorzaakt worden indien het toestel valt Voorzorgsmaatregelen Plaats uw televisie niet op een onstabiel karretje standaard plank of tafel Een ernstig letsel aan een individu of schade aan de televisie kan veroorzaakt worden indien het valt ...

Page 96: ...zijn hoogspanning elektrische apparatuur Wanneer u afstoft of er water aan het scherm de kast rond de knoppen of aansluitingen komt moet het netsnoer uit het stopcontact worden verwijderd Veeg de TV af met een zachte droge stofvrije doek Ontkoppel het netsnoer en de antenne antennekabel tijdens onweer om schade aan uw TV en eventuele andere aangesloten apparaten te voorkomen Alle reparaties aan de...

Page 97: ...ORAF INGESTELD PC 3 5 1024x768 1280x1024 60 60 1 640x480 60 31 47 2 800x600 60 37 88 48 36 63 98 RESOLUTIE V Freq KHz H KHz Freq 4 1360x768 60 47 7 Introductie DU LED backlight TV Gebruiksaanwijzing DU 6 ...

Page 98: ...ort Laat voldoende ruimte tussen de tv en de muur om ventilatie mogelijk te maken Deze televisie niet draaien a u b Vermijd uitzonderlijk warme plaatsen om schade aan de kast of voortijdig falen van een component te voorkomen Introductie DU 7 LED backlight TV Gebruiksaanwijzing 1 Plaats de tv met het scherm naar beneden op een vlakke ondergrond Gebruik een doek om het scherm te beschermen Zoek het...

Page 99: ...oetstuk in de richting van de aangegeven pijl en zet deze vervolgens vast met drie schroeven 3 Gebruik de vier meegeleverde schroeven om de tv vast te zetten aan de wandbeugel niet meegeleverd via de vier VESA standaardgaten aan de achterzijde van de televisie Deze televisie kan als volgt aan de muur gemonteerd worden Introductie DU LED backlight TV Gebruiksaanwijzing DU 8 M4X10 M4X10 M4X10 M4X10 ...

Page 100: ...r 2 3 4 5 Digitale audio uitgang Ingang DC vermogen 6 S PDIF PERITEL L Raudio VIDEO 7 USB AC INPUT 100 240V 50 60Hz YPbPr VIDEO L R SPDIF OUTPUT SCART 2 3 1 4 6 5 7 8 9 11 12 13 14 10 8 9 HDMI2 met ARC 10 11 12 13 HDMI1 GEMEENSCHAPPELIJKE IN INTERFACE CI PC AUDIO analogeaudio uitgang Hoofdtelefoon VGA INGANG 14 ANT Het voorpaneel Ingang Introductie Ingang Ingang Ingang uitgang Ingang Ingang Ingang...

Page 101: ...r AC INPUT 100 240V 50 60Hz YPbPr VIDEO L R SPDIF OUTPUT SCART G R B CVBS DVD speler of ander apparaat met YPbPr YCbCr CVBS DVD spelerofander apparaatmetCVBS S Video Aansluiten op uw Haier TV Introductie DU LED backlight TV Gebruiksaanwijzing DU 10 COMMON INTERFACE CI VGA RF USB HDMI2 HDMI1 HEADPHONE PC AUDIO COMMON INTERFACE CI ...

Page 102: ...e afstandsbediening om het apparaat te selecteren dat met de COMPONENT kabel is aangesloten gebruik de toetsen om COMPONENT te selecteren en druk op de OK toets Optie 5 VGA 15pins Sub D Sluit een VGA kabel niet meegeleverd aan vanaf de VGA aansluiting op de TV naar de PC Laptop Druk op de SOURCE toets op de afstandsbediening om de PC Laptop te selecteren dat met de VGA kabel is aangesloten gebruik...

Page 103: ...n op het scherm zal een bericht verschijnen indien de CA module gedetecteerd wordt Wacht enkele ogenblikken tot de kaart geactiveerd is Druk op de MENU toets en vervolgens op de toets om de Common Interface optie te selecteren toetsen om de CI informatie optie te selecteren Gedetailleerde informatie over de CI kaart die in gebruik is wordt weergegeven Druk op de OK toets om het kaartmenu te openen...

Page 104: ... vorig bestand 28 USB STOP 29 USB AFSPELEN PAUZEREN 30 START OPNEMEN 31 Cursor OMHOOG OMLAAG LINKS RECHTS Indrukken om uw selectie te navigeren 32 Fav Om uw favoriete kanalenlijst in de TV of DTV modus te benaderen 33 Selecteer programma Druk op de knop om het volgende of vorige TV kanaal te selecteren 34 GIDS Indrukken om het elektronische programmagids in de TV modus weer te geven 35 Q View Om h...

Page 105: ...ame hervat De aanduiding verschijnt links bovenaan De pagina bevriezen Het weergeven of verbergen van informatie oplossingen bij spelletjes De gebruiker kan vier favoriete pagina s direct koppelen aan de vier gekleurde toetsen Terwijl de lijst geactiveerd is is het niet mogelijk om met TOP of FLOF te navigeren met de kleurtoetsen De favoriete paginanummers moeten opgeslagen en hersteld worden van ...

Page 106: ...chtstreeks naar ATV afstemmen 5 Nadat het afstemmen voltooid is zijn de kanalen in een vooraf ingestelde volgorde gerangschikt Als u kanalen wilt overslaan wijzig de vooraf ingestelde volgorde of hernoem kanalen selecteer Program Edit onder het Channel menu 1 1 Automatisch afstemmen DVB T 1 KANALENMENU 1 Druk op de MENU toets en druk vervolgens op de toetsen om het Channel menu te selecteren en dr...

Page 107: ...ngschikt Als u kanalen wilt overslaan wijzig de vooraf ingestelde volgorde of hernoem kanalen selecteer Program Edit onder het Channel menu 4 Druk in het Mode menu op de toetsen om ATV DTV DTV ATV te selecteren 5 Het afstemmen van de kanalen zal beginnen Deze bewerking kan tot 6 minuten duren De display zal de voortgang van het afstemmen en het aantal gevonden kanalen weergeven Als u het DTV afste...

Page 108: ...matige scanmenu van DVBC 2 Het CADTV Manual Tuning scherm zal verschijnen Druk op de toetsen om Frequency Symbol ks s QAM Type QAM te selecteren en selecteer Start om het zoeken van dat kanaal te beginnen Wanneer het signaal is afgestemd zal het beeld en de signaalsterkte op het scherm worden weergegeven 3 Druk op de MENU toets om naar het hoofdmenu terug te keren 4 Druk op de EXIT toets om het me...

Page 109: ...abel FAV Druk op de FAV toets in plaats van de gekleurde toets om het favoriete kanaal in te stellen Als u de lijst met favoriete kanalen wilt bekijken moet u het Program Edit menu afsluiten en vervolgens op de FAV toets drukken 6 Signaal informatie alleen voor DTV Druk op de toetsen om Signal Information in het Channel menu te selecteren Druk vervolgens op de OK toets om de bijbehorende informati...

Page 110: ...n Restore Factory Default Druk op de toetsen om Restore Factory Default te selecteren en druk op de OK toets om de eerste instellingen te openen Zodra bevestigd worden alle instellingen gewist Dit moet worden gebruikt als u problemen met uw TV ondervindt 2 Om het automatisch uitschakelen te annuleren Selecteer Auto standby 4hr in het Setup menu het TV scherm keert naar het Setup menu terug en de o...

Page 111: ...n het geluid echter uitgeschakeld er zal geen weergave zijn maar het apparaat zal toch ingeschakeld zijn U kunt op de STANDBY toets drukken om het beeld en het geluid weer in te schakelen U kunt op de rode toets drukken om de lijst met geplande programma s weer te geven U kunt ook de programma s verwijderen die u hebt gepland INFO groene toets Druk in het EPG menu op de groene toets om meer inform...

Page 112: ...or het aansluiten van een USB verlengkabel worden veroorzaakt in plaats van de USB direct op de TV aan te sluiten 3 Niet alle USB apparaten zijn compatibel Hieronder is een lijst van aanbevolen USB stations Modellen die niet opgenomen zijn kunnen werken maar dit is niet gegarandeerd De lijst met ondersteunde USB apparaten is dezelfde als die van de tijdverschuivingsfunctie raadpleeg de volgende pa...

Page 113: ...nition TV U kunt ts bestanden op een computer of laptop met de juiste software afspelen Raadpleeg het Internet of een IT leverancier voor meer informatie over de meest geschikte software Voorzichtig Haier neemt geen enkele verantwoordelijkheid voor software gedownload door een klant of leverancier en kan virussen bevatten of kan als gevolg van het installeren van de software storing veroorzaken De...

Page 114: ...uk op de toets op de afstandsbediening om een helpbalk onder het scherm weer te geven Druk op de PLAY PAUSE toets op de afstandsbediening om af te spelen of te pauzeren Druk op de LINKS toets op de afstandsbediening om de vorige foto in te lezen Druk op de RECHTS toets op de afstandsbediening om de volgende foto in te lezen Druk op de LINKS RECHTS toets op de afstandsbediening om deze functie te s...

Page 115: ...d muziek Druk op de LINKS RECHTS toets op de afstandsbediening om deze functie te selecteren druk vervolgens op de OK toets om in uit te schakelen Stel A in Druk op de LINKS RECHTS toets op de afstandsbediening om deze functie te selecteren druk op de OK toets om A en B in te stellen De film zal tussen de tijdspunten A naar B blijven herhalen Inzoomen Druk op de LINKS RECHTS toets op de afstandsbe...

Page 116: ...kelaar staat niet aan Contrast en helderheid volume instellingen zijn geopend Druk vanuit de standby toets op de afstandsbediening om dit te controleren Geen kleur Normale audio Kleurbeheer Steedsverlies vanbeeld Normale audio of zwak Kanaal opnieuw instellen Geen kleur Geluid tv systeem Normale audio Antennepositie richting of aansluiting Probleemsymtoom Wazig Normale audio Aspect wijzigen om te ...

Page 117: ...dat elke bron afzonderlijk wordt gecontroleerd Druk op de Menu toets van de TV Druk op de pijl naar rechts om het submenu van het beeld te openen Druk op de omlaagpijl om hoogte breedteverhouding te selecteren Selecteer Auto Druk op Exit Herhaal dit voor alle ingangsbronnen Ik heb net een DVD speler of een ander apparaat op mijn TV aangesloten en het werkt niet Dit is op alle apparatuur op de TV a...

Page 118: ...eelte van de HDMI stekker moet meestal erg dicht tegen het lichaam van de TV of het onderdeel zijn of raken Wanneer HDMI kabels worden aangesloten kunt u problemen ervaren als de HDMI kabels worden aangesloten terwijl de TV of het andere component is ingeschakeld Schakel altijd de TV en het component uit dat u wilt aansluiten Als u de stekkers en stopcontacten hebt gecontroleerd schakel de TV en w...

Page 119: ...coder DVB T DVB C 16 32 64 128 256 QAM modulatie MPEG2 MPEG4 H 264 2 HDMI aansluitingen 1 SCART aansluiting PC ingangsaansluiting Component Video aansluiting Composiet 1 USB poort 1 Hoofdtelefoonuitgang 1 SPDIF poort Ondersteunde systemen PAL SECAM Opslag aantal kanalen 1000 DTV 100 ATV TV RF 75 Ω ongebalanceerd AV Video ingang 75 Ω 1 V P RCA AV Audio ingang 20 KΩ 500 mB RMS YPbPr HDMI Video ingan...

Page 120: ......

Page 121: ...Lea este manual con atención antes de operar la unidad y consérvelo para referencia futura TV de pantalla plana con retroiluminación LED MANUAL DE INSTRUCCIONES LE32C800C ...

Page 122: ...MAGEN Bienvenidos Información importante 01 Seguridad y advertencias 2 2 Aviso de seguridad Advertencias y precauciones 3 4 Características principales Instruccionessobreelmontajedelsoportebase 02 Introducción 5 7 Pautas de instalación para el montaje en pared Panel frontal 8 9 Conexiones posteriores AV 9 Conexión de su TV Interfaz común 10 12 Mando a distancia 03 Mando a distancia 13 TELETEXTO 14...

Page 123: ...TA TENSIÓN EN SU INTERIOR ES PELIGROSO TENER CUALQUIER TIPO DE CONTACTO CON LAS PIEZAS INTERNAS DE ESTE PRODUCTO UN SIMBOLO DE EXCLAMACIÓN EN EL INTERIOR DE UN TRIÁNGULO ESTE SÍMBOLO LE AVISA QUE SE HA INCLUIDO LITERATURA RELACIONADA CON EL FUNCIONAMIENTO Y CON EL MANTENIMIENTO CON ESTE PRODUCTO PRECAUCIÓN PARA REDUCIR EL RIESGO DE DESCARGA ELÉCTRICA E INCENDIO NO COLOQUE EL TV CERCA DE LAS FUENTE...

Page 124: ... lesiones Nunca coloque objetos pesados o afilados sobre el panel o el marco Desenchufe la alimentación de la toma de corriente cuando no se utilice el aparato Se debe prestar atención a los aspectos medioambientales sobre la eliminación de la batería PRECAUCIÓN La batería batería baterías o pack de baterías no debe exponerse a una temperatura excesiva como la luz solar fuego o similares PRECAUCIÓ...

Page 125: ...ción quede atrapado bajo el televisor Cuidado Nunca se suba ni se apoye ni empuje bruscamente el televisor o su soporte Debe prestar especial atención a los niños Si cayera podría causar serias lesiones Cuidado No coloque su televisor sobre un carrito soporte estantería o mesa inestables Si cayera podría causar serias lesiones personales y daños al televisor Cuidado Cuando el televisor no se vaya ...

Page 126: ...en la PANTALLA o carcasa o alrededor de los botones o conectores debe desconectar el cable de alimentación del conector de alimentación Limpie el TV con un paño suave y seco libre de polvo Durante las tormentas eléctricas desconecte el cable de alimentación y el cable de la antena para evitar daños al TV y a otros dispositivos que estén conectados al mismo Todas las reparaciones al TV deben efectu...

Page 127: ...CIDOS PC 3 5 1024x768 1280x1024 60 60 1 640x480 60 31 47 2 800x600 60 37 88 48 36 63 98 RESOLUCIÓN Frecuencia V KHz Frecuencia H KHz 4 1360x768 60 47 7 INTRODUCCIÓN ES TV de pantalla plana con retroiluminación LED ES 6 ...

Page 128: ...espacio suficiente entre el TV y la pared a fin de permitir ventilación Atención El pie de esta TV no es posible rotarlo Evite ubicaciones excesivamente calurosas para prevenir un posible daño a la carcasa o un fallo prematuro de los componentes INTRODUCCIÓN ES 7 TV de pantalla plana con retroiluminación LED 1 Coloque el TV con la pantalla hacia abajo sobre una superficie plana Utilice una tela pa...

Page 129: ...icie sólida Por favor coloque algún material suave sobre el frente de la pantalla para protegerla de cualquier daño 3 Utilice los cuatro tornillos suministrados para fijar el TV sobre el soporte de pared del TV no incluido por medio de los cuatro orificios estándar VESA de la parte posterior del televisor Este televisor puede montarse en pared de la siguiente manera INTRODUCCIÓN TV de pantalla pla...

Page 130: ...digital entrada FuentedealimentaciónCA 6 S PDIF SCART L Raudio VIDEO 7 USB AC INPUT 100 240V 50 60Hz YPbPr VIDEO L R SPDIF OUTPUT SCART 2 3 1 4 6 5 7 8 9 11 12 13 14 10 8 9 HDMI2 con ARC 10 11 12 13 HDMI1 COMMON INTERFACE CI PC AUDIO Salidadeaudioanalógico HEADPHONE ENTRADAVGA 14 ANT Panel frontal de control entrada entrada entrada entrada salida entrada INTRODUCCIÓN entrada entrada entrada entrad...

Page 131: ...C INPUT 100 240V 50 60Hz YPbPr VIDEO L R SPDIF OUTPUT SCART G R B Video reproductor DVD u otro aparato con YPbPr YCbCr Video reproductorDVDu otroaparatoconCVBS S Video Conexión con su TV Haier TV de pantalla plana con retroiluminación LED ES 10 INTRODUCCIÓN ES COMMON INTERFACE CI VGA RF USB HDMI2 HDMI1 HEADPHONE PC AUDIO COMMON INTERFACE CI ...

Page 132: ...NT pulse el botón SOURCE en el mando a distancia y utilice las teclas para seleccionar COMPONENT y pulse el botón OK satélite EUROCONECTOR satélite satélite Video AV COMPONENTS Opción 5 VGA Sub D de 15 pines Conecte un cable VGA no incluido de la conexión VGA en el TV a PC ordenador portátil Para seleccionar el PC ordenador portátil conectado con el cable VGA pulse el botón SOURCE en el mando a di...

Page 133: ...nura de la IC que se ubica en la parte lateral del TV Encienda el TV y éste mostrará el siguiente mensaje si se detecta el módulo AC Aguarde unos minutos hasta que se active la tarjeta Pulse el botón MENU y luego pulse el botón para seleccionar la opción de Interfaz Común CI Se muestra la información detallada en la tarjeta IC en uso Pulse el botón OK para acceder al menú de la tarjeta Consulte el...

Page 134: ...r USB 28 PARAR USB 29 REPRODUCIR PAUSA USB 30 INICIO DE LA GRABACIÓN 31 Cursor ARRIBA ABAJO IZQUIERDA DERECHA Pulse para navegar hasta su selección 32 Fav Utilizado para acceder a sus canales favoritos en el modo de TV analógica o de TDT 33 Seleccionar programa Presione los botones para seleccionar el canal de TV siguiente o anterior 34 GUÍA Presiónelo para mostrar la guía electrónica de programac...

Page 135: ...ara congelar la página Para mostrar u ocultar la información oculta soluciones de juegos El usuario puede establecer cuatro páginas favoritas para ser enlazadas directamente por las cuatro teclas coloreadas Mientras el modo de lista esté activado no hay posibilidad de utilizar la navegación TOP o FLOF con las teclas coloreadas Los números de página favoritos se almacenarán y recuperarán en desde l...

Page 136: ... la sintonización 5 Después que esté completa la sintonización los canales se ordenarán en un orden preestablecido Si desea saltar canales modifique el orden preestablecido o cambie el nombre de los canales seleccione en el menú TDT analógica Editar Canales Canales 1 1 Búsqueda automática 1 MENÚ CANALES 1 Pulse el botón MENU luego pulse los botones para seleccionar el menú y después pulse el botón...

Page 137: ...nales modifique el orden preestablecido o cambie el nombre de los canales seleccione en el menú País Modo Empezar Editar canales Canal 4 En las opciones de use los botones para seleccionar ATV DTV DTV ATV Modo 5 Comenzará la sintonía de canales Esta operación puede tomar hasta 6 minutos La pantalla mostrará el progreso de la sintonía y la cantidad de canales encontrados Si desea saltar el paso de ...

Page 138: ...de Use los botones para seleccionar Frequency Symbol ks s tipo QAM y pulse para empezar la búsqueda de dicho canal Cuando se haya sintonizado la señal la imagen y la intensidad de la señal de mostrarán en la pantalla 3 Presione el botón MENU para regresar al menú principal 4 Presione el botón EXIT para salir del menú Búsqueda manual de cable empezar 3 Usted puede cambiar el de sonido para buscar l...

Page 139: ... como favorito Si desea ver la lista de canales favoritos necesita salir del menú de edición de programas y después pulsar el botón FAV 6 Información de la señal sólo para TDT Use los botones o para seleccionar la opción Signal Information en el menú de canales Luego pulse el botón OK para ver la información relacionada con el canal actual 7 Actualización de Software USB Use los botones o para sel...

Page 140: ...la pantalla Use los botones o para seleccionar la opción Restore Factory Default y pulse el botón OK para entrar en la configuración inicial Una vez que lo confirme toda la configuración se borrará Esto debería utilizarse sólo si experimenta problemas con su TV 2 Para anular el apagado automático desde en el menú de opciones seleccione Auto Standby 4hr el TV regresará al menú de opciones y le apar...

Page 141: ...s programas que ha programado INFO botón Verde Desde el menú EPG pulse el botón Verde para ver más información sobre el programa actual 8 Sistema de archivos PVR sólo para TDT Use los botones o para seleccionar PVR File System luego pulse el botón OK para entrar en el sub menú y luego use los botones o para desplazarse por la opciones El menú EPG Guía electrónica de programas le perite ver la info...

Page 142: ...o puede ser debido al uso de cables de conexión USB en vez de conectar el dispositivo USB directamente al TV 3 No todos los dispositivos USB son compatibles A continuación hay una lista de unidades USB recomendadas Los modelos que no aparezcan en la lista pueden ser compatibles pero no se garantiza que La lista de USB soportados es la misma que para la función Timeshift consulte las páginas siguie...

Page 143: ...a definición Puede reproducir archivos ts en un PC de sobremesa o portátil usando el software correcto Busque en Internet o pregunte en su tienda de Informática sobre el software más apropiado Precaución Haier no asume ninguna responsabilidad sobre cualquier software descargado por el usuario o distribuidor que pueda contener virus ni de cualquier avería resultante al instalar el software El clien...

Page 144: ... mando a distancia para mostrar la barra de ayuda en la parte inferior de la pantalla Pulse la tecla Reproducir en el mando a distancia para reproducir o hacer una pausa Pausa Pulse la tecla Izquierda en el mando a distancia para ver la foto anterior Pulse la tecla Derecha en el mando a distancia para ver la foto siguiente Use las teclas Izquierda Derecha para seleccionar esta función y pulse la t...

Page 145: ...DUCIR para reanudar la reproducción Música de fondo Use las teclas Izquierda Derecha en el mando a distancia para seleccionar esta función y pulse OK para activar desactivar Establecer punto A Use las teclas Izquierda Derecha en el mando a distancia para seleccionar esta función y pulse OK para establecer los puntos A y B La película se reproducirá cíclicamente desde A hasta B Ampliar Use las tecl...

Page 146: ...entación apagado Ajustes de Contraste y brillo Volumen Pulsar tecla Standby en el mando para examinarlo Sin color Sonido normal Control del color Imagenpartida Sonido normal o débil Resintonizar canal Sin color Ruido Sistema de TV Sonido normal Posición dirección o conexión de la antena Síntoma del problema Borroso Sonido normal Cambie el formato de pantalla Hay barras negras en la parte superior ...

Page 147: ...ecuencia que se muestra a continuación para todas las fuentes de entrada ATV DTV SCART HDMI 1 y 2 ya que cada fuente de entrada se controla por separado Pulse el botón TV Menu Pulse la flecha derecha para acceder al submenú Picture Pulse la flecha de abajo para seleccionar Aspect Ratio Seleccione Auto Pulse Exit Repita para todas las fuentes de entrada Recién he conectado un reproductor de DVD u o...

Page 148: ... firmemente sólo el último milímetro hace contacto En general la parte plástica posterior del enchufe HDMI debe estar muy cerca del cuerpo del TV o del componente o debe tocarlos Cuando se conectan cables HDMI puede experimentar problemas si se los conecta cuando el TV u otro componente están encendidos Siempre apague tanto el TV como el componente que está conectando Si ha verificado los enchufes...

Page 149: ... 16 32 64 128 256 QAM MPEG2 MPEG4 H 264 2 conectores HDMI 1 Euroconector SCART Conector de entrada de PC Conector de vídeo por componentes Vídeo compuesto 1 puerto USB 1 salida de auriculares 1 puerto SPDIF Sistemas soportados PAL SECAM Número de canales en memoria 1000 DTV 100 ATV TV RF 75Ω desbalanceada Entrada de vídeo AV 75Ω 1V P RCA Entrada de Audio AV 20KΩ 500mB RMS Entrada de vídeo YPbPr HD...

Page 150: ......

Page 151: ...Leggere questo manuale con attenzione prima di utilizzare l unità e conservarlo per futuro riferimento TVaschermopiattoconretroilluminazioneaLED MANUALEDIISTRUZIONI LE32C800C ...

Page 152: ...MAGINI Benvenuti Informazioni Importanti 01 Sicurezza ed avvisi 2 2 Avvisi di sicurezza Avvisi e cautela 3 4 Parametri principali Istruzionidiassemblaggiodellabasedisostegno 02 Introduzione 5 7 Linee guida per l installazione a muro Pannello anteriore 8 9 Collegamenti AV supportati 9 Collegare il vostro televisore Common interface 10 12 Telecomando 03 Telecomando 13 TELETEXT televideo 14 Contenuti...

Page 153: ...PRODOTTO E PRESENTE UN PUNTO ESCLAMATIVO IN UN TRIANGOLO QUESTO SIMBOLO VI AVVISA CHE NEL PRODOTTO SONO INCLUSE ISTRUZIONI IMPORTANTI PER L USO E LA MANUTENZIONE CAUTELA PER RIDURRE IL RISCHIO DI INCENDI O SHOCK ELETTRICO NON PONETE IL TELEVISORE VICINO A SORGENTI DI UMIDITA NON UTILIZZATE DETERSIVI ABRASIVI CHE POSSANO GRAFFIARE O ROVINARE LO SCHERMO LCD EVITATE IL CONTATTO CON OGGETTI CHE POSSAN...

Page 154: ...lo sostegno scaffale tripode braccio o tavolo instabile L unità potrebbe cadere causando danni Non posizionate oggetti pesanti o affilati sullo schermo o sulla cornice Scollegate l alimentatore dalla presa quando l unità non è in uso Si deve fare attenzione agli aspetti ambientali perlo smaltimento delle batterie AVVISO Le batterie batteria batterie o pacco batterie non devono essere esposte a cal...

Page 155: ...poggiatevi né spingete all improvviso il televisore o il suo supporto Fate particolarmente attenzione ai bambini Se dovesse cadere potrebbe causare serie ferite Cautela Non posizionate l unità su un carrello sostegno scaffale o tavolo instabile Se dovesse cadere potrebbe causare serie ferite alle persone e danni al televisore stesso Cautela Quando il televisore non viene utilizzato per un lungo pe...

Page 156: ... d acqua dallo SCHERMO o dalla STRUTTURA o intorno a pulsanti o connettori il cavo di alimentazione deve essere rimosso dalla presa di alimentazione Pulire la TV con un panno morbido asciutto e senza polvere Durante i temporali scollegare il cavo di alimentazione e l antenna per prevenire il danneggiamento della TV e di qualsiasi altro dispositivo collegato ad essa Tutte le riparazioni a questa TV...

Page 157: ... PC 3 5 1024x768 1280x1024 60 60 1 640x480 60 31 47 2 800x600 60 37 88 48 36 63 98 RISOLUZIONE V Freq KHz H Freq KHz 4 1360x768 60 47 7 INTRODUZIONE Manuale di istruzioni TV a schermo piatto con retroilluminazione a LED IT 6 IT ...

Page 158: ...i non ruotare questo TV Lasciate abbastanza spazio tra il televisore e il muro per permettere la ventilazione Evitate luoghi eccessivamente caldi per prevenire eventuali danni al cabinet o guasto prematuro dei componenti INTRODUZIONE IT 7 Manuale di istruzioni TV a schermo piatto con retroilluminazione a LED 1 Posizionate il televisore con lo schermo rivolto verso il basso su una superficie piana ...

Page 159: ...osizionate un panno morbido sulla parte anteriore dello schermo per proteggerlo da qualunque danno 3 Utilizzate le quattro viti fornite per fissare il televisore su un braccio di sostegno a muro non incluso attraverso i quattro fori standard VESA sul retro del televisore Questo televisore può essere montato a muro come segue INTRODUZIONE Manuale di istruzioni TV a schermo piatto con retroilluminaz...

Page 160: ...io digitale Ingresso AlimentazioneDC 6 S PDIF SCART AUDIOL R VIDEO 7 USB 8 9 HDMI2 con ARC 10 11 12 13 HDMI1 COMMON INTERFACE CI AUDIO PC Uscitaaudioanalogica HEADPHONE IngressoVGA 14 ANT Controlli del pannello anteriore INTRODUZIONE STANDBY Ingresso Ingresso Ingresso Ingresso Uscita Ingresso Ingresso Ingresso Ingresso Ingresso Ingresso IT 9 Manuale di istruzioni TV a schermo piatto con retroillum...

Page 161: ...100 240V 50 60Hz YPbPr VIDEO L R SPDIF OUTPUT SCART G R B INTRODUZIONE Manuale di istruzioni TV a schermo piatto con retroilluminazione a LED IT 10 IT CVBS DVD Player o altri dispositivi con YPbPr YCbCr CVBS DVD Player o altri dispositivi con CVBS S Video CollegamentoallapropriaTVHaier VGA RF USB HDMI2 HDMI1 HEADPHONE PC AUDIO COMMON INTERFACE CI ...

Page 162: ...Per selezionare il dispositivo collegato con il cavo COMPONENT premere il pulsante SOURCE sul telecomando e usare i tasti per selezionare COMPONENT e premere il pulsante OK Opzione 5 VGA 15pin Sub D Collegare un cavo VGA non fornito dalla presa VGA sulla TV al PC Laptop Per selezionare il PC Laptop collegato con il cavo VGA premere il pulsante SOURCE sul telecomando e usare i tasti per selezionare...

Page 163: ... il televisore ed esso visualizzerà il messaggio sottostante se il modulo CA viene identificato Aspettate qualche momento perché la scheda si attivi Premete il tasto MENU quindi premete il tasto per selezionare l opzione di informazione CI Vengolo visualizzate le informazioni dettagliate sulla scheda CI Premete il tasto OK per accedere al menù della scheda Fate riferimento al modulo del manuale di...

Page 164: ...27 Tasto giallo Teletext File precedente USB 28 STOP USB 29 PLAY PAUSA USB 30 AVVIO REGISTRAZIONE 31 Cursori SOPRA SOTTO SINISTRA DESTRA Premere per muoversi nella propria selezione 32 Fav Per accedere ai canali preferiti in modalità TV o DTV 33 Seleziona programma Premere il pulsante per selezionare il canale TV successivo o precedente 34 GUIDE Premere per visualizzare la guida elettronica dei pr...

Page 165: ...le informazioni nascoste soluzioni dei giochi L utente può impostare quattro pagine preferite da collegare direttamente ai quattro tasti colorati Mentre è attivata la modalità lista non è possibile utilizzare la navigazione TOP o FLOF con i tasti colorati I numeri delle pagine preferite devono essere archiviate in e ripristinate da una memoria non volatile per ogni canale dal software di sistema S...

Page 166: ...o a 6 minuti Il display mostrerà il progresso della sintonizzazione e il numero di canali trovati 4 Se si vuole saltare la sintonizzazione DTV premere il pulsante MENU per interrompere la sintonizzazione in corso Si passerà direttamente alla sintonizzazione ATV 5 Dopo il completamento della sintonizzazione i canali sono organizzati in un ordine preimpostato Se si desidera saltare canali modificare...

Page 167: ...In modalità Paese premere i tasti per selezionare il paese in cui si utilizzerà la TV 4 Nel menu Modalità premere i tasti per selezionare ATV DTV DTV ATV 5 La sintonizzazione dei canali inizia Questa operazione può richiedere fino a 6 minuti Il display mostrerà il progresso della sintonizzazione e il numero di canali trovati 6 Se si vuole saltare la sintonizzazione DTV premere il pulsante MENU per...

Page 168: ...anuale DVBC 2 Apparirà la schermata di Sintonizzazione manuale CADTV Premere i pulsanti per selezionare Frequenza Simbolo ks s QAM tipo QAM premere il pulsante Start per iniziare la ricerca di tale canale Quando il segnale è stato sintonizzato l immagine e la potenza del segnale sarà visualizzata sullo schermo 3 Premere il pulsante MENU per ritornare al menu principale 4 Premere il pulsante EXIT p...

Page 169: ...visualizzare l elenco dei canali preferiti è necessario uscire dal menu Program Edit e quindi premere il tasto FAV 6 Informazioni segnale solo per DTV Premere i tasti per selezionare le informazioni segnale nel menu Channel Quindi premere il tasto OK per visualizzare le informazioni relative del menu Channel 7 Aggiornamento software USB Premere i tasti o per selezionare Aggiornamento software USB ...

Page 170: ...stina impostazioni di fabbrica e premere il tasto OK per accedere alla prima configurazione Una volta confermato tutte le impostazioni saranno annullate Deve essere utilizzato se si verificano problemi con la TV 2 Per annullare lo spegnimento automatico nel menu Opzioni selezionare Stand by automatico 4 ore Lo schermo della TV ritorna al menu Opzioni e l opzione Spegnimento automatico 4 ore sarà v...

Page 171: ...ggiori informazioni relative al programma attuale 8 File System PVR solo per DTV Standard Definition Premere i tasti o per selezionare il File System PVR quindi premere il tasto OK per accedere al sottomenu e quindi utilizzare i tasti o per scorrere tra le opzioni Il menu EPG Guida elettronica alla programmazione fornisce informazioni dettagliate in merito al programma trasmesso Premere il tasto E...

Page 172: ...o dal collegamento di un cavo prolunga USB invece di collegare direttamente la USB alla TV 3 Non tutti i dispositivi USB sono compatibili Di seguito una lista di unità USB raccomandate I modelli che non sono riportati nella lista possono essere compatibili ma non è garantito il loro funzionamento La lista di supporto USB è la stessa della funzione Timeshift si vedano le pagine seguenti per I detta...

Page 173: ... o un laptop con il corretto software Consultare Internet oppure un fornitore IT per maggiori informazioni sul software da usare Attenzione Haier non è responsabile per qualsiasi software scaricato dal cliente o negozio se contiene virus o provoca qualsiasi malfunzionamento a causa della installazione di questo software Il cliente lo usa a proprio rischio e pericolo Assicurarsi che il dispositivo ...

Page 174: ...le foto sono riprodotte premere il tasto del telecomando una menu di aiuto apparirà in basso sullo schermo Premere il tasto Play Pause del telecomando per riprodurre o mettere in pausa Premere il tasto Left del telecomando per leggere la foto precedente Premere il tasto Right del telecomando per leggere la foto successiva Premere il tasto Left Right del telecomando per fermare la riproduzione e ri...

Page 175: ...eft Right del telecomando per selezionare questa funzione premere il Musica di sottofondo Premere il tasto Left Right del telecomando per selezionare questa funzione premere il tasto ok per attivare disattivare questa funzione Set A da A a B Premere il tasto Left Right del telecomando per selezionare A e B il filmato passerà ZOOM IN Premere il tasto Left Right del telecomando per selezionare quest...

Page 176: ...agado Ajustes de Contraste y brillo Volumen Pulsar tecla Standby en el mando para examinarlo Nessun colore Audio normale Control del color L immagineè spezzata Audio normale o debole Resintonizar canal Nessun colore Rumore di sottofondo Sistema de TV Audio normale Posición dirección o conexión de la antena Sintomo del problema Effetto fantasma Audio normale Cambie el formato de pantalla C è una st...

Page 177: ...tte le sorgenti di ingresso ATV DTV SCART HDMI 1 e 2 in quanto ogni sorgente di ingresso è controllata separatamente Premere il pulsante menu TV Premere la freccia Destra per accedere al sottomenu Picture Premere la freccia Giù per selezionare Aspect Ratio Selezionare Auto Premere Exit Ripetere per tutte le sorgenti di ingresso Ho collegato un lettore DVD o un altro dispositivo alla mia TV e non f...

Page 178: ...te è l ultimo millimetro che crea il contatto Solitamente la parte in plastica nera dello spinotto HDMI deve essere molto vicina o toccare quasi il corpo della TV o del dispositivo collegato Quando si collega un qualsiasi cavo HDMI possono verificarsi problemi se i cavi HDMI sono collegati quando la TV o altro dispositivo è acceso Spegnere sempre sia la TV sia il dispositivo collegato Se si devono...

Page 179: ...umero di canali Memorizzabili 1000 DTV 100 ATV TV RF 75Ω Non bilanciato AV Video Input 75Ω 1V P RCA AV Audio Input 20KΩ 500mB RMS YPbPr HDMI Video Input 480i 480p 576i 576p 720p 1080i 1080p DTV Tuner Decorder DVB T DVB C 16 32 64 128 256 QAM modulation MPEG2 MPEG4 H 264 2 prese HDMI 1 presa SCART Presa ingresso PC Presa video component Composite 1 porta USB 1 porta cuffia 1 porta SPDIF Funzioni su...

Page 180: ...10BIT IR KEYPAD INTERFACE VGA PC analog Audio YPBPR1 SPI SIS289 CODE DATA FLASH 4MB 8MB I2C IF 1920x1080 3113 1517 PC DVI L R H VSYNC PANEL TUNER EARPHONE EU FULL SCART HDMI 2 HP_L R DDR3 64X16 DDR3 V_3 3V SY8008D V_1 5V V_1 0V SY8009B MOS CVBS AV YPBPR2 YPbPr audio AV YPbPr Audio USB USB TS CI TS SPDIF AV OUT ...

Page 181: ...111 430RᬍЎ100R ᬍ SPDIF ݐ ᆍᗻ 2012 8 10 R181 R189 R47KᬍЎ30K ᬍ 2V䕧ߎ ᔶ ⳳDŽ 2012 8 31 Ў䗮䖛CI 1 2 䆩 ݐ ᆍᗻ 䆩 ߴ䰸V3ǃY6㛮㛮Ϟⱘ㔥㒰 ᑊ ࡴR216ǃR222 ܗ ӊ 2012 8 21 R193 68KᬍЎ4 7K R194 11 8KᬍЎ1 2K ᬍ SCART ݐ ᆍᗻ 2012 10 25 ᬍ DVDᑆᡄ ᡞC121 R107ߴ䰸 2012 10 25 EC805 㾘 㾘㒘ӊ㒳ϔᬍЎ450V㗤य़ 2012 11 6 ᬍ Ԣ 10oCϡਃࡼ D809 1N4007ᬍЎFR107 18 5 32ܼᬍЎFR104 2012 11 14 Ўњᬍ PC ᓣϟ 䕏ᖂᑆᡄ ᵓᑩ㚠 C101 ...

Page 182: ...06 Q808 3904 Q808 3904 D809 1N4007 D809 1N4007 FB114 56 4A 1206 FB114 56 4A 1206 R823 51K R823 51K TP2 TP2 C31 102 25V 0805 C31 102 25V 0805 HS2 HS2 1 2 3 R899 36K 0603 R899 36K 0603 C40 220pF C40 220pF R68 0 3 1 4W J 1206 R68 0 3 1 4W J 1206 C20 0 1uF X7R C20 0 1uF X7R R842 270K R842 270K U808 PC817 U808 PC817 1 2 4 3 CY801 471 CY801 471 TP3 TP3 R845 NC 20K R845 NC 20K J8 2pin 2 0mm J8 2pin 2 0mm...

Page 183: ...P_DET D19 SA_GPIO9 B16 SA_GPIO10 A14 SA_GPIO11 A15 SA_GPIO12 B15 SA_GPIO13 B14 SA_GPIO14 A16 SA_GPIO15 CF_WP_N A12 SA_GPIO16 25MCK_IN B12 SA_GPIO17 D15 SA_GPIO24 C19 SA_GPIO23 ENC_SPI_N D13 SA_GPIO25 U_2SPI C16 SA_GPIO26 C18 SA_GPIO27 PWM0 D14 SA_GPIO28 D18 SA_GPIO29 SPI_CS1 B10 SA_GPIO31 CK24 576O C13 SA_GPIO34 PWM2 D9 UARTA_TX D5 UARTA_RX C5 IR D6 PS_ON C6 UA_GPIO0 E6 UA_GPIO18 D7 UA_GPIO19 C7 U...

Page 184: ...R1 10K_1 R1 10K_1 Q2 GV3407 Q2 GV3407 R920 NC 0R 0805 R920 NC 0R 0805 R229 100K R229 100K Q1 GV3407 Q1 GV3407 1 3 2 C225 0 1uF X7R C225 0 1uF X7R L1 2 2uH_2 5A L1 2 2uH_2 5A SRQ5 SRQ5 C222 10uF X5R C222 10uF X5R R4 100K_1 R4 100K_1 R30 10K R30 10K H1 HOLE H1 HOLE 9 2 3 4 5 6 7 8 SRQ6 SRQ6 L3 2 2uH_2A L3 2 2uH_2A C223 10uF X5R C223 10uF X5R C228 10uF X5R C228 10uF X5R R23 2K 0603 R23 2K 0603 H2 HOL...

Page 185: ...2 C61 1uF_0402 TP20 TP20 R228 82_1 _0402 R228 82_1 _0402 C80 12pF C80 12pF C76 1n C76 1n C69 0 1uF X7R C69 0 1uF X7R R253 33R R253 33R C65 0 1uF X7R C65 0 1uF X7R C59 0 1uF X7R C59 0 1uF X7R C117 0 1uF X7R C117 0 1uF X7R C118 0 1uF X7R C118 0 1uF X7R C119 0 1uF X7R C119 0 1uF X7R C120 0 1uF X7R C120 0 1uF X7R C249 0 1uF X7R C249 0 1uF X7R C116 0 1uF X7R C116 0 1uF X7R TP21 TP21 C82 12pF C82 12pF C...

Page 186: ...S AB16 VSS AB18 VSS AB22 VSS AC12 VSS AC17 VSS AC19 VSS B22 VSS F11 VSS F12 VSS F13 VSS G11 VSS G12 VSS G13 VSS G14 VSS G15 VSS H11 VSS H12 VSS H13 VSS H14 VSS H15 VSS J10 VSS J11 VSS J12 VSS J13 VSS J14 VSS J15 VSS J9 VSS K10 VSS K11 VSS K12 VSS K13 VSS K14 VSS K15 VSS K3 VSS H16 VSS F14 OVDD3P3_AUX E15 OVDD1P5 T15 OVDD1P5 T16 OVDD1P5 T17 OVDD1P5 U15 OVDD1P5 U16 OVDD1P5 T19 OVDD1P5 T20 OVDD1P5 U1...

Page 187: ...IF ゟ 1 2 3 C128 100uF 10V C128 100uF 10V R225 47R R225 47R RX45 NC ESD_3P RX45 NC ESD_3P 1 1 2 2 C114 47nF C114 47nF C112 12pF C112 12pF C106 47nF C106 47nF J11 NC AV JACK 3 YPbPr J11 NC AV JACK 3 YPbPr 1 1 2 2 3 3 4 4 5 5 7 7 6 6 8 8 R78 330R R78 330R F1 P150TFT F1 P150TFT EC11 100uF 10V EC11 100uF 10V R117 100K R117 100K RX1 NC ESD_3P RX1 NC ESD_3P 1 1 2 2 CN504 AV JACK 3 AV CN504 AV JACK 3 AV 1...

Page 188: ...2 ESD_0 15P 1 1 2 2 R133 100R R133 100R R136 NC 1M R136 NC 1M R124 NC 1 2K R124 NC 1 2K RX19 ESD_0 15P RX19 ESD_0 15P 1 1 2 2 R131 100R R131 100R RX23 ESD_0 15P RX23 ESD_0 15P 1 1 2 2 RX18 ESD_0 15P RX18 ESD_0 15P 1 1 2 2 R123 NC 100K R123 NC 100K R139 47K R139 47K CON5 HDMI19P_QJ51193 FFB4 7F CON5 HDMI19P_QJ51193 FFB4 7F TMDS_D2 1 TMDS_D2_SHIELD 2 TMDS_D2 3 TMDS_D1 4 TMDS_D1_SHIELD 5 TMDS_D1 6 TM...

Page 189: ... VCCRF 1 RFin 2 NC 3 NC 4 GNDDIG0 5 AS_XTSel 6 GNDDIG1 7 Test1 8 Test2 9 GNDDIG2 10 SCL 11 Test1 13 Xtal 14 SDA 12 Xtalnot 15 VCCSYN 16 CapRFAGC 40 RFAGC_Sense 39 UHFH 38 UHFSupply 37 UHFL 36 VCCRF Filter 35 VHFH 34 VHFSens 33 GND 41 R147 1 5K R147 1 5K R167 NC R167 NC L12 330nH 140mA 5 L12 330nH 140mA 5 C138 0 1uF X7R C138 0 1uF X7R C253 1uF_0402 C253 1uF_0402 L13 220nH 120mA 5 L13 220nH 120mA 5 ...

Page 190: ...02 R185 NC 0_0402 R171 75R R171 75R 10k R182 10k R182 RX35 ESD 3P RX35 ESD 3P 1 1 2 2 3904 Q13 3904 Q13 1 2 3 R176 1K R176 1K G S D Q22 2N7002 G S D Q22 2N7002 B E C Q5 3904 B E C Q5 3904 C180 12pF C180 12pF R250 22R R250 22R R236 47R R236 47R C181 10uF X5R C181 10uF X5R R247 22R R247 22R 2 2uF C177 2 2uF C177 20K R188 20K R188 RX38 ESD 3P RX38 ESD 3P 1 1 2 2 R595 1K R595 1K C255 12pF C255 12pF R1...

Page 191: ...11 3904 Q11 3904 1 2 3 C191 0 22uF 0603 C191 0 22uF 0603 L25 33uH 2A L25 33uH 2A R200 10K R200 10K FB8 56 4A 1206 FB8 56 4A 1206 R195 68K R195 68K R206 68K R206 68K Q8 3906 Q8 3906 1 3 2 C192 2 2uF C192 2 2uF C205 4 7uF 16V X5R C205 4 7uF 16V X5R L27 33uH 2A L27 33uH 2A S4 NC HOT S4 NC HOT 1 2 C200 1uF 0603 C200 1uF 0603 C190 1uF 0603 C190 1uF 0603 EC13 220uF 16V EC13 220uF 16V 1 2 L28 33uH 2A L28...

Page 192: ......

Reviews: