background image

12

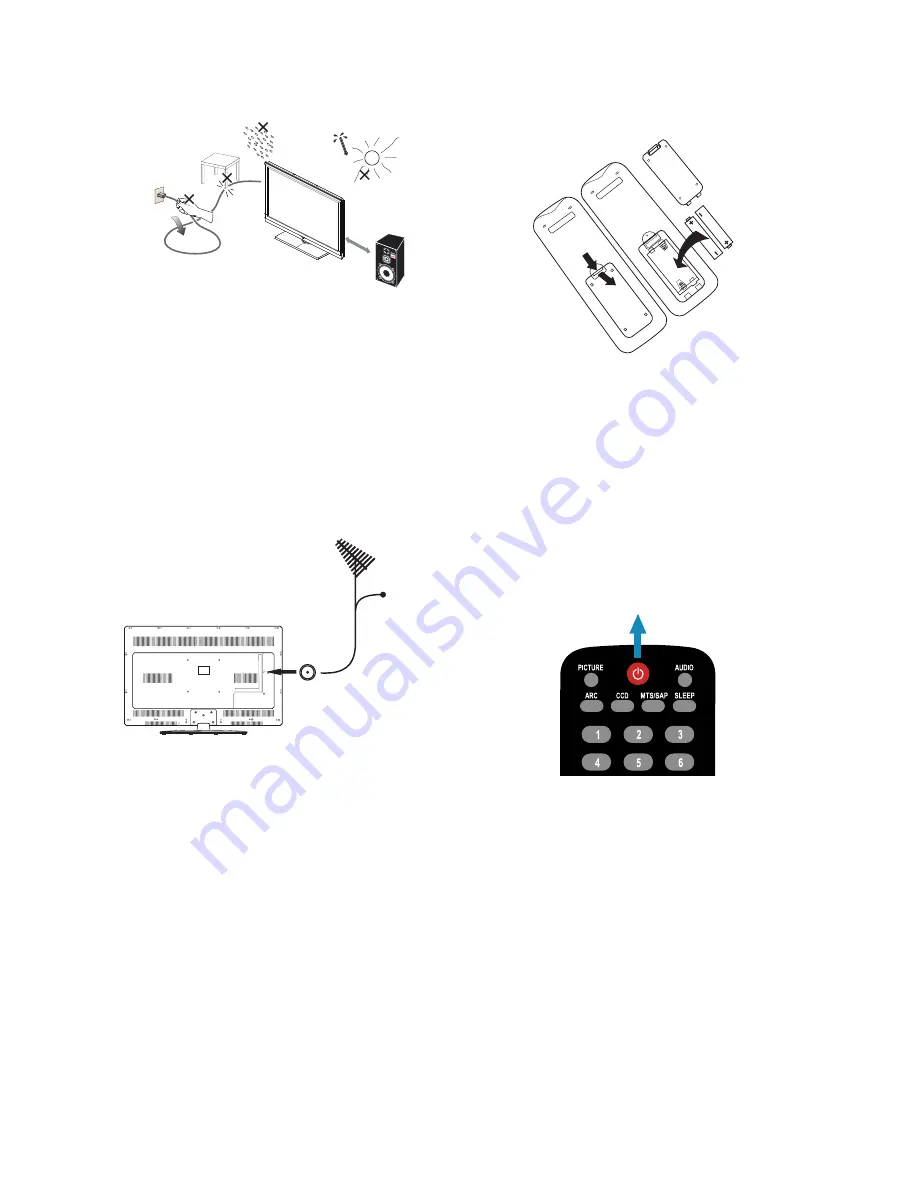
1. Install the stand; place the TV on a solid 

surface.

Ensure that the TV is placed in a position to 

allow free flow of air. Do not cover the 

ventilation openings on the back cover.

To prevent any unsafe situations, no naked flame 

sources, such as lighted candles, should be 

placed on or in the vicinity.

Avoid heat, direct sunlight and exposure to rain 

or water. The equipment shall not be exposed 

to dripping or splashing.

2. Connect the antenna cable or CATV cable 

to the ANT IN 75


aerial socket at the 

back of the TV set.

3. Remote control:

Remove the cover of the battery compartment. 

Insert the 2 supplied batteries (Type AAA 1.5V).

4. 

Power:


Insert the power cord into a wall socket with 

AC power supply. You can check the LED status 

on the front panel. If the LED lights up blue, it 

means that the TV set is powered on. If the LED 

lights up red, it means that the TV set is in 

standby mode.

5. Turn the TV on:

Press the Power key on the remote control or 

the TV’s front panel control. The TV will turn on 

in a few seconds.

Min.

1 m

CABLE

Power Key

Summary of Contents for LE32C1320

Page 1: ...LED HDTV OWNER S MANUAL Please READ this manual carefully before operating your TV and keep it for future reference MODELS LE32C1320 LE42C1380 LE46C1380 ...

Page 2: ...enden de una antena de TV necesitarán un conversor de TV para recibir por el aire una programación digital pero seguirán funcionando como antes para otros usos por ejemplo para ver emisoras de TV de baja potencia que todaviá transmiten en analógico para ver películas pregrabadas o para utilizar sus videojuegos Para obtener más información llame FCC 1 888 CALL FCC 1 888 225 5322 o refiérase a www D...

Page 3: ...ar installation If this equipment does cause harmful interference to radio or television reception which can be determined by turning the equipment off and on the user is encouraged to try to correct the interference by one or more of the following measures 1 Reorient or relocate the receiving antenna 2 Increase the separation between the equipment and receiver 3 Connect the equipment into an outl...

Page 4: ...Prohibit avoid opening the TV cabinet Avoid direct sunlight dusty high humidity and smoky areas Don t throw any objects inside the TV cabinet like metals or flammable materials Remember to unplug the AC cord from the AC outlet before cleaning Do not use liquid cleaners or aerosol cleaners to clean the TV Call service personnel to clean the internal parts of the TV once a year Don t place the TV in...

Page 5: ...plug this apparatus during lightning storms or when unused for long periods of time 15 Refer all servicing to qualified service personnel Servicing is required when the apparatus has been damaged in any way such as power supply cord or plug is damaged liquid has been spilled or objects have fallen into apparatus the apparatus has been exposed to rain or moisture does not operate normally or has be...

Page 6: ...TENNA GROUNDING AS PER NATIONAL ELECTRICAL CODE Note to the CATV system installer This reminder is provided to call the CATV system installer s attention to Article 820 40 of the NEC that provides guidelines for proper grounding and in particular specifies that the cable ground shall be connected to the 6 English grounding system of the building as close to the point of cable entry as practical Pl...

Page 7: ... use manual will guide you in getting the best use of your product Remember to record the model and serial number They are on the label on the back of the unit Model number Serial number Date of purchase Staple your receipt to your manual You will need it to obtain warranty service ...

Page 8: ...3 OPERATING INSTRUCTIONS 14 FRONT PANEL CONTROLS 14 GETTING TO KNOW THE REMOTE CONTROL 15 USING THE MENUS 17 Video Menu 17 Audio Menu 17 TV Menu 18 Setup Menu 18 Parental Controls Menu 19 USING THE TIME SHIFT FUNCTION 20 Preparation 20 Using the Time Shift Function 20 USING THE MEDIA PLAYER 20 Viewing Photos 21 Playing Music 22 TIPS 24 PRODUCT SPECIFICATIONS 25 TROUBLESHOOTING 27 GLOSSARY 28 WARRA...

Page 9: ...o prevent any damage to the TV 2 Secure the stand column to the back of the TV using the four supplied M4 screws 3 Gently align the stand with the stand column and tighten the stand to the stand column using the three supplied M4 tapping screws For LE42C1380 1 Place the TV unit face down on a soft and flat surface blanket foam cloth etc to prevent any damage to the TV 2 Secure the stand column to ...

Page 10: ...M4 screws PREPARING YOUR TV FOR WALL MOUNTING Before mounting your TV on the wall you need to remove the stand For your safety please use only with UL listed wall mount brackets with minimum weight of the TV without stand Please see PRODUCT SPECIFICATIONS on page 25 To attach a wall mount bracket to your TV For LE32C1320 1 Remove the screws holding your TV to the stand 2 Secure the wall mount brac...

Page 11: ...he back of your TV using four M4 screws as indicated in the illustration For LE46C1380 1 Remove the screws holding your TV to the stand 2 Secure the wall mount bracket to the back of your TV using four M6 screws as indicated in the illustration NOTE The wall mount bracket and the screws are not supplied ...

Page 12: ...ing 2 Connect the antenna cable or CATV cable to the ANT IN 75Ω aerial socket at the back of the TV set 3 Remote control Remove the cover of the battery compartment Insert the 2 supplied batteries Type AAA 1 5V 4 Power Insert the power cord into a wall socket with AC power supply You can check the LED status on the front panel If the LED lights up blue it means that the TV set is powered on If the...

Page 13: ...s DVD multimedia players or set top boxes through these all digital connectors You can also connect devices with a DVI video output connector to one of these HDMI input connectors using a DVI HDMI adaptor cable and connect the audio output connector of the same device to the PC DVI AUDIO connector of the TV 6 ANT IN Connect to an antenna or digital cable out of the wall not from Cable Box for digi...

Page 14: ...t lower program number 7 POWER Press to turn on off standby the TV set 8 LED indicator RC sensor This area is the LED indicator and remote control sensor Please do not block or cover this area When the LED is red the TV is in standby mode When it is blue the TV is on 9 RC sensor Receives the command signals from the remote control Please do not block or cover this area 10 LED indicator When the LE...

Page 15: ...such as Stereo SAP or Mono tone and audio languages of DTV SLEEP Press repeatedly to set the sleep timer off 5 10 15 30 60 90 120 180 240 minutes The TV will automatically turn off after the selected amount of time passes 0 9 number Press to enter the TV channel number and select a channel Press to choose the sub channel INPUT Press repeatedly to select an input source TV AV Component VGA HDMI 1 H...

Page 16: ...ss to fast reverse a media file When in DTV input mode and the Time Shift function is enabled press to fast reverse DTV video FWD In media player mode press to fast forward a media file When in DTV input mode and the Time Shift function is enabled press to fast forward DTV video PREV In media player mode press to jump to the previous media file When in DTV input mode and the Time Shift function is...

Page 17: ...rom three color temperature modes Normal Warm or Cool Noise Reduction Adjusts the noise reduction level You can choose from Low Medium High or Off The default setting is Low Backlight Adjusts screen backlight strength The tuning range is 0 30 Adaptive Contrast Dynamically analyzes the input signal and enhances details in bright and dark areas of the picture You can choose On or Off Dynamic Contras...

Page 18: ... menu you can change general settings of the TV like time date OSD menu language and so on 1 Language Select the OSD menu language English Français Español 2 Time Set the current date and time Date Time You can set up the current date and time using these options Mode Select Auto to let the TV acquire day and time information automatically from the TV signal or Manual to set up date and time manua...

Page 19: ...s not satisfactory you can manually adjust the picture using the options below H Position Manually adjust the horizontal position of the picture The tuning range is 0 100 V Position Manually adjust the vertical position of the picture The tuning range is 0 100 Phase Manually adjust the picture phase to reduce horizontal line noise The tuning range is 0 31 Clock Manually adjust the picture clock to...

Page 20: ... Using the Time Shift Function While watching digital TV programs press the PLAY PAUSE button on the remote control The TV program will be paused and the Time Shift function will start recording the TV program signal from the time when the button is pressed and onward To stop the time shift function and resume normal viewing press the PLAY PAUSE button on the remote control again You can press the...

Page 21: ...ou want to view and press the ENTER button to open the folder or view the photo The photo slideshow will start automatically To return to the previous level in the thumbnail or list view press the EXIT button 6 When viewing the slideshow you can Press the NEXT button on the remote control to jump to the next photo or press the PREV button to return to the previous photo Press the yellow button to ...

Page 22: ...urn to the previous level in the thumbnail or list view press the EXIT button 6 When playing music you can Press the NEXT button on the remote control to jump to the next song or press the PREV button to return to the previous song Press the FWD button to fast forward the song or press the REV button to fast reverse the song To resume normal playback press the PLAY PAUSE button Press the yellow bu...

Page 23: ...cal spectrum on the lower left corner of the screen Audio Only Turns off screen display and play audio only 7 Press the EXIT button to return to the thumbnail or list view 8 To exit media player press the USB button on the remote control ...

Page 24: ...ith the limits for a Class B digital device pursuant to part 15 of the FCC Rules These limits are designed to provide reasonable protection against harmful interference in a residential installation This equipment generates uses and can radiate radio frequency energy and if not installed and used in accordance with the instructions may cause harmful interference to radio communications However the...

Page 25: ...put PC IN D SUB and PC Audio Headphone mini jack Supported scan rates 640x480 60 72 75Hz 720x400 70Hz 800x600 56 60 75Hz 1024x768 60 70 75Hz 1280x768 75Hz 1360x768 60Hz 1280x1024 60 75Hz LE42C1380 LE46C1380 only 1920x1080 60Hz LE42C1380 LE46C1380 only Recommended 1360x768 60Hz for LE32C1320 1920x1080 60Hz for LE42C1380 LE46C1380 Component Video input Supported resolution 480i60 480p60 576i50 576p5...

Page 26: ...47 84 lb Weight without Stand 18 58 lb 27 78 lb 37 04 lb WALL MOUNTING VESA compatible wall bracket W x H 100 x 100 mm 200 x 200 mm Screw type Metric 4 x 10 mm Metric 6 x 10 mm Metric 6 x 10 mm POWER Power Consumption 100W 150W 175W Standby 1W Mains Power AC120V 60Hz Audio Power 10W 10W Ambient Temperature 40 F 95 F PACKAGE CONTENTS Supplied Accessories TV unit x1 Stand x1 Stand column x 1 Screws ...

Page 27: ... channel Adjust the contrast and brightness settings Check the Closed Captions control Some TEXT modes could block the screen Good picture but no sound Increase the volume Check if the TV is muted press the MUTE button on the remote control Good sound but poor color Adjust the contrast color and brightness settings Poor picture Poor picture quality may occur when an activated S VHS camera or camco...

Page 28: ...es shown on the TV screen is made available for user adjustments MPAA Motion Picture Association of America Multichannel Television Sound MTS The broadcasting standard which allows stereo sounds to be transmitted with the TV picture RF Radio Frequency or modulated signal design used as the carrier for television broadcasts Second Audio Program SAP Another or additional audio channel provided for i...

Page 29: ... to extend the duration of any warranties beyond the time period described herein on behalf of Haier The warranties described herein shall be the sole and exclusive warranties granted by Haier and shall be the sole and exclusive remedy available to the purchaser Correction of defects in the manner and for the period of time described herein shall constitute complete fulfillment of all abilities an...

Page 30: ......

Reviews: