background image

21

22

- HDMI   


. The HDMI logo and High-Definition  Multimedia Interface is a trademark 

or registered trademark of HDMI Licensing.
-This TV can receive the High-Definition Multimedia Interface (HDMI).
-This TV supports HDCP (High-bandwidth Digital Contents Protection) Protocol for 
720x480p, 1280x720p and 1920x1080i resolution.
-When you connect this TV with a source device (DVD player, Set Top Box or PC) 
supporting Auto HDMI function, the output resolution of the source device will be
automatically set to 1280x720p.
-If the source device does not support Auto HDMI, you need to set the output 
resolution appropriately.
To get the best picture quality, adjust the DVD Player or Set Top Box’s output resolution 
to 1280x720p, and the PC graphics card’s output resolution to 1024x768, 60Hz.
-If the source device has an HDMI output, no other audio connection is necessary 
because HDMI-to-HDMI connecting includes both video and audio.

How To Connect

1. Connect the source device to HDMI port of this TV with an HDMI cable (not 
supplied with this product).
2. No separated audio connection is necessary.

How To Use

-If the source device supports Auto HDMI function, the output resolution of the source 
device will be automatically set to 1280x720p.
-If the source device does not support Auto HDMI, you need to set the output resolution 
appropriately.
To get the best picture quality, adjust the output resolution of the source device to 
1280x720p.
-Select HDMI input source by using INPUT button.

How To Set

The method to set is similar to TV.

OTHER SETTING FUNCTION

TM

ANT .

VCR

A UDI O IN

L

R

S-V ID EO

 IN       

DVD

DVD

L

R

A UD I O I N

  Y   Cb/Pb  Cr/Pr

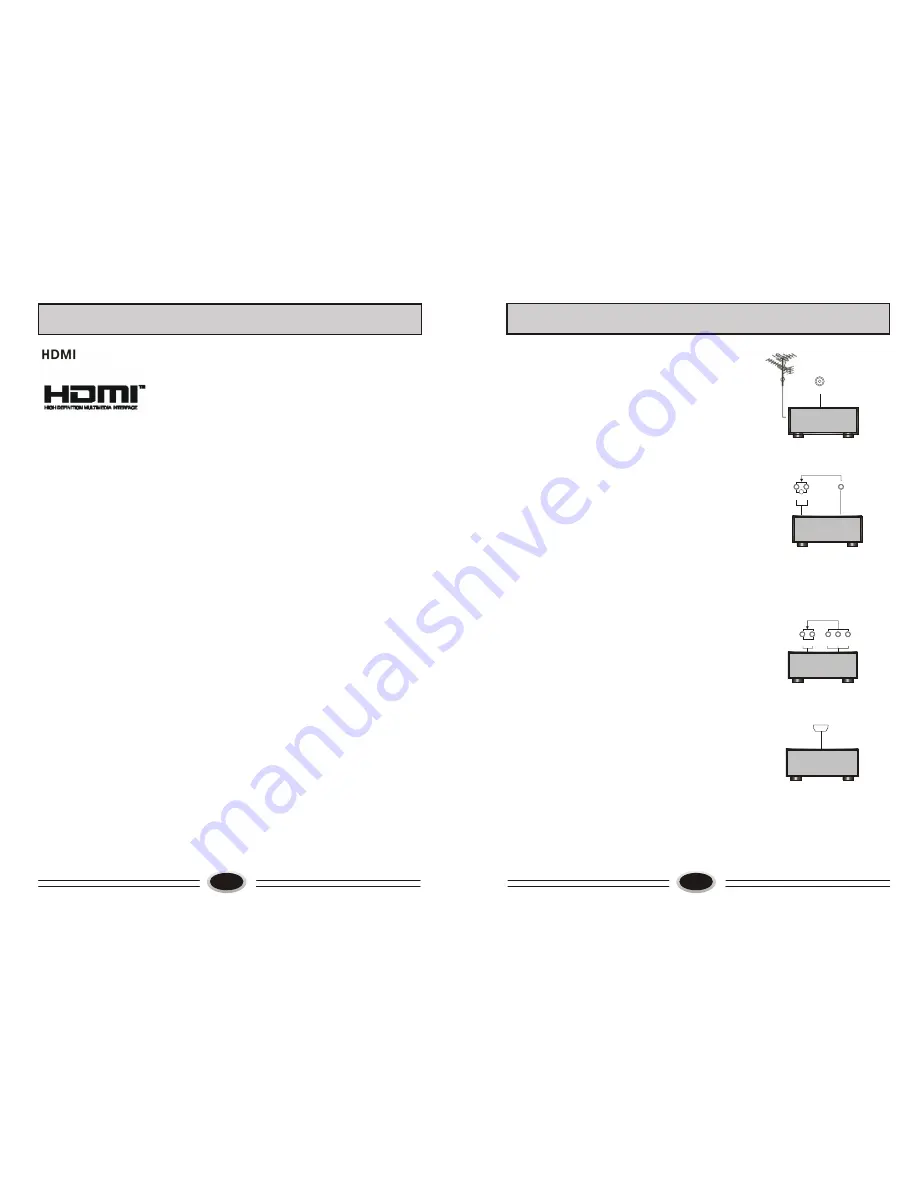
You can connect outside signal source VCR,  VCD 
DVD, PC equipment to the TV set. 
Antenna Input
1.Connect the VCR radio frequency input to 
    the back radio frequency input of the LCD.
2. Connect the antenna to VCR antenna input.
3. Press INPUT button to select TV mode.
4. Press PLAY button in VCR to start watching.

 
S-VIDEO input 
If you use S terminal as signal input source, the
image quality will be better than video (AV).
1.Connect S terminal output in DVD to S terminal 
   input in TV set.
2.Connect S terminal left/right audio output in DVD to 
   the relevant port in TV set.
3.Press INPUT button repeatedly until the display 
   mode is S-VIDEO.
4.Press PLAY button in DVD to broadcast. At this time
    the image programs in DVD will broadcast in TV set.

COMPONENT input
1. Component terminal (Y/PbCb/PrCr) connect to the 
    component output of picture output device (such as 
    DVD, HDTV TUNER and so on ), the sound is input
    from AUDIO IN:
2.Press INPUT button to select COMPONENT mode.
3.Press PLAY button on the external device to start
   watching.

HDMI input
1.Connect HDMI signal source output to the HDMI
   input in this TV set. 
2.Press INPUT button to select HDMI mode.
3.Press PLAY button on the external device to start
   watching.

EXTERNAL AUDIO AND VIDEO EQUIPMENT CONNECTION

HDMI

DVD

Summary of Contents for LC-4027P

Page 1: ...LC 4027P LC 4027P LCD COLOR TELEVISION OPERATING INSTRUCTIONS Wide view angle display high contrast MTS HDMI 01 0090504184 ...

Page 2: ...g 10 Image control 13 Sound control 14 Function setting 15 Time setting 19 Signal source setting 20 Basic playback 21 Advanced playback 22 Special function playback 23 DVD system setup 24 Playable discs 28 Disc protection and DVD characteristics 29 Other setting function 30 External audio and video equipment connection 31 Using your TV as a computer display 32 Specifications 33 Trouble shooting gu...

Page 3: ...service provider 2 Do not place the set near a heat source or in direct sunlight 1 WARNING AND CAUTION CAUTION TO REDUCE THE RISK OF ELECTRIC SHOCK DO NOT REMOVE COVER OR BACK NO USER SERVICEABLE PARTS INSIDE FOR ANY PROBLEM REFER SERVICING TO QUALIFIED SERVICE PERSONNEL THERE IS A LIGHTNING ARROW SYMBOL IN THE TRIANGLE THIS SYMBOL INDICATES HIGH VOLTAGE IS PRESENT INSIDE IT IS DANGEROUS TO MAKE A...

Page 4: ...s of time 14 Refer all serving to qualified service personnel Servicing is required when the apparatus has been damaged in any way such as power supply cord or plug is damaged liquid has been spilled or objects have fallen into the apparatus the apparatus has been exposed to rain or moisture does not operate normally or has been dropped The apparatus shall not be exposed to dripping or splashing a...

Page 5: ...emote 3 Close the cover of battery apartment Cautions for using remote control Confirm there is no object between the remote control and the remote sensor of TV set Sunshine or other strong light will interfere the signal sent by the remote control In this situation turn the TV set to avoid the direct light source Do not put the remote control in direct heat or a damp place or potential damage to ...

Page 6: ...on status The power on channel number will display on the screen and it will disappear without operation in several seconds 2 Pressing power button again the TV set will enter standby status Standby set connecting the power supply wire the TV set will enter standby status TV PROGRAM SELECTION AND VOLUME ADJUSTMENT You can use CH button or number button to select the TV channel number Press VOL but...

Page 7: ...u display 2 Press button to select TUNER menu press button to enter 3 Press button to select CH SOURCE item 4 Press button to select CATV or AIR AUTO SCAN Using AUTO SCAN can search all receiving programs We recommend using auto search to search the program when you use this TV set for the first time 1 Press MENU button to make the main menu display 2 Press button to select TUNER menu press button...

Page 8: ...hannel you need delete press CH button to delete the current channel 2 During operating if you want to cancel delete press VOL button to exit after setting press VOL button to save 3 The deleted channel will disappear from the channel list completely you can t use CH button or one digit selection button to select this channel 001 002 003 004 005 006 007 008 009 010 VOL RENAME CH DELETE VOL SKIP CH...

Page 9: ...AST 45 BRIGHTNESS 45 TINT 50 COLOR 45 SHARPNESS 50 COLOR TEMP NORMAL ZOOM WIDE Items VOL VOL Contrast Brightness Color Tint Sharpness Weak Strong Dark Bright Light Thick Green Red Blur Sharp SOUND CONTROL SOUND SOUND STANDARD BALANCE 50 AVC ON EQUALIZER SURROUND ROOM DIGITAL BASS ON SOUND MODE 1 Press MENU button to make the main menu display 2 Press button to select SOUND menu 3 Press button to s...

Page 10: ...POSITION 31 PHASE 100 CLOCK 55 AUTO FUNCTION SETTING 4 Press button to select different item press button to adjust AAA using this function can improve the brightness contrast and arrangement of image There are ON SPLIT MOVE and ZOOM four modes CTI opening this function can restrain the different color from crossing and interfering in order to improve the quality of picture LTI opening this functi...

Page 11: ...A Mature audience only this type of rated programs may contain graphic violence explicit sexual content and profane language FV This type of rated programs contain Fantasy and cartoon violence Violence This type of rated programs contain violence S This type of rated programs contain sex L This type of rated programs contain offensive language D This type of rated programs contain dialogue with se...

Page 12: ...ENU button to make the main menu display 2 Press button to select TIMER menu 3 Press button to select TIME ON item press button to enter setting Press button to select hour or minute position press button to adjust the value After setting press MENU button to save and exit Note on the condition that the clock is set TIME SETTING TIMER SLEEP TIMER OFF CLOCK TIME OFF TIME ON BOOK CHAN 0 TIME SETTING...

Page 13: ...the best picture quality adjust the output resolution of the source device to 1280x720p Select HDMI input source by using INPUT button How To Set The method to set is similar to TV OTHER SETTING FUNCTION TM ANT VCR AUDIO IN L R S VIDEO IN DVD DVD L R AUDIO IN Y Cb Pb Cr Pr You can connect outside signal source VCR VCD DVD PC equipment to the TV set Antenna Input 1 Connect the VCR radio frequency i...

Page 14: ...he screen VGA SVGA XGA 640 x 480 800 x 600 1024 x 768 31 5kHz 37 9kHz 48 4kHz 60Hz 60Hz 60Hz Mode Resolution Horizontal Frequency Vertical Frequency RESOLUTION Note The above parameters are VESA standard SPECIFICATIONS LC 4027P 101 4 73 8 31 0 including base Model Screen Type Viewable angle TV VIDEO NTSC AV DTV Y Pb Pr Power Power consumption Dimension W D H cm Environment conditions Accessory Com...

Page 15: ...or Vehicle Fluorescence lamp etc Volume Sound mute The power plug isn t plugged in AC outlet The main power isn t turned on The setting up of contrast brig htness and volume Adjust color control Adjust channel again The following problems are not always caused by hardware failure please use the follow trouble shooting guide before you call for service Picture with Snow No Color No Picture Normal D...

Reviews: