background image

13

20

2. A separate audio connection is necessary. 
   Connect DVD AUDIO OUT  to VGA 
    AUDIO IN port of this TV set with DVI 
   audio cable (not supplied with this product).

How To Use

-If the source device supports Auto HDMI/DVI function, 
the output resolution of the source device will be 
automatically set to 1280x720p.
-If the source device does not support Auto HDMI/DVI, 
you need to set the output resolution appropriately.
To get the best picture quality, adjust the output
 resolution of the source device to 1280x720p.
-Select HDMI or DVI input source by using TV/AV button.

How To Set HDMI

The method to set is similar to VGA or YPbPr.
Note: If the input signal is an HDTV signal, the method
to set is similar to YPbPr. If the input signal is an RGB
signal, the method to set is similar to VGA. The system
will recognize the type of signal automatically. 

OTHER FUNCTIONS

PICTURE

MOVE

SELECT   MENU   EXIT

WARM

PICTURE MODE         BRIGHT
CONTRAST
BRIGHTNESS
COLOR TEMP.
COLOR-R
COLOR-G
COLOR-B

COOL

PICTURE

MOVE

SELECT   MENU   EXIT

STRONG

PICTURE MODE         BRIGHT
CONTRAST
BRIGHTNESS
SATURATION
SHARPNESS
HUE
DNR
COLOR TEMP.

HDTV signal

RGB signal

13

21

ANT.

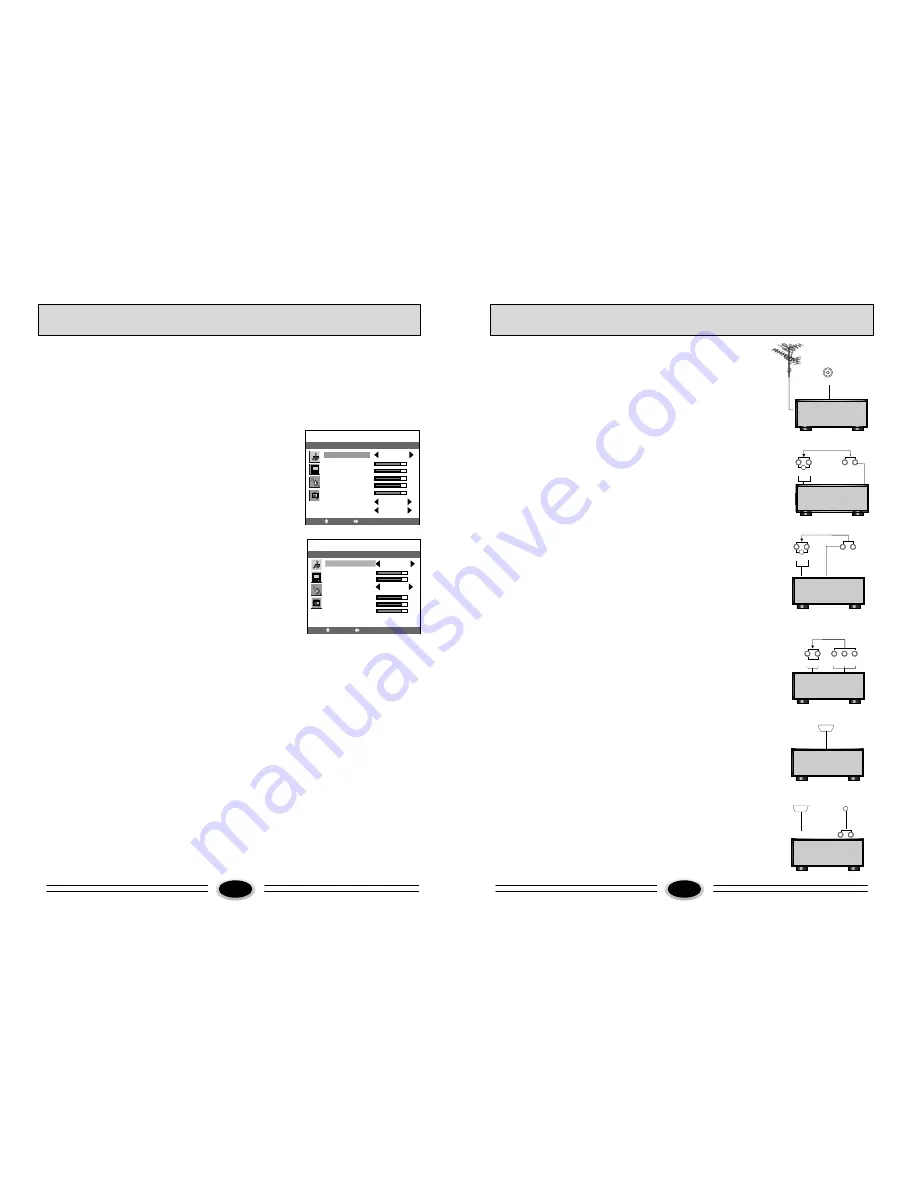
EXTERNAL AUDIO AND VIDEO EQUIPMENT CONNECTION

You can connect outside signal source VCR,  VCD, 
DVD , PC equipment to the TV set. 
Antenna Input
1.Connect the coaxial cable input to the back cable 
   input of the LCD.
2. Connect the antenna to the source coaxial input.
3. Press TV/AV button to select TV mode.

AV input
1.Connect audio video output port on source to 
    AUDIO IN and VIDEO IN port in TV set.
2. Press TV/AV button to select component 
    VIDEO mode.
3. Press PLAY button on source to start watching.
 
S-VIDEO input 
If you use S terminal as signal input source, 
the image quality will be better than video(AV).
1.Connect S terminal output on source to S terminal 
   input in TV set.
2.Connect S terminal left/right audio output on source to 
   the relevant port in TV set.
3.Press TV/AV button repeatedly until the display 
   mode is S-VIDEO.
4.Press PLAY button on source to start watching..

DTV input
1. Composite terminal (Y/PbCb/PrCr) connect to the 
    composite output of picture output device (such as 
    DVD, HDTV TUNER and so on ), the sound is input
    from AUDIO IN:
2.Press TV/AV button to select YPbPr mode.
3.Press PLAY button on the external device to start
   watching.

HDMI input
1.Connect HDMI signal source output to the HDMI
   input in this TV set. 
2.Press TV/AV button to select HDMI mode.
3.Press PLAY button on the external device to start
   watching.

DVI input
1.Connect DVI signal source output to the HDMI
    input in this TV set.
2.Connect audio output to the VGA audio input of
    this TV set with DVI audio cable.
3.Press TV/AV button to select DVI mode.
4.Press PLAY button on the external device to start
   watching.

VCR

AU DI O IN

L

R

S- VI D E O

 IN       

VIDEO IN       

VCD

A UD IO IN

L

R

S -V ID EO

 IN       

VIDEO IN       

DVD

DVD

L

R

AU DI O IN

  Y   C b/ Pb  C r/Pr

HDMI

DVD

HDMI

DVD

DVI

L

R

VGA-AUDIO-IN

Summary of Contents for LC-2710D

Page 1: ...LC 2710D LC 3210D LC 2710D LC 3210D COLOR TELEVISION OPERATING INSTRUCTIONS LCD Display Wide View angle Display high contrast HDMI input Parental guidance CCD function MTS 0090508203 ...

Page 2: ...ERVICEABLE PARTS INSIDE FOR ANY PROBLEM REFER SERVICING TO QUALIFIED SERVICE PERSONNEL THERE IS A LIGHTNING ARROW SYMBOL IN THE TRIANGLE THIS SYMBOL INDICATES HIGH VOLTAGE IS PRESENT INSIDE IT IS DANGEROUS TO MAKE ANY KIND OF CONTACT WITH ANY INSIDE PART OF THIS PRODUCT THERE IS A EXCALMATION MARK IN THE TRIANGLE THIS SYMBOL ALERTS YOU THAT IMPORTANT LITERATURE CONCERNING OPERATION AND MAINTENANCE...

Page 3: ......

Page 4: ...ries specified by the manufacturer 12 Use only with the cart stand tripod bracket or table specified by the manufacturer or sold with the apparatus When a cart is used use caution when moving the cart apparatus combination to avoid injury from tip over 13 Unplug this apparatus during lightning storms or when unused for long periods of time 14 Refer all serving to qualified service personnel Servic...

Page 5: ... 1 5V batteries Do not mix battery types Install the batteries as the correct polarities Do not use the rechargeable batteries 6 BASE DISASSEMBLY METHOD AND PREPARATION FOR WALL MOUNT BRACKET 1 In order not to scratch the TV set it is recommended putting the TV set with the face down on the soft and clean blanket 2 Disassemble the six screws from base and remove the base 3 Mount the airproof board...

Page 6: ...power on to the set 2 Pressing power switch on the remote control or the TV set again the TV set will enter standby status Standby mode connect set to the AC power outlet TV PROGRAM SELECTION AND VOLUME ADJUSTMENT You can use CH button or direct number buttons to select the TV channel number Press VOL button to adjust the volume RECALL Pressing RECALL button can switch the channel to the last chan...

Page 7: ...ress MENU button to select the menu operation in the user s manual please refer to these operation instructions AUTO SEARCH Using AUTO SEARCH can search all available channels We recommend using auto search to search the program when you use this TV set for the first time 1 Press MENU button to select source menu 2 Press CH button to select AUTO SEARCH 3 Press VOL button to start searching press M...

Page 8: ...N SHARPNESS HUE DNR COLOR TEMP PICTURE CONTROL DNR CAN DECREASE THE NOISE OF THE PICTURE 1 Press MENU button to select the PICTURE menu 2 Press CH button to select the DNR 3 Press VOL button to select OFF WEAK or STRONG as preferred COOL PICTURE MOVE SELECT MENU EXIT STRONG PICTURE MODE BRIGHT CONTRAST BRIGHTNESS SATURATION SHARPNESS HUE DNR COLOR TEMP COLOR TEMPERATURE 1 Press MENU button to sele...

Page 9: ...CAPTION OFF PARENT CONTROL MOVE SELECT MENU RETURN FUNCTION CLOCK TIME ON TIME OFF HALF TONE DURATION 15S LANGUAGE ENGLISH CLOSED CAPTION OFF PARENT CONTROL MOVE SELECT MENU RETURN FUNCTION CLOCK TIME ON TIME OFF HALF TONE DURATION 15S LANGUAGE ENGLISH CLOSED CAPTION OFF PARENT CONTROL MOVE SELECT MENU RETURN FUNCTION CLOCK TIME ON TIME OFF HALF TONE DURATION 15S LANGUAGE ENGLISH CLOSED CAPTION OF...

Page 10: ...ogue and situation and rare language TV 14 Parents strongly cautioned this type of rated programs may contain sexual content strong language and more intense violence PARENTAL CONTROL CHANGE PASSWORD 1 Press CH button to select CHANGE item 2 Press VOL button to enter INPUT PASSWORD 3 Input any four digits that you can easily remember 4 Input the new password again Then the screen will display CHAN...

Page 11: ... 1 Press MENU button to select SCREEN menu 2 Press CH button to select the item that needs adjust 3 Press VOL button to adjust the selected item Notes The others menu setting is similar to TV Please refer to TV mode SCREEN MOVE SELECT MENU EXIT SIZE MODE ASPECT H POSITION V POSITION PIXEL CLOCK PHASE AUTO ADJUST HDMI The HDMI logo and High Definition Multimedia Interface is a trademark or register...

Page 12: ...CD 2 Connect the antenna to the source coaxial input 3 Press TV AV button to select TV mode AV input 1 Connect audio video output port on source to AUDIO IN and VIDEO IN port in TV set 2 Press TV AV button to select component VIDEO mode 3 Press PLAY button on source to start watching S VIDEO input If you use S terminal as signal input source the image quality will be better than video AV 1 Connect...

Page 13: ...00 600 1024 768 31 5KHz 37 9KHz 48 4KHz 60Hz 60Hz 60Hz Mode Resolution Horizontal Frequency Vertical Frequency RESOLUTION Note The above parameters are VESA standard SPECIFICATIONS LC 2710D LC 3210D The part specifications of this TV set provided here are for reference only Difference may occur as product technology is updated Model Screen Type Viewable angle Color system Sound system Video input ...

Page 14: ...or Vehicle Fluorescence lamp etc Volume Sound mute The power plug isn t plugged in AC outlet The main power isn t turned on The setting up of contrast brig htness and volume Adjust color control Adjust channel again The following problems are not always caused by hardware failure please use the follow trouble shooting guide before you call for service Picture with Snow No Color No Picture Normal D...

Reviews: