background image

9

Connection and preparation of the TV set

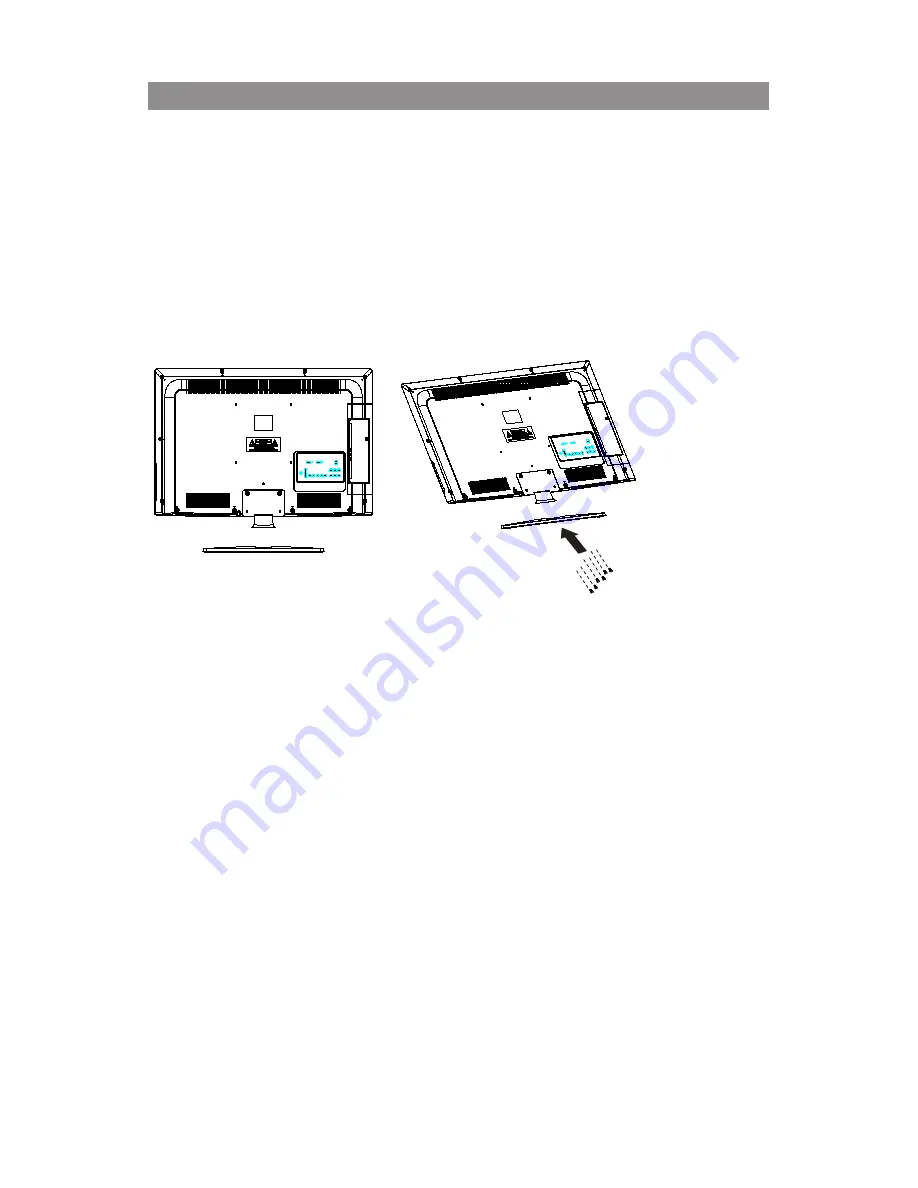
Mounting the seat

Take the TV set and its seat out of the carton, and assemble them with 

the screws in the accessory box as shown in the following diagram: 

1.  Put the TV set on the soft cloth or cushion on the desktop with the 

face downwards.Place the seat on a secure plane surface.

2.  Insert the seat into the clipgroove on the bottom of the TV set.

3.  Attach the screws into the seat and screw them down.


Summary of Contents for L32F6

Page 1: ...LCD TV OWNER S MANUAL MODEL L32F6 L42F6 Please READ this manual carefully before operating your TV and retain it for future reference ...

Page 2: ......

Page 3: ...nt electric shock match wide blade of plug to wide slot fully insert local regulations End of life directives Recycling 1 WARNING To reduce the risk of fire or electric shock this apparatus should not be exposed to rain or moisture and objects filled with liquids such as vases should not be Please be sure to dispose of this set in accordance with all state and End of life directives Recycling comp...

Page 4: ... properties of its cabinet design P OPU DPNQSPNJTF UIFTF EFTJHO TUBOEBSET CZ applying excessive pull force to the front or top of the cabinet which could ultimately overturn the product MTP EP OPU FOEBOHFS ZPVSTFMG PS DIJMESFO CZ placing electronic equipment toys on the top of the cabinet Such items could unsuspectingly fall from the top of the set and cause product damage and or personal injury W...

Page 5: ...en left exposed for some time Be careful of condensation when temperature changes occur Condensation can cause damage to the LCD screen and electrically parts After condensation fades spots or blemishes will be present on the LCD screen POSITIONING THE LCD TELEVISION Place the LCD TV on a solid sturdy base or stand Be sure the stand is strong enough to handle the weight of the LCD TV Try to leave ...

Page 6: ...erfaces 10 Side signal source interfaces 11 Preset and watch TV Power On Off 12 Selecting input signal for TV program 12 Using Menu functions Menu operation 13 PICTURE MENU 14 AUDIO MENU 15 FEATURE MENU 15 INSTALLATION MENU 16 VGA MENU 17 Multimedia feature setting USB 18 Establish and use the channel favorite list 19 Others Troubleshooting 20 Glossary 21 Care And Cleaning 22 Product specification...

Page 7: ...ess to select the input source then Press VOL or the ok of RC to change theinput source while in standby mode the input may be used to turn on the TV set 2 MENU Press to open or exit the on screen menu 3 VOL In TV mode Press to increase or decrease the volume In TV menu Move right or move left in the options 4 CH In TV mode Press to increase or decrease the channel number In TV menu Move up and do...

Page 8: ... YPbPr Video Audio Input Terminal 2 AUDIO IN VGA audio input terminal 3 PC IN VGA video input terminal 4 AV IN 1 AV IN 1 audio video input terminal 5 AV OUT AV audio video output terminal TV ANTENNA Antenna input terminal HDMI1 HDMI2 HDMI3 input terminal AV IN 2 AV IN 2 audio video input terminal Earphone output socket USB Panel control and rear terminal control 32 6 7 8 9 10 ...

Page 9: ...s Never use a new batteries together with an old one Never use batteries of different types together e g use a zinc carbonate battery together with an alkaline battery Never recharge short circuit reassemble heat or burn used batteries It is necessary to change batteries only when the remote control operates well or bad occasionally or fails to control the operation of the TV set If you don t use ...

Page 10: ...ust the volume SOURCE The Source List should be activated and show on OSD MUTE Switch the sound ON OFF CH Λ V Press Λ or V to browse through the TV channels Press the keys to navigate OSD menu OK 1 Press button to activate the setting selection of OSD 2 Press to return previous level MENU 1 Press to activate OSD menu or back to previous level of OSD 2 Exit OSD USB Press to choose USB source mode P...

Page 11: ... them with the screws in the accessory box as shown in the following diagram 1 Put the TV set on the soft cloth or cushion on the desktop with the face downwards Place the seat on a secure plane surface 2 Insert the seat into the clipgroove on the bottom of the TV set 3 Attach the screws into the seat and screw them down ...

Page 12: ...ket This socket is a 75Ω coaxial cable input AV IN 1 input Connect the VIDEO outputs of DVD player LCD player video recorder or video camera etc to the VIDEO input of the TV set Audio input Connect the audio signal source PC DVD player LCD player video recorder or video camera etc to the audio input port AV output This interface can be used to output the TV signal of the unit to another TV set Com...

Page 13: ...the earphone via the earphone socket AV IN 2 input Connect the VIDEO outputs of DVD player LCD player video recorder or video camera etc to the VIDEO input of the TV set Audio input Connect the audio signal source PC DVD player LCD player video recorder or video camera etc to the audio input port ...

Page 14: ...e control to pop out signal source menu on the TV screen as shown in the right diagram Press the key and SOURCE key to select the option TV and then press key or OK key to confirm switching to TV input terminal After such switching the signal source selection menu disappears and the information on the current signal source is displayed on the up right corner of the screen If no other operations ar...

Page 15: ...eter setting Audio Adjust audio parameter setting Features Set different functions timer TV lock etc Installation Setting OSD language channel search TV reset to factory setting etc Use key to select the function item that needs to be adjusted Press left key to return to previous menu Source Menu 1 Press Source key to display Source Menu and re press the button to change input source 2 3 Press rig...

Page 16: ...arpness Noise reduction Color Temp Normal Personal 100 100 50 4 Medium Move Select Exit Picture 7 Noise reduction Video noise signal reduction 8 Color Temp Provide different color temperature modes 9 Advanced Pic Adjust picture appearance to the best contrast color and sharpness through digital method Dynamic contrast Auto enhance video contrast Dynamic backlight Adjust backlight to get the best v...

Page 17: ... press OK or key and current TV time will show on top right corner of the screen 3 On Timer You can turn on TV and switch to appointed channel from standby mode automatically at the appointed time with setting on timer Activate Set Daily Once Off and other items While select Off you can turn off On timer and now only activate item is available Please set TV Time before you activate On timer Time S...

Page 18: ...en sound system type Press OK key could confirm the selected sound system type and return to previous menu If you press Menu key and you could directly exit the menu but the selected sound system is not stored Press key to select store current channel or store new channel Press OK key to pop up new menu and press key to decide whether to store the channel or not Search Set start frequency for chan...

Page 19: ...e the current modification to current channel and store it in the definite channel Menu then press key to decide whether to skip current channel or not When one channel is skipped this channel will not be available by pressing remote control CH key but could be available by pressing relevant number Skip channel Press key to select and press OK or key to enter skip channel Current Channel TV curren...

Page 20: ...he time needs for multimedia player to read information are also different So the information reading speed of the player temporarily getting slow are not the model malfunction 3 The voltage supplied to USB interface is 5V and the most electrical current is 500mA When some interface criteria of USB devices are different from standard USB protocol digital multimedia player may be unable to recogniz...

Page 21: ...enu Rename channel has the function to rename the current channel Lock channel has the function to lock the current channel 1 While watching TV press OK to show channel option menu 2 Press OK to choose Show favorite ch and you will find favorite list 3 Press key to select favorite list 4 Press OK to show favorite channel in the list 1 While watching TV press OK key to show channel option menu 2 Pr...

Page 22: ...DPMPS UJOU BOE CSJHIUOFTT TFUUJOH 5SZ BOPUIFS BVUP QJDUVSF TFUUJOH Snowish picture and noise IFDL UIF BOUFOOB DPOOFDUJPO Television not responding to remote control IFDL XIFUIFS UIF CBUUFSJFT BSF XPSLJOH 3FQMBDF JG OFDFTTBSZ 0QFSBUJOH SBOHF CFUXFFO 57 BOE UIF SFNPUF DPOUSPM TIPVME OPU CF NPSF UIBO BQQSPYJNBUFMZ UXFOUZ GFFU PV DBO TUJMM VTF UIF CVUUPOT PO UIF TJEF PG ZPVS 57 IFDL JG UIF SFNPUF DPOU...

Page 23: ... to the TV By offering the cinch type input YPbPr the pri mary colors red green and blue are connected from a set top box directly into the TV allowing for the signal to display on the screen HDTV resolution of today s NTSC TV which essentially makes the picture twice as sharp HDTV also has a screen ratio of 16 9 as compared with most of today s TV screens which have a screen ratio of 4 3 HDTV off...

Page 24: ...FFO JG UIF 57 QSPHSBNNJOH DPWFST UIJT news 4IPQQJOH DIBOOFM MPHPT QSJDJOH EJTQMBZT NBZ CF CSJHIU BOE NBZ BQQFBS DPOTUBOUMZ EVSJOH UIF TIPX These usually appear in the same location on the TV screen TV Location 5P BWPJE DBCJOFU XBSQJOH DBCJOFU DPMPS DIBOHFT BOE BO JODSFBTFE DIBODF PG 57 GBJMVSF EP OPU QMBDF the TV where temperatures can become excessively hot for example in direct sunlight or near ...

Page 25: ...x1 AUDIO INx1 Audio output Audio output L R Speaker built in 2 x 10W For stereo earphone mini socket Power supply Power supply 100 240V 50 60Hz Power consumption 150W 230W Power consumption in standby mode 1W Operating environment Temperature 5 C 35 C Storage temperature 20 C 50 C Humidity 20 80 Size Wide x Height x Thickness including the seat 789 08x566 53x230 17 mm 1019 38x697 03x301 33 mm Wide...

Page 26: ...0p 60 2 576i 576p 50 3 720p 50 60 4 1080i 50 60 Input format of supported PC interface Number Resolution Refresh frequency Hz 1 640 480 60 2 640 480 75 3 720 400 70 4 800 600 56 5 800 600 60 6 800 600 72 7 800 600 75 8 1024 768 60 9 1024 768 70 10 1024 768 75 11 1360 768 recommended 60 12 1920 1080 only for L42F6 60 ...

Page 27: ...ut format of supported HDMI interface SN Name of signal Refresh frequency Hz 1 480i 480p 60 2 576i 576p 50 3 720p 50 60 4 1080i 1080p 50 60 5 720 400 70 6 640 480 60 75 7 800 600 56 60 72 75 8 1024 768 60 70 75 9 1360 768 60 26 ...

Page 28: ......

Page 29: ......

Page 30: ......

Page 31: ...Q41G32MV672 9A ...

Reviews: