background image

11

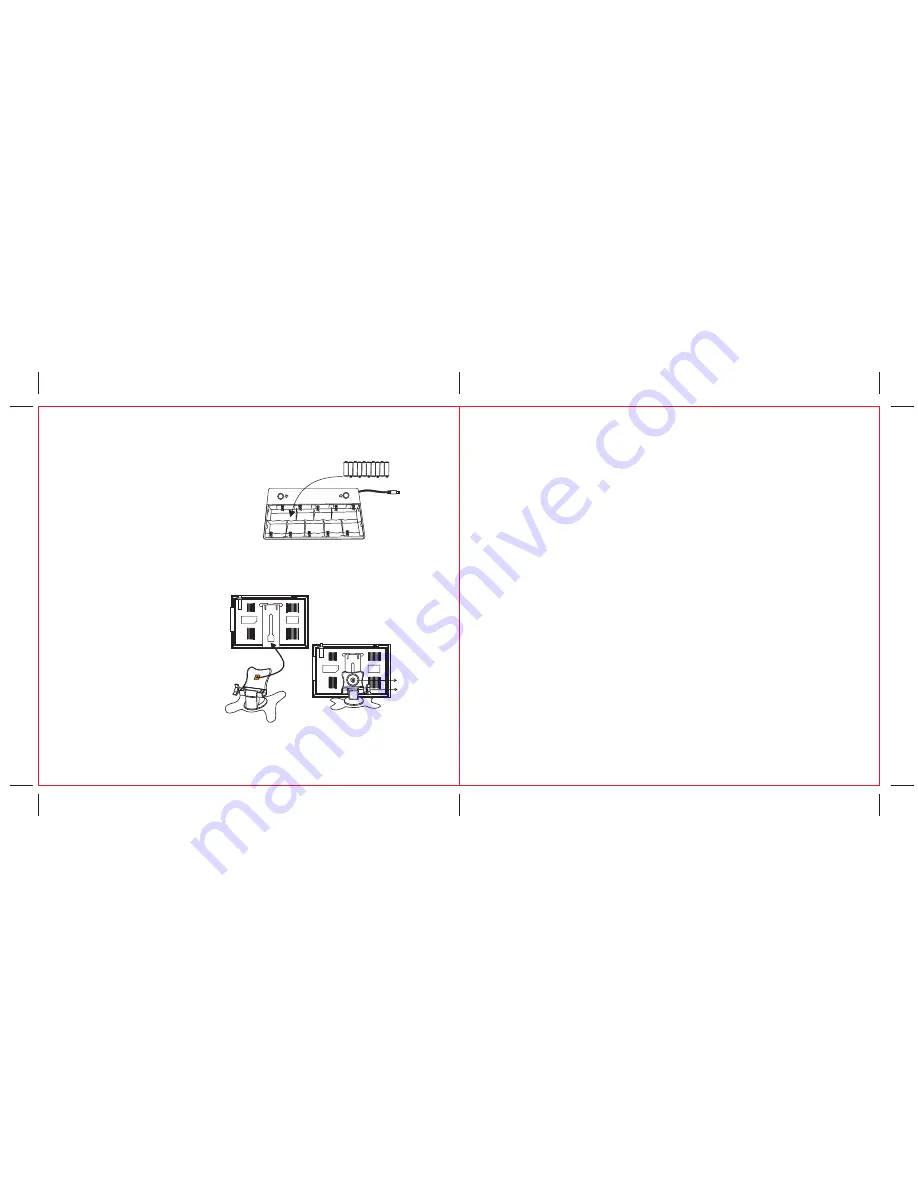
6. Battery Installation( Optional): 

Open and remove the battery door located on

the bottom of  the battery compartment stand

and pulling firmly outwards. Insert 10 "AA"  

x (UM-3) batteriesinto thebatterycompartment

(see right   picture).  Be sure the polarity (+and-)

matches,as made  inside thebattery compartment.  

Closethe  battery door and connect the power cord 

ofthe battery compartment to the power source

input jack of the unit.

NOTE: 

Metal washer

7.  Stand Fixture(Optional) 

Screw1

Screw2

3-1

3-2

3-3

-  Release the metal washer on the top of 

   the stand but should not separate it from 

   the stand (see picture 3-1).

-  Insert the metal washer with the stand

   into a hollow at the back of the unit and

   move the stand up to a suitable height

   (see picture 3-2).

- Tighten the screw 1 (see picture 3-3) up 

  on the stand to fix the stand with the unit.

- Control the unit direction by controlling

   the screw 2 (see picture 3-3).

-  

Weak or dead batteries may leak or corrode the set. Always remove batteries 

    when the set will not be used for a long period of  time.

-  When the battery box is being charged, forbid the battery box to connect 

    with a machine, watch TV. 

+ – + – + – + – + –

+

+

+

+

+

12

1.   Description:  Portable 7” TFT LCD  Color TV Set 
2.   TV System:  NTSC 3.58  System
3.   AV System:  NTSC 3.58
4.   Audio System:  M

5.  

Display device: Color  TFT-LCD

6.   Display Screen Size:  7 inches


7.   Video Input: 1Vp

-

p

8.   Audio Outp

u

t:  

O

250mW (MAX)

9.   Power Consump

t

ion:  

o

11w

10.  Resolution:  1440 (H)*2

3

4 (V)

11.  Dots Distance:  0.107(H) X 0.3

7

2(V)mm

12.  Visible Range:  154.08(H) X 87

.

05(V)mm

13.  Power Source:  AC adaptor or car adaptor (normal:


 DC 12V)

14.  Measurement:  195 (L) X 135 (W) X 30(D) inches
15.  Weight:  A

p

prox. 490 lbs

16.  Connection terminals:


1

.


Antenna Jack


2

.


AV Input Jack


3

.


Headphone Jack


4

.


External Power Source Input Jack

8.  General Specification:

Summary of Contents for KXT7020BK

Page 1: ...person is authorized to make any warranties other than those described herein or to extend the duration of any warranties beyond the time period described herein on behalf of Haier The warranties described herein shall be the sole and exclusive warranties granted by Haier and shall be the sole and exclusive remedy available to the purchaser Correction of defects in the manner and for the period of...

Page 2: ...e product 11 Only use attachments accessories specified by the manufacturer Use of attachments accessories not recommended by the product manufacturer may cause hazards 12 Use only with a cart stand tripod bracket or table specified by the manufacturer or sold with the apparatus When a cart is used use caution when moving the cart apparatus combination to avoid injury from tip over 13 Unplug the a...

Page 3: ...stment 7 Stand By Mode 8 Detachable TV Battery Compartment Stand 9 Headphone Jack 10 English Deutch Japanese Espanol Chinese OSD language options 3 12 Stand Holder Plastic 11 Rotary Telescopic Antenna 1 Power Button 2 Menu Button 3 Volume Down Button 4 Volume Up Button 5 Channel Down Button 6 Channel Up Down 7 AV TV Switch 8 Remote Control Sendor 9 Direc light Power Standby indicator 10 Built In S...

Page 4: ...ies are not included Power Cord to DC 12V Input Options Options 1 2 1 1 4 Connection 1 Connection of the Antenna See picture 1 1 Plug the antenna into the ANT jack 13 NOTE The unit can receive CATV ANT signals from the ANT jack input 2 Connection of the External AV Equipment See picture 1 1 Plug the AV cable into the AV IN jack 14 Press AV TV button 1 to enable the con nection of external audio an...

Page 5: ...ach option PICTURE BRIGHT 32 CONTRAST 32 COLOR 32 TINT 00 2 3 BRIGHT Press VOL up to make picture brighter and VOL down to make picture darker CONTRAST Press VOL up to increase contrast and VOL down to decrease contrast COLOR Press VOL up or VOL down to adjust color levels TINT Press VOL up or VOL down to adjust tint levels Press the MENU button to scroll through these three on screen options Pres...

Page 6: ...VOL up or VOL down to adjust the desired option PRESET 10 AUTO Use this feature to program all available channels Use the CH up or CH down button to highlight the AUTO feature Then press VOL up or VOL down to initiate this feature Allow the unit to search all possible channels NOTE If some channels do not have sound use the FINE feature to fine tune the channel If sound does not appear please refe...

Page 7: ...e 3 3 up on the stand to fix the stand with the unit Control the unit direction by controlling the screw 2 see picture 3 3 Weak or dead batteries may leak or corrode the set Always remove batteries when the set will not be used for a long period of time When the battery box is being charged forbid the battery box to connect with a machine watch TV 12 1 Description Portable 7 TFT LCD Color TV Set 2...

Page 8: ...nna is not adjusted properly or reception is too weak The brightness contrast are too low TV antenna is not properly adjusted or reception is too weak TV antenna is not adjusted correctly The reception is too weak or compromised by buildings or nearby mountains Color is not set correctly 9 General Troubleshooting Sound on some channels but not all Adjust FINE function up or down in the MENU until ...

Reviews: