background image

iPod/iPhone functions

•  
•  

Switch on the unit.

•  

For iPod touch and iPhone select the iPod mode.

•  

To start playback, press the PLAY/PAUSE button (11) once.

•  

For extended instructions, read the paragraph "iPod functions" further on in this manual.


Place the iPod/iPhone in the docking station.

Installing and removing an iPod/iPhone

To install an iPod/iPhone:


•  

Insert the iPod/iPhone into the docking station.

•  

To remove an iPod/iPhone:


•  

Pull the iPod/iPhone gently out of the docking station.

•  

Whilst the iPod/iPhone is docked in the system, its battery is charged 
automatically.When the battery is fully charged, the charging process 
is completed.

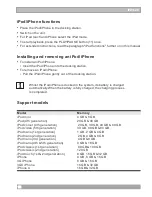
Support models

iPod mini                                                         4 GB & 6 GB
iPod (4th generation)                                    20 GB & 40 GB
iPod colour (4th generation)                         20 GB , 30 GB, 40 GB & 60 GB
iPod video (5th generation)                          30 GB, 60 GB & 80 GB
iPod nano (1st generation)                           1 GB, 2 GB & 4 GB
iPod nano (2nd generation)                          2 GB, 4 GB & 8 GB
iPod nano (3rd generation)                           4 GB & 8 GB
iPod nano (4th & 5th generation)                 8 GB & 18 GB
iPod classic (1st generation)                        80 GB & 160 GB
iPod classic (2nd generation)                      120 GB
iPod touch (1st & 2nd generation)               8 GB, 16 GB & 32 GB
iPhone                                                             4 GB, 8 GB & 16 GB
3G iPhone                                                       8 GB & 16 GB
3GS iPhone                                                    16 GB & 32 GB
iPhone 4                                                          16GB & 32 GB

Model                                                              Memory

IPDS-20

10

Summary of Contents for IPDS-20

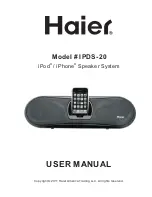
Page 1: ...USER MANUAL Model IPDS 20 iPod iPhone Speaker System Copyright 2011 Haier America Trading LLC All rights reserved ...

Page 2: ...tents 5 4 Installation 5 4 1 Connecting random equipment 6 4 2 Connecting to the mains 7 4 3 Remote control 7 5 Functions 8 5 1 iPod Music System 8 6 Operation 9 6 1 Quick start 9 7 Cleaning and maintenance 11 8 Troubleshooting 12 9 Technical data 12 10 Disposal of used electrical and electronic equipment 13 11 Warranty 14 Copyright notice Design and specifications are subject to change without no...

Page 3: ... to the equipment is possible A note gives additional information e g for a procedure 1 3 General safety instructions WARNING Do not put force on the unit The unit can fall and can cause serious injury CAUTION Do not spill any liquid on the unit WARNING Do not insert any objects in the ventilation holes CAUTION Do not block the ventilation holes This appliance is double insulated therefore no eart...

Page 4: ...e with the instructions may cause harmful interference to radio communications However there is no guarantee that interference will not occur in a particular installation If this equipment does cause harmful interference to radio or television reception which can be determined by turning the equipment off and on the user is encouraged to try to correct the interference by one or more of the follow...

Page 5: ...otect the product against damage in transit If you do dispose of the carton and the packing materials please remember to recycle with due care to the environment The following items are included in the received package 1 iPod Music System 1 Main AC adaptor 1 Remote control 1 Battery cell CR2032 3V 1 Operator manual 1 Carrying case If any item is missing please contact your reseller 4 Installation ...

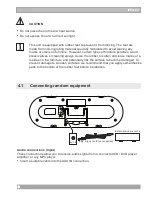
Page 6: ... prevent it from moving The feet are made from non migrating material specially formulated to avoid leaving any marks or stains on furniture However certain types of furniture polishes wood preservatives or cleaning sprays cause the rubber to soften and leave marks or a residue on the furniture and potentially risk the surface to become damaged To prevent damage to wooden surfaces we recommend tha...

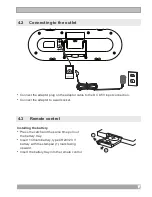
Page 7: ...t the adaptor plug on the adaptor cable to the DC 8 5V input connection Installing the battery Press the catch and the same time pull out the battery tray Insert 1 lithium battery type CR2032 3 V battery with the stamped mark facing upward Insert the battery tray into the remote control 1 2 7 ...

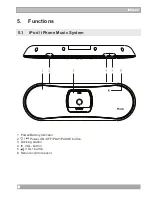
Page 8: ...5 Functions 5 1 iPod iPhone Music System 1 Power Battery indicator 2 Power ON OFF PLAY PAUSE button 3 Docking station 4 VOL button 5 VOL button 6 Remote control sensor IPDS 20 8 ...

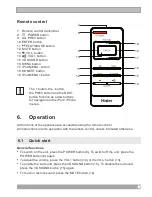
Page 9: ...d iPhone menus 6 Operation All functions of the appliance are accessible using the remote control All instructions refer to operation with the remote control unless indicated otherwise General functions To switch on the unit press the POWER button 8 To switch off the unit press the POWER button 8 again To adjust the volume press the VOL button 14 or the VOL button 13 To enable the surround press t...

Page 10: ...Phone is docked in the system its battery is charged automatically When the battery is fully charged the charging process is completed Support models iPod mini 4 GB 6 GB iPod 4th generation 20 GB 40 GB iPod colour 4th generation 20 GB 30 GB 40 GB 60 GB iPod video 5th generation 30 GB 60 GB 80 GB iPod nano 1st generation 1 GB 2 GB 4 GB iPod nano 2nd generation 2 GB 4 GB 8 GB iPod nano 3rd generatio...

Page 11: ... select a submenu Press the ENTER button 10 to select a setting Charging the unit The appliance is fitted with an internal battery While the unit is connected to the power source its battery is charged automatically The power battery indicator provides the information regarding the power blue the appliance is switched on green the battery is fully charged orange the battery is charging red the bat...

Page 12: ...not increase audio volume No response to MENU function iPod iPhone volume control only controls the volume output to the headphone jack Set the unit volume control when the iPod iPhone is docked on the unit iPod iPhone does not support these functions Trouble Action AUX No sound on the unit system Input source is low Increase the volume level on the audio source device Check cables for damage Chec...

Page 13: ...cal and electronic equipments waste By ensuring the correct disposal of this product you will help prevent potentially hazardous to the environment and to human health which could otherwise be caused by unsuitable waste handling of this product Therecycling of materials will help conserve natural resources Please do not therefore dispose of your old electrical and electronic equipment with your ho...

Page 14: ...e sole and exclusive remedy available to the purchaser Correction of defects in the manner and for the period of time described herein shall constitute complete fulfillment of all abilities and Responsibility of Haier to the purchaser with respect to the product and shall constitute full satisfaction of all claims whether based On contract negligence strict duality or otherwise In no event shall H...

Reviews: