background image

Even there's no water in the tub, the 
spinning will start after a certain period.

Do not use soak process for woolen

 laundries

.

Wash the laundries that are prone to lose
colors separately from other laundries.
The pulsator will not rotate unless the 
water is filled to selected water level.

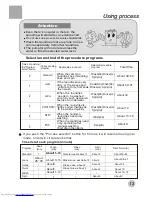
Selection method of the procedure programs

Attention

Using process

Using process

Times of pushing 
the"Program
select"button

0

1

2

3

4

5

Applicable procedure

When the common

 laundries need only

washing

When the laundries need 

only  spinning after

 manual washing 

(first drain then spin)

If the laundries are very 

dirty, or the sleeve and

 collar are dirty, first soak

 then wash

Standard

Corresponding
program

JEANS

GENTLE

QUICK WASH

WASH

SPIN

Wash(bb) Rinse(cc)
 Spin(dd)

Soak(AA) Wash(bb)
Rinse(cc) Spin(dd)

Wash(bb) Rinse(cc)
 Spin(dd)

Wash(bb) Rinse(cc)
 Spin(dd)

Wash(bb)

 Spin(dd)

Total Time

About 39~44

About 64~91

About 34

About 10

About 13~18

About 9

Time list of each program (minute)

When the  laundries is 

lightly soiled that needs

 to  be washed quickly.

When the  laundries

 needs to  be washed 

carefully such as woolen 

textiles or underwear.

When the common

 laundries need washing

rinse and spin

Selected procedure 
program

Standard

Program

Gentle

Jeans

Quick

Wash

(min)

About 6

About 39~44

About 6

About 34

About 10

About 6

About 6

Rinse
(min)

Spin

(min)

Total time(min)

Rinse once, about 2

Rinse twice, about 2

Rinse twice, each abut 3

Rinse twice,each about 3

Soak
(min)

/

About
25~45

/

/

About11~16

About11~16

About10~16

About6

About3

Wash

Spin

/

/

About11~16

/

About 2

/

About 13~18

About 9

/

/

/

About 64~91

If you push the "Process selector" button for 6 times, it will resume the original 
mode, and it will circulate like that.

Summary of Contents for HWM60-10

Page 1: ...Full Automatic Washing Machine HWM60 10 User s manual This manual is for Please read this manual carefully before using Retain it for future reference 0030807260 ...

Page 2: ... Install the water inlet hose 6 Preparation before washing 7 Put in the laundries 8 Put in the detergent 9 Use the operation buttons 10 Close the top lid 14 Finish washing 15 Disposal after washing 15 Trouble shooting Answer to question 16 Packing list 17 Specifications back cover ...

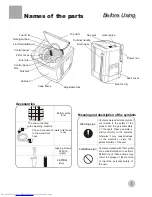
Page 3: ... with that symbol are actions forbidden to perform Performing of those actions may result in damage of the machine or injure the personal safety of the user Accessories Bottom plate one water inlet hose one ST4X16 tapping screws eight Lint filter two Adjustable foot fixed foot 3 back cover Cabinet base frame Drain hose Control panel film Control panel Filter cover Power line Pulsator Inner tub Det...

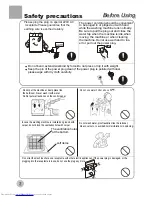
Page 4: ...o not block the ventilation hole with carpet Do not let the machine share one receptacle with other electric appliances If the power plug is damaged or the plugging into the receptacle is loose do not use the plug any more Do not wash water proof laundries like the raincoat bike covers etc to avoid abnormal vibrations in spinning Do not use water hotter above 50 C Do not put the machine at damp pl...

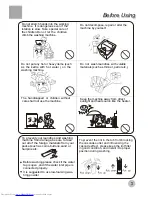
Page 5: ...rous even if the rotation is slow Take special care of the children Do not let the children climb the washing machine Petrol Thinner To prevent your laundries and washing machine from damage be sure to take out all of the foreign materials from your pocket such as coins buttons sand or hairpins etc Before washing please check if the water tap is open and if the water inlet pipe is connected proper...

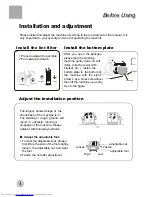
Page 6: ...ne 1 Press downward to assmble 2 Pull upward to detach 1 To twist the adjustable foot please first lift up the side of the foot slightly loosen the adjustable nut and twist the foot 2 Fasten the nut after adjustment Loosen Fasten High Low adjustable nut adjustable foot Install the bottom plate After you open the package please lean the washing machine gently down on soft items like the towel cloth...

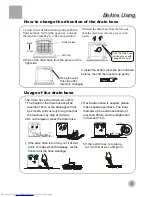
Page 7: ...hine down gently with the front surface facing the ground Loosen the eight screws by a cross screwdriver 3 Extend the drain hose from the left side Push the drain hose into the groove with hands 4 Install the bottom plate as per indicated before then lift the machine up gently 2 Pull out the drain hose from the groove at the right side Back Front Bottom plate Soft item Use groove at this side afte...

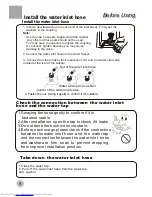
Page 8: ...ater inlet hose and the water tap 1 Close the water tap 2 Pull off the water inlet hose from the water tap and washer Take down the water inlet hose Install the water inlet hose 4 Fasten the nut Swing it gently to confirm if it s suitable Water absorption cushion Nut of the water inlet hose Jointer of the water inlet valve 1 Swaying the hose gently to confirm if it is fastened stable 2 After insta...

Page 9: ...the laundries shall not exceed the rated value The big laundries like the jeans shall be put in loosely Using process Using process 1 Preparation before washing Pay attention to followings before washing the laundries A Check if the laundries are applicable for washing with machine b Divide the laundries that are not colorfast from other laundries c Put those laundries difficult to absorb water in...

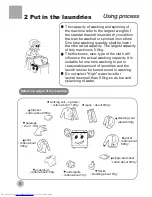
Page 10: ...pacity of washing and spinning of the machine refer to the largest weight of the standard laundries under dry condition that can be washed or spinned in one time One time washing quantity shall be lower than the rated capacity The largest capacity of this machine is 5 0kg The thickness size type of the cloth will influence the actual washing capacity It is suitable for one time washing to put in r...

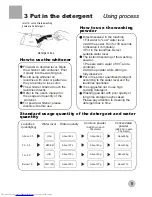
Page 11: ... dissolve it completely 3 Put in the laundries Select suitable water level The instant dissolving of the washing powder 1 Prepare warm water of 30 and a container 2 Add the powder while stirring to fully dissolve it Put in the prorer quantities detergent according to the water level and the laundries quantities It is suggested not to use high sudsing detergent Washing powder with poor quality or l...

Page 12: ...servation period To indicate fault symbols for abnormal conditions see page 16 SURPLUS MIN Page 16 The user selects a suitable water level depending on the load WATER LEVEL button PROGRAM button RESERVATION you can select one or several of inse and Spin Press programs PROGRAM RESERVATION button StandardJe ansG entle Quick R you can select of peservtion Press over 2 seconds the program the N tube d...

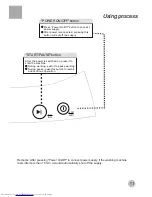
Page 13: ...ess Using process POWER ON OFF START PAUSE After the power is switched on press it to start the machine During working push it to pause working During pause push this button to restart and continue operation START PAUSE button Press Power On Off button to connect power supply After power is connected pressing this button will cut off the supply POWER ON OFF button ...

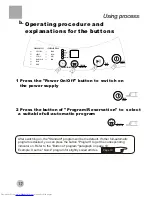
Page 14: ...S JEANS GENTLE QUICK WASH WASH SPIN STANDARD POWER ON OFF POWER ON OFF POWER ON OFF START PAUSE PROGRAM RESERVATION PROGRAM RESERVATION PROGRAM RESERVATION WATERLEVEL SOAK WASH RINSE SPIN PROCEDURE STATUS PROGRAM STATUS JEANS GENTLE QUICK WASH WASH SPIN STANDARD After switching on the Standard program will be the default If other full automatic program is desired you can press the button Program t...

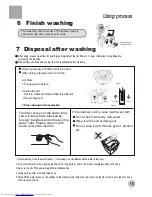
Page 15: ...Rinse cc Spin dd Soak AA Wash bb Rinse cc Spin dd Wash bb Rinse cc Spin dd Wash bb Rinse cc Spin dd Wash bb Spin dd Total Time About 39 44 About 64 91 About 34 About 10 About 13 18 About 9 Time list of each program minute When the laundries is lightly soiled that needs to be washed quickly When the laundries needs to be washed carefully such as woolen textiles or underwear When the common laundrie...

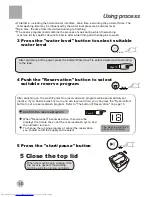
Page 16: ...ct suitable water level When Reservation becomes active the nixie tube displays the time to the end of the reserved wash cycle and the indicator turns on To change the running program or cancel the reservation you should cut off the supplyand reselect Confirm the reserve program 4 Push the Reservation button to select suitable reserve program WATERLEVEL PROGRAM RESERVATION PROGRAM RESERVATION STAR...

Page 17: ... and inside the tub Open the top lid for some time about 1 hour then close the top lid 4 Hang up the power cord and drain hose 3 Be sure to pull off the power plug before maintenance 2 Do not store water in the washing machine for a long period Drain the water completely after each using Clean Figure 1 Figure 2 Put down Put up The filter screen of the water inlet valve is likely to be blocked by f...

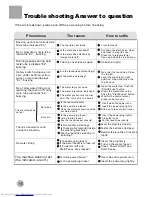
Page 18: ...sion to theset water level Is the power plug loose Insert the power plug tightly Is the top lid closed Close the top lid Are the laundries put orderly Put the laundries orderly Not spin Not wash Buzzing upon reservation starts Nixie tube indicates E0 Safety switch actuates not spin after self correction twice nixie tube displays E3 buzzing No or slow water filling not reaching the level in 15 min ...

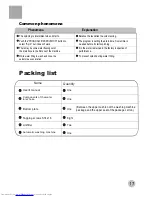
Page 19: ...ittent when it starts While water filling in wash and rinse the pulsator pauses rotation There may be some water flowing out of the drain hose in the first use of the machine Push the button to select Spin but it doesn t work PROGRAM RESERVATION User s manual Name Components of the water inlet hose Bottom plate Tapping screws ST4x16 One One One Eight One Quantity Automatic washing machine Between ...

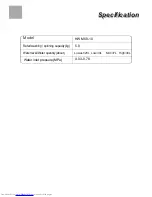
Page 20: ...Rated washing spinning capacity kg Water level Water quantity about 5 0 0 03 0 78 Model HWM60 10 Specification Specification Lowest 20L Low 30L Mid 37L High 48L Water inlet pressure MPa ...

Reviews: